Laerdal Silicone Resuscitator User Manual
Page 2
O
2
O
2
Indications for Use
The Laerdal Silicone Resuscitator is a self-inflating manual resuscitator that is intended for patients
requiring total or intermittent ventilatory support. The Laerdal Silicone Resuscitator provides positive
pressure ventilation and allows spontaneous breathing either with a 22 mm ID (inner diameter) face-
mask port, through an artificial airway or with a facemask that has a 15 mm OD (outer diameter)
connection. The Preterm model is intended for patients below 2,5 kg (5,5 lb), the Paediatric model
is intended for patients from 2,5 (5,5 lb) to 25 kg (55 lb), and the Adult model is intended for pati-
ents over 25 kg (55 lb).
Ventilation with ambient air
Resuscitator ventilation without supplemental
oxygen is possible.
Ventilation with oxygen
The Laerdal Silicone Resuscitator can be connected to an
O
2
source via the oxygen nipple. Concentrations delivered
to the patient depend on O
2
flow rate, use (or non-use)
of a Reservoir Bag and ventilation technique, e.g. tidal
volume, ventilation frequency, time relations during
compression-release cycles. See Technical Specifications.
Inhalation of supplemental oxygen
A patient who breathes spontaneously can inhale
O
2
through the resuscitator with minimal resistance.
Attachment of the reservoir increases O
2
concentration.
See Technical Specifications.
The mask can be hand held or strapped to the face.
Safety when using oxygen
1. Build-up and transfer of high pressure to the patient is
prevented since excess O
2
is vented to atmosphere over
the outlet membrane of the Intake Valve.
2. When O
2
supply is insufficient, adequate ventilation
volume is ensured by intake of ambient air over
the intake membrane of the Intake Valve.
3. A Reservoir Bag that stays flat during the whole
ventilation cycle is a visual indication that no,
or little supplemental O
2
is being provided.
Pressure Relief Valve
The Preterm and Paediatric resuscitators feature a Patient
Valve with a pressure limiting device mounted on the upper
valve housing. If patient airway pressure exceeds 35 cm
H
2
O, the device opens to reduce
the risk of stomach distention and barotrauma. A hissing
sound can be heard when the device opens.
When higher airway pressures are necessary, the operator
can keep the Pressure Relief Valve closed with the tip of
index finger while squeezing the bag.
A Lock Clip (optional) can be used as an alternative
to finger pressure.
Accessories
Masks
The Laerdal Silicone Resuscitator can be combined
with the following mask types and sizes:
a) Circular Infant Masks 00, 0/1, 2
b) Laerdal Child Mask 3-4 and Laerdal Adult Mask 4-5+
For difficult facial anatomies the Multi-Function Mask
Cover is used to assist in getting a better mask seal.
All masks are transparent to enable the user to
observe the patient’s face and lip colour and
the temporary fogging caused by exhalations.
Mask connection
The Patient Valve has a standard 15 (ID)/22(OD) mm
patient port which connects to all standard masks or
tube adapters. The Laerdal Masks 4-5+ and 3-4, plus
the mask size 2, fit outside the patient valve connector.
All other infant sizes fit inside, to reduce deadspace.
To use the Laerdal Head Strap
For Laerdal Child Mask 3-4 and Laerdal Adult
Mask 4-5+, place the correct size Multi/Function Mask
Cover over the mask connector. Fasten end of strap
into the hooks on the cover. Tighten just enough to
provide an airtight seal between mask and face.
For the Infant Mask 2, use the Attachment Ring
supplied with the Laerdal Head Strap.
Expiration Diverter
An Expiration Diverter with two silicone gaskets can be
snapped onto the Patient Valve.
The diverter provides an airtight seal to the valve housing
but does not prevent the swivel function (possibility of
horizontally rotating the bag without interfering with the
position of mask or tube) of the valve connector.
The diverter will provide an airtight seal when expired air
is free flowing. The use of the Expiration Diverter with
a restriction device (e.g. PEEP Valve) may cause some
air leakage around the silicone gasket of the Expiration
Diverter.
Equipment for measuring, scavenging or monitoring
expired gases, can be attached to the standard
(30 mm OD) outlet port of the diverter.
Manometer Connector
If used insert the Manometer Connector between the
Patient Valve and the mask or tube adapter.
Attach a manometer via tubing to the connector nipple
(OD 6 mm) to monitor both inspiratory
and expiratory pressures.
Extension Tube
The flexible Silicone Extension Tube may be used
between ventilation bag and the Patient Valve.
This extension tube makes it easier to ventilate when
the patient is being transported.
It also permits an operator to squeeze the bag against
a bed, strecher or themselves.
CAUTION: Leave connectors in the necks of Ventilation Bags, Extension Tube, and Reservoir
Bags during the entire decontamination procedure.
Laerdal strongly discourages the use of rinsing and drying agents. Such agents may not be compatible
with the materials used in the Laerdal Silicone Resuscitator.
The use of non-validated cleaning, disinfecting or sterilisation methods may have adverse effects on
the LSR material and/or performance.
Chose either the manual (I) or automatic (II & III) method below for cleaning the product.
CAUTION: Thorough cleaning and rinsing are the first and most important steps in the reprocessing of any reusable
medical device. Without thorough cleaning and rinsing, it might not be possible to achieve high-level disinfection or
sterilisation of the device.
1. The cycle has been validated on a Getinge Model A8666 validated to HTM2030. Ninhydrin protein detection test was
used to qualify the process (to determine if any soil remained on the parts). Use of alternative washer/disinfector must
be validated.
2. Includes pre rinse, main wash, rinse, final rinse and drying.
3. The Washing Detergent used in the validation – Olympic Chemicals Sprayclean 2000 (Non-enzymatic alkaline detergent
containing 2-5% NaOH). Alternative detergents must be validated to show cleaning efficacy and material compatibility.
Method has been validated using a common available tenside based Dish Washing Detergent (Zalo Ultra manufactured
by Lilleborg AS). A pH neutral detergent solutions or hydrogen peroxide-based formulations may also be used for
manual cleaning but must be validated to show they effectively clean the components.
4. CAUTION: If detergent or disinfectant residuals are allowed to dry on the resuscitator parts, surfaces may become
sticky, which may cause valve malfunction
5. Drying; the most effective method of drying is a fan assisted hot air cabinet, 50-70¡C (122-158¼F) for at least 30
minutes. Other drying methods may be used but must be validated to show they effectively dry the components. The
Reservoir Bag must be dried by blowing air into the Reservoir Bag opening.
6. The cycle has been validated on a Pasteurmatic Compact from Olympic Medical.
2. Disinfection/Sterilisation
To obtain high-level disinfection/sterilisation of the resuscitator, the following 5 methods
(I to V) have been validated and are recommended.
The sterilisation methods apply to all parts except reservoir bags, Head Straps, Wall Bracket, Storage
Pouch and Containers. High-level disinfection methods apply to all parts.
Pasteurization applies to all parts except Wall Bracket, Storage Pouch and Containers
3. Inspection
Carefully inspect all parts for signs of wear or damage. Worn or damaged components must be
discarded and replaced with new components.
4. Reassembly
Reassemble resuscitator as shown in Parts/Assembly Illustration, in this Directions for Use.
I. Manual Cleaning
B Rinse parts in a sink under cold running water from a tap. Submerge parts in warm tap water
(30-40¼C / 86-104¼F) ensuring that all surfaces are in contact with the warm water for at least
2 minutes before exposure to detergent.
C Immerse all parts in hot tap water (60-70¼C / 140-158¼F) containing a Dish Washing
detergent
3
.
Thoroughly clean all surfaces using a brush as necessary.
D Rinse all components free of detergent
4
in warm tap water (30-40¼C / 86-104¼F).
Dry the components thoroughly
5
E Inspect all components to confirm that they are CLEAN and DRY.
II. Automatic Cleaning by Washer/Disinfector
Place parts in wire baskets. Cycle
1
: 90-95¼C (194-203¼F) for more than 12 seconds.
Total process time: approx. 52 min.
2
Use a Non-enzymatic alkaline detergent containing 2-5%
NaOH
3
.
III. Automatic Cleaning by Pasteurmatic Compact.
6
30 min wash cycle at 32-43¼C (90-110¼F)
Practical Operation
a) When used in accordance with ISO 10651-4 the following resuscitator size recommendation
applies: Adult for patients over 20 kg (44 lb), Paediatric for patients from 2.5 (5,5 lb) to 20 kg
(44 lb) and Preterm for patients below 2,5 kg (5,5 lb).
When used to deliver tidal volumes as recommended by the AHA/ILCOR Guidelines 2000, the
following applies. Adult for patients over 25 kg (5,5 lb), Paediatric for patients from 2,5 kg (5,5 lb)
to 25 kg (55 lb) and Preterm for patients below 2,5 kg.
b) Either connect the Patient Valve directly to the patient«s tube, or choose the
appro-
priate size mask and attach it to the Patient Valve. Mask seal on difficult anatomies may be impro-
ved by using the Multi Function Mask Cover (Mask size 3-4
and 4-5+ only).
c) Ventilate the patient by rhythmically compressing the bag for inspiration, allowing ample time
between inspirations for patient’s passive exhalation and bag re-expansion.
d) Follow local guidelines for resuscitation.
e) If the Patient Valve becomes contaminated with vomitus during ventilation, disconnect the
resuscitator from the patient and clear the Patient Valve as follows.
- Tap the Patient Valve with the patient port against your gloved hand to shake free any
contaminant and squeeze the silicone bag to deliver several sharp breaths through
the Patient Valve to expel the contaminant.
- If contaminant does not clear; disassemble the Patient Valve and rinse.
Caution:
Visually inspect and test valve function to ensure proper operation of the Laerdal Silicone
Resuscitator prior to patient use. Improper assembly of the flap valves, intake membrane,
disk membrane and lip valve may affect performance. Misassembly of two lip valves may cause
inadvertant EEP (End Expiratory Pressure) or prevent proper patient exhalation.
Decontamination
Thorough decontamination of the resuscitator components and accessories is necessary after
each use. To reduce risk of cross contamination, follow steps below.
1. Washing and Rinsing
Washing and rinsing is always the first step in the decontamination process.
A Disassembly
- Disassemble the LSR into individual parts as shown in the Parts Illustration in Directions for Use,
to make surfaces accessible to cleaning
- Separate Expiration Diverter (if used) into its three parts
- Separate Patient Valve into its four main parts
- For Preterm and Paediatric models, unscrew top of Pressure Relief Valve, but do not
disassemble this part any further.
- Separate Intake Reservoir Valve into its six parts
Method
I. Steam Autoclaving
Autoclave at 132-137¼C
15min. 00s
(gravity- displacement)
(270 - 279˚F)
(+ 30s)
II. Steam Autoclaving
Autoclave at 134-137¼C
3min. 00s
(prevacuum - pulse)
(273-279¼F)
(+ 30s)
III. Cidex OPA
Conc.: 0,55%
60 minutes
(orthophtalaldehyde)
Ambient temperature
IV. Sodium Hypochlorite Conc.: 0,5%
20 minutes
Ambient temperature
V. Pasteurization
Pasteurization cycle
30 minutes
70-75¼C (158-167¼F)
Allow parts to cool
and dry.
Remove traces of
disinfectant by rinsing in
warm tap water
(30-40¼C / 86-104¼F)
for minimum 2 minutes.
Dry the components
thoroughly
Dry the components
thoroughly
Parameters/Concentration Exposure time
Process parameters
Post-treatment
a) 00
b)
3-4
4-5+
0/1
2
Sterilisation
High-level disinfection
Upper part of valve housing
Lip valve
Valve housing, patient side
Disk membrane
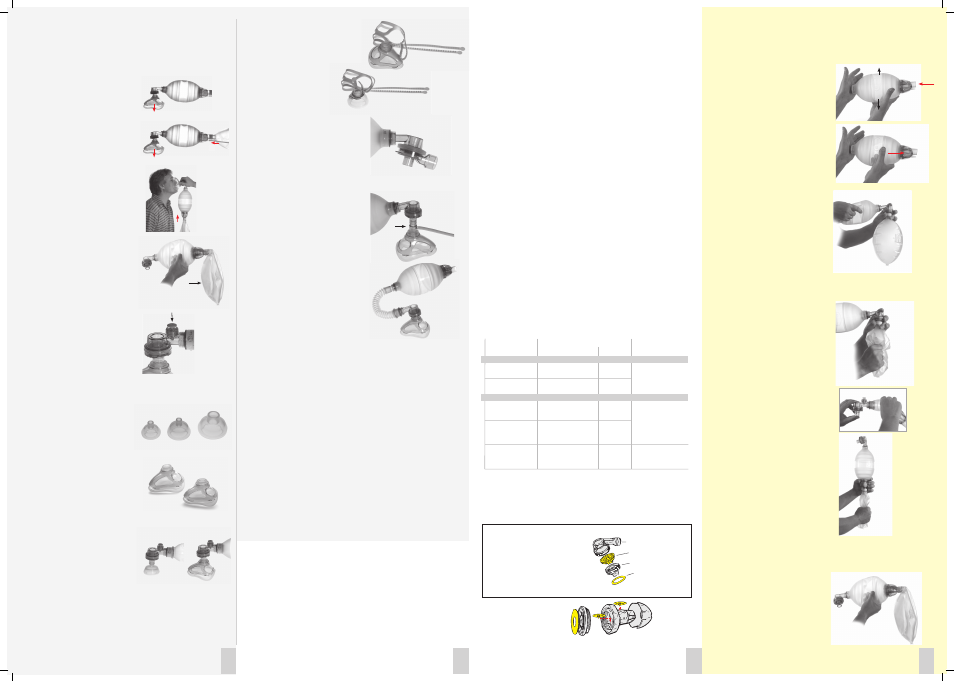
Function Testing
Test valve functions to ensure proper operation of
the resuscitator after each disassembly-
reassembly. An O2 Reservoir Bag is needed to
complete the test procedures described below:
1. Intake/Reservoir Valve
a) Compress the ventilation bag with one hand
and close its neck opening with your other hand.
Release the grip on the bag. Rapid bag reexpansion
confirms efficient air intake.
b) Close the neck opening and try to compress
the bag. If the bag cannot be compressed with rea-
sonable force, or if bag compression forces the air
out between your hand and neck of the bag, the
valve efficiently prevents backward leakage of air.
2.1 Patient Valve
a) Assure that a (single) Lip Valve has been installed
in the Patient Valve. Attach the Patient Valve to
the bag. Hold a Reservoir Bag over the patient
port connector pressing with your thumb on the
reservoir bag connector.
Ensure tight seal between the patient port and
Reservoir Bag.
Compress the bag with your other hand
several times. Inspect that the Lip Valve opens
during compression.
Filling of the Reservoir Bag in this set-up
confirms that the Patient Valve efficiently
directs air to the patient.
b) With the filled Reservoir Bag held firmly to the
valve connector, compress the Reservoir Bag while
watching the external Disk Membrane.
Lifting of the Disk Membrane from its seat
confirms that air is correctly directed to
atmosphere instead of being returned to the
ventilation bag.
2.2 Patient Valve with Pressure Relief Valve
Close patient port connector with your thumb
while compressing the bag several times. Visual
and audible opening of the relief valve confirms its
operation.
3. Reservoir Flap Valves
(located in the Intake Valve assembly.)
a) Do as described and shown in 2.1a above in
order to fill the Reservoir Bag with ambient air.
Attach reservoir to the Intake Valve and press on
Reservoir Bag.
Compression of the Reservoir Bag and visual rise
of the outlet Flap Valve confirms that the Reservoir
Valve efficiently vents excessive gas to atmosphere.
b) Do as described and shown in 2.1a above in
order to fill a Reservoir Bag with ambient air.
Attach reservoir to the Intake Valve. With the
Patient Valve in place and the reservoir
attached to the Intake Valve, perform several
compression-release cycles on the ventilation bag
until the Reservoir Bag is flat and empty.
Rapid reexpansion of the ventilation bag after
flattening of the Reservoir Bag confirms that the
Reservoir Valve efficiently lets in ambient air.
2
3
4
5
Caution: Patient Valve reassembly
Make sure that only one Lip Valve
Cat.No. 54 01 03 is installed.
If the valve housing does not tighten completely
during reassembly, it may indicate that two lip valves
have been mounted instead of one. Also, be sure not
to mix the Disk Membrane for the Patient Valve
with the Intake Membrane meant for the Intake Valve
assembly. Test functions as described in Function Testing.
Intake Valve reassembly
Reassembly as shown right.