2v - 8.4v, Receiver and servo connections – HITEC Aggressor FM User Manual
Page 3
7
6
L) Crystal:
- The crystal is located above the power switch and can be interchanged with different channels in
conjunction with the receiver to prevent any conflicts with other radios used in your area.
- FM Transmitter crystal part# 67175XX 75MHz, #67127XX 27MHz (XX= Your channel number)
- FM receiver crystal part# 66875XX 75MHz, #66827XX 27MHz (XX= Your channel number)
- Warning: Use only genuine Hitec crystals. Other brands will not work properly!
M) Charging Jack:
- The charging jack is located under the power switch for use with the optional Hitec CG-25 charger
when using rechargeable batteries.
- (See "Recharging Batteries" for more information about this feature.)
N) Steering Wheel:
- Used to control the steering of your vehicle.
O) Throttle Trigger:
- Used to control the throttle and braking of your vehicle.
- Pull the trigger for throttle, and push it for braking or reverse (Reversing ESC's only.)
- Press down on the battery cover and slide in the direction illustrated.
- Remove the cover and install the batteries as shown.
- Be careful to pay close attention to the polarity of each cell or the transmitter will not operate.
- Replace the cover making sure it is closed securely.
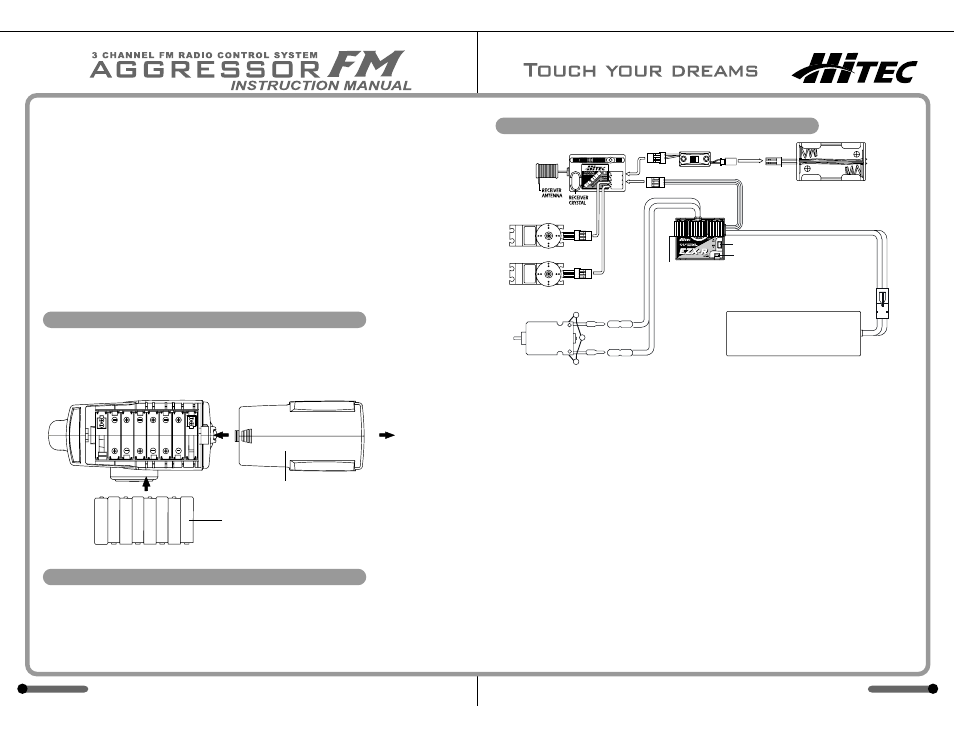
A) Receiver:
- You can use a separate receiver 4.8v - 6V battery pack if required for your particular model.
This battery is typically only used with a gas or nitro powered vehicle to supply power to the receiver.
Connect as shown.
- Note: If using an electronic speed control, it will supply the power to the receiver through the connector
plugged into channel #2.
- Be aware you should keep your receiver antenna at least 2" away from any power wires to
prevent potential interference.
- Route the antenna up an antenna tube as typically shown in your vehicles instructions.
- Warning: Be sure not to cut off any excess antenna wire, as it will shorten your operating range.
B) Servos:
- When installing the servos, refer to the manual of the vehicle for proper installation.
- Once your servos are correctly installed you will need to make sure they are properly centered.
To do this, remove the servo horns turn on your transmitter, then the power to your receiver.
Remember; always turn your transmitter on first and off last. Failure to do so may result in loss of
control and can damage your servos and/or linkage.
- Now that the power is on check that the servos are working properly.
- You will now center the trim knobs on the transmitter and replace the horns so that they are centered.
- Be aware they may not be perfectly centered; this is OK, just get them as close as possible.
Then use the trims for fine-tuning.
C) Battery:
- The AA receiver battery holder supplied with your radio should be used in a non-electric vehicle that
requires two servos.
- Connect the AA Receiver battery holder to the power switch supplied, and then plug the switch into the
"Batt" channel of the receiver for power.
- You will not need to connect this battery if you are using an electric car with an electronic
speed control or mechanical speed control with BEC.
AGGRESSOR
AGGRESSOR
EODFN#+0,#######
QLFDG#EDWWHU\#
7.2V - 8.4V
UHG#+.,#######
VWHHULQJ#VHUYR
\HOORZ#+.,########
Eoxh#+0,#######
.
0
PRWRU##########
ZLWK#314xi#
FDSDFLWRU####
GXDO#OHG#####
UHG#=#EUDNH######
JUHHQ#=#IXOO#SRZHU
LQGLFDWRU####
VHW#XS#EXWWRQ
Rq2Rii#Vzlwfk
WKURWWOH#VHUYR#+Rswlrqdo,
ESC Installation
ESC
(Optional)
RECEIVER
Receiver battery
CH1
CH2
CH2
BATT
Alkaline or Nicad "AA"size
Battery Cover
Remove
3. Transmitter Battery Installation
4. Recharging Batteries
- You must install individual AA size rechargeable batteries.
- Only use Nicad or NiMh type. (Alkaline batteries are not rechargeable).
- Connect the optional Hitec CG-25 overnight wall charger to the charging jack located under the
switch to charge. Depending on the capacity of the battery;
- A full charge on a typical Nicad will take 12-16 hours.
- A full charge on a typical NiMh will take 24-36 hours.
5. Receiver and Servo Connections