Parts, Scope, Steps of installation – Grandview GPCP-D User Manual
Page 2: Details of installation
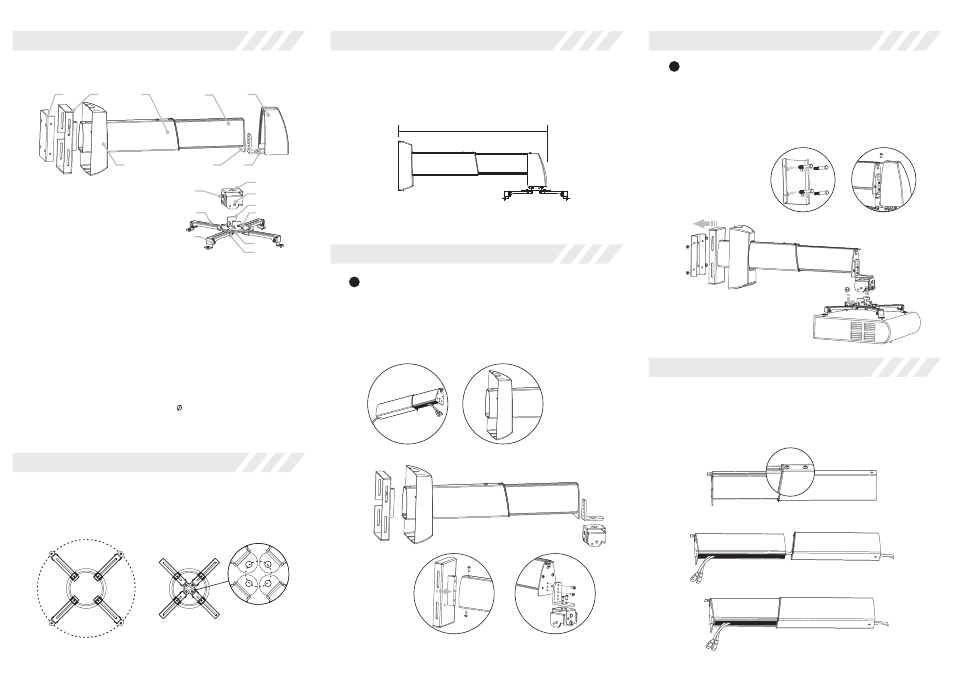
1
2
1-1
1-3
1-4
2-2
1-2
2-1
2-3
1-5
GPCP-D is combined by GPCP and GPD
Parts
GPCP Main Bar Overview
1-1 Top Cap
1-2 Front Board
1-3 Subsidiary Bar
1-4 Main Bar
1-5 Installation Board
2-1 Low Cap
2-2 Low Board
2-3 Fixation
GPD Adjustment Overview
3-1 Adjuster
3-2 Hanging Button
3-3 Horizontal Adjusting Hole
4-1 Installation Bracket
4-2 Vertical Adjusting Button
4-3 Installation Arm
4-4 Adjustable Screw
4-5 Sliding Installation
Button
4-6 Installation Base
①M3X8 Philips Screw (4pcs)
②M4X8 Philips Screw (4pcs)
③M5X8 Philips Screw (4pcs)
④M5X8 Philips Screw (2pcs)
⑤M6X12 Anti-Slip Screw (2pcs)
⑥M5X10 Philips Screw (5pcs)
⑦M6X25 Tapping Screw (4sets)
⑧ 6X50 Wood Screwn (4sets)
Scope for installation (Installation hole of projector):
Maximum scope for installation:360mm diameter
Minimum scope for installation:50mm diameter
Note: Connect the installation arms to the projector conversely for different installation
holes of projector.
Maximum diameter: 360mm
Scope
Minimum diameter: 50mm
Scope for installation (H is the distance between ceiling and projector)
The H of GPCP-D4060 is 420mm~600mm
The H of GPCP-D6090 is 600mm~900mm
The H of GPCP-D90150 is 900mm~1500mm
Scope
Firstly, collect the power wires to the main bar as figure 1.
Invaginate the low cap to the main bar as figure 2. Install the
low board to the main bar, and then fasten the screws
(accessories 5) as figure 3. Finally, install the front board to
installation board of main bar and install the adjuster to the
front board, and then fasten the screws (accessories 6) as
figure 4.
Steps of installation
figure 1
figure 2
figure 3
figure 4
Steps of installation
Install the fixation on the wall (choose the screws according
to the materials of wall, Use the screw of accessory 7 for
concrete-wall, and use the screw of acessory 8 for wood-
wall) as figure 5.And then, install the Main Bar Overview to
the fixation and fasten the screws (accessory 4)as figure 5.
Finally, connect the GPD Adjusting Overview to the adjuster
and then fasten the screws (accessory 6 ) as figure 7.
figure 5
figure 7
figure 6
Details of installation
Wires collection
Loosen out the positioning screws of main bar (1-4) as figure 8, and then
take apart subsidiary bar (1-3) from main bar (1-4). Put the wires into
the main bar (1-4) then insert the wires to the plastic groove of
subsidiary bar (1-3). And then, re-install the subsidiary bar (1-3) to main
bar (1-4) after collecting the wires as figure 9-10.
figure 8
figure 9
figure 10
Accessories
3-1
3-3
3-2
4-1
4-5
4-2
4-4
4-3
4-6
H
GPCP-D