Components and accessories, Gpc gpm three steps for installation, Diagram for applicable projector area – Grandview GPCM-B User Manual
Page 2
H
130mm
255mm
30mm
295mm
60mm
Max 360mm
Min 280mm
M
a
x
3
6
0
m
m
M
in
2
8
0
m
m
M
ax
25
5m
m
M
in
19
8m
m
Components and Accessories
GPCM-B is combined by GPC and GPM .
Accessories
M4x10 Pressing Screw (4pcs)
M4x5 Pressing Screw (2pcs)
M3x10 Cross Machine Screw(4pcs)
M4x10 Cross Machine Screw(4pcs)
M5x10 Cross Machine Screw(8pcs)
M5x30 Cross Machine Screw(4pcs)
Specifications
Adjust distance
for each grid
Specifications for
Multifunctional Arm
The length of
main arm
⑧
The length of
subsidiary arm
⑧
a
Load
GPC
GPM
Three steps for installation
B
C
3°
30°
3°
Optional Accessories
(
)
Support Bar、Multifunctional Arm
Product Name
The length of support bar
400/600/800
Specification for Multifunctional Arm
30x355
Specifications
Unit(mm)
Diagram for applicable projector area
10x30mm
spot of insatllation
Figure 1
28
0
255
Bottom View
Front View
Top View
This projector lift must be installed on the bottom of projector (length 240mm;
width 255mm). Figure 1. Note: there is a spot of insatllation , figure 2.
Figure 2
Unit(mm)
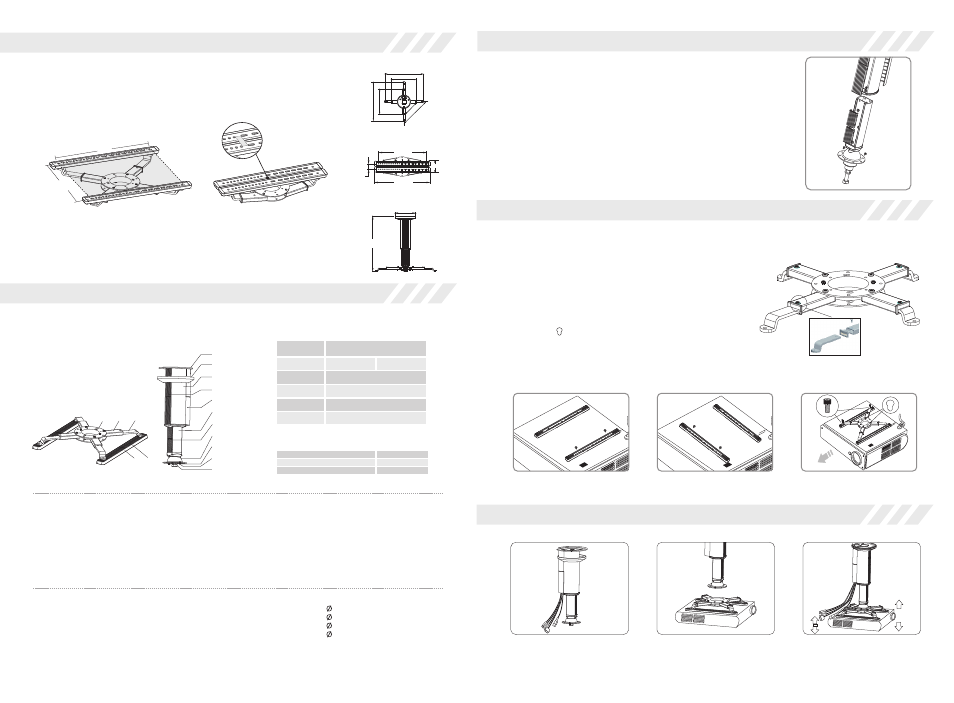
1. Assembly
The main bar and the subsidiary bar
are fixed together from factory. And
the positioning bar is installed on half-cycle junction⑤ b. Before installation,
please put the half-cycle junction⑤ on subsidiary bar④. Please put the glider ⑤
b on the half-cycle junction⑤, and then fasten the screw.
2. Adjustment
Loosen the screens of main bar③ and subsidiary bar④. The distance between
projector and ceiling can be adjusted according to the distance of install holes
between main bar③ and subsidiary bar④ . Please refer to H in specification
table.
(Note: GPCM-B100 is no subsidiary bar and no stretch function).
③
④
Figure 3
Figure 4
Figure 5
Figure 6
A. Please install GPC support
bar assembly on the ceiling
B. Please connect the GPC
support bar assembly and
GPM projector fixation
C. Adjust your desired angle.
Usage
1. If need, please loosen the screws on the main arm⑧ and
subsidiary arm⑧a to extend the arms.
2. Please follow figure 4 or figure 5 to install the multifunctional
arm, because of different projectors. In addition, the
multifunctional arm can be invisible from the projector.
3. Put the main fixation⑦ on projector at the central gravity. Make
sure the two holes on the main fixation⑦ locate at the both side.
4. Before connecting GPC main bar③, please fasten the screws
of main arm⑧ and subsidiary arm⑧a.
GPC
GPM
⑦ ⑧ ⑧a
⑨ ⑨a
①
②
③
③b
④
③a
④a
⑤
⑤a
⑤b
⑥
GPCM-B
/
Model
16
Parts:
① Base (1pc)
② Ornament Cover (1pc)
③ Main Bar (1pc)
③a Front Ornament Board
③b Back Ornament Board
④ Subsidiary Bar(1pc)
④a Ornament board for
subsidiary bar
⑤ Half-Cycle Junction (1pc)
⑤a Positioning Screw (2pcs)
⑤b Glider (1pc)
⑥ Main Screw (1pc)
⑦ Main Fixation (1pc)
⑧ Main Arm (4pcs)
⑧a Subsidiary Arm (4pcs)
⑨ Multifunctional Arm (2pcs)
⑨a Ornament board for
Multifunctional Arm(4pcs)
M3x20 Cross Machine Screw(4pcs)
M4x20 Cross Machine Screw(4pcs)
M5x20 Cross Machine Screw(4pcs)
M3x30 Cross Machine Screw(4pcs)
M4x30 Cross Machine Screw(4pcs)
M6 Drop In Anchors(3 sets)
16x10 Rubber Insert(4pcs)
16x20 Rubber Insert(2pcs)
Washer(4pcs)
Spring Washer
Spanner (1pc)
(4pcs)
A
30x295
70
50
25kg