Operation instruction, Instructions – Grandview LF-MIC(Cyber Integrated Tab-Tension Motorized) User Manual
Page 6
5
6
Operation Instruction
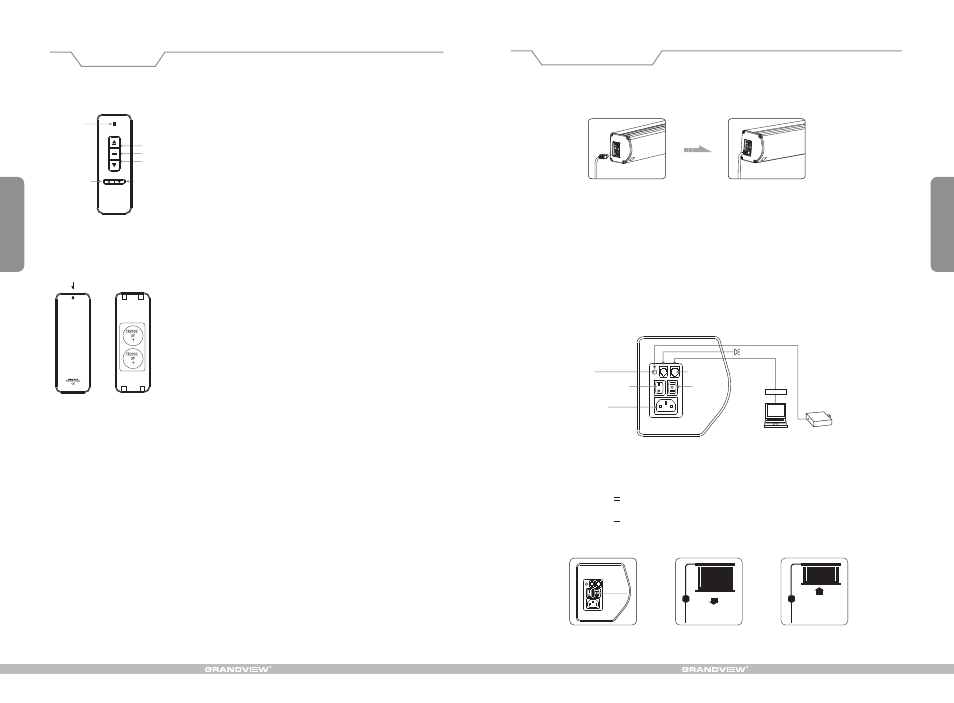
Power Cord Connecting Screen:
1. Plug the power cord into the power jack on the left end cap (Figure 18-19). (Attention: The plug slot must be
matched with the power jack slot)
2. T
3. Switch on the power(within stated voltage).
ear off the glue cloth fixed on the bottom rod,ensure the bottom rod is not stuck by the casing.
How to use Manual/Remote Control Switch Button: (Figure 20)
The screen has four kinds of optional control methods: IR Remote Control, Manual Control, Trigger Control, External
Control (Central Control or RS232/USB). When switching the Manual/Remote Control Switch Button to position "1",
you can use Manual Control or Trigger to control up/pause/down of the screen. When switching to position "0", you
can use IR Remote Control or External Control (Central Controller or Rs232/USB) to control up/pause/down of the
screen.
How to use manual switch control:
1. Switch Manual/Remote Control Button to position "1" (manual stalls).
2.
" "
; it will come down slowly. When it is all the way down, it will
stop automatically (Figure 22)
.
3. Turn the switch to
" " to
the screen; it will go up into the metal casing. When it is all the way up, it
will stop automatically (Figure 23).
4. To stop any time while the screen is in motion, turn the switch to 0.
Turn the switch to position
to lower the screen
position
lower
Instructions
Figure 18
Figure 19
Manual/Remote Control
Switch Button
Power Cord Jack
Trigger Jack
Rs232
Central Controller
Manual Control
Connecting External IR
Projector
Computer Output
Jack
Figure 20
Figure 21
Figure 22
Figure 23
Manual Control
Button Function and Operation Instruction :
1.Press UP button to lift the screen
2.Press STOP button to stop the screen
3.Press DOWN button to lower the screen
4.Press MICRO-UP button to retract the screen in small
increments(150ms for each movement)
5.Press MICRO-DOWN button to lower the screen in small
increments (150ms for each movement)
Cautions:
1.The minimum distance between Controller and Receiver: 50cm
2.Workable within 8m in horizontal directionfrom the Receiver to the
Controller
3.Do not cover the Controller’s launching port while operation
4.Strictly banoperation in wet or high temperature environment.
5.Replacing batteries when the signal is faint or no signal.
6.Batteries for the Controller: 2 units CR2032 button cells.
Batteries Installation Instruction:
When the signal of the Controller is faint, please replace the batteries
as follow steps:
1.Reverse Controller to the back, push down as the arrow mark to open
the cover.
2.Installtwo cells of battery and set the direction of positive and
negative electrode just like the chart shows.
3.Close the battery cover.
LED
UP
STOP
DOWN
Micro-up
Micro-down
Model:AC127
Push down