Rv kit installation, 0 connecting to the battery & solar array – Go Power! GP-RV-20 User Manual
Page 6
6
www.gpelectric.com
RV Kit Installation
RV Kit Installation
RV Kit Installation
RV Kit Installation
RV Kit Installation
4.1 Using the Mounting Feet
1. Assemble the mounting feet onto the ends of the solar module using the 1/4” bolts,
washers and nuts as shown in Figure 2.
2. Tighten nuts securely using a 7/16” wrench.
3. Place the module in a location that follows the criteria listed here:
•
Select a location where the mounting surface is at least 1/2" thick and strong
enough to support mounting hardware, the solar module and wind loads.
•
Minimize distance between the location of the solar module and the location
where the power cable will enter the vehicle to connect to the battery.
•
Place the module lengthwise along the roof to reduce wind loading on vehicles
(if applicable).
•
Avoid internal wiring when selecting the spots for drilling the four mounting
holes.
•
Ensure obstacles, such as air conditioners, will not shade the solar module.
* Place module so that you have room to expand the current system if needed.
4. Mark the mounting hole locations by using a pencil to trace through the holes in the
mounting feet. Drill mounting holes only one inch deep with a 3/8” drill bit.
5. Use the appropriate sealant as recommended by your RV Dealer to ensure a
watertight installation.
6. Gently insert the well-nuts into the drill holes so that only the topmost flange part
remains above the roofline. Be careful not to push well-nuts through the holes.
7. Insert screws with lock washers and tighten. Do not overtighten.
5.0 Installing a BD-3 or Regulator
Installing a BD-3 or Regulator
Installing a BD-3 or Regulator
Installing a BD-3 or Regulator
Installing a BD-3 or Regulator
RV-10
The RV 10 Kit includes a BD-3 (diode and inline fuse) to be connected on the positive
wire of the power cable. Use the included butt splice for this application.
The 3/8 ring terminal end of the BD-3 must be connected to the positive battery
terminal or the reverse diode protection will not work and the battery will not
charge. The RV-10 Kit does not include a regulator.
RV-20
The RV-20 Kit includes a regulator. Select a suitable location for the installation of
the regulator. Run the power cable from the solar module to the location selected.
Please refer to the regulator instruction manual for installation instructions. It is
recommended to put a 5 Amp inline fuse within 12 inches of the battery on the
positive wire between the regulator and the battery.
6.0 Connecting to the Battery & Solar Array
It is recommended to connect directly to the battery wherever possible.
1. Clean all corrosion from battery terminals before proceeding. Crimp the included
ring terminals onto the negative and positive wires of the power cable to be attached
to the battery. The RV-10 Kit will have the BD-3 crimped to the positive wire of the
power cable.
2. Attach the negative wire’s 3/8” ring terminal to the RV battery first. Check all electrical
connections and apply a protective coating to battery terminals.
6.1 Typical Battery Connection
1. Single 12 Volt battery connection (See Figure 4)
2. Multiple 12 volt battery connection. (See Figure 5)
3. 6 volt battery connection. (See Figure 6
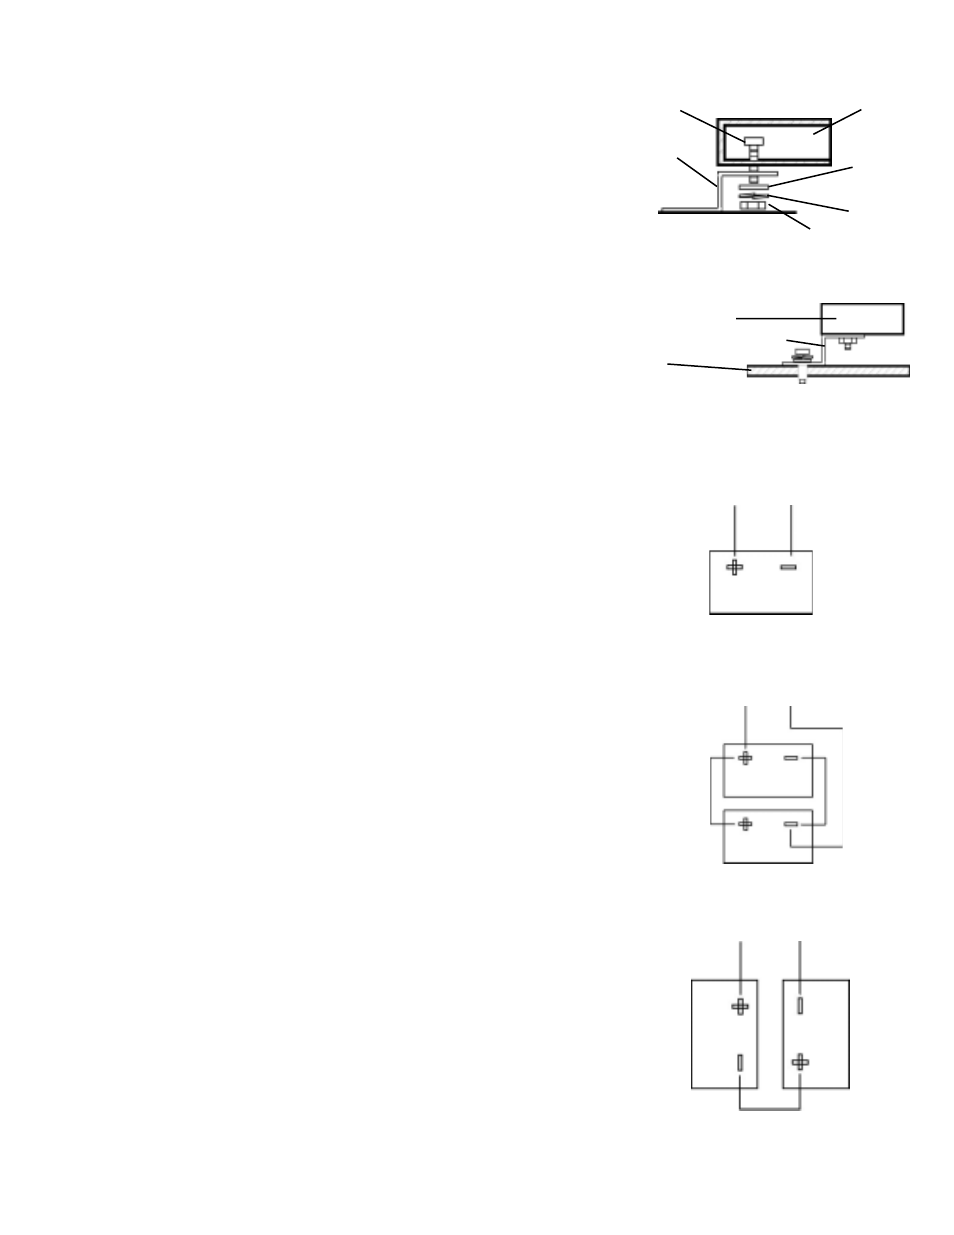
Solar
Module
1/4” Flat
Washer
1/4’
Lock
Washer
1/4’ Bracket
Bolt
Mounting
Foot
R V
Roof
1/4” Nut
Figure 2
Figure 2
Figure 2
Figure 2
Figure 2
Figure 4
Figure 4
Figure 4
Figure 4
Figure 4
Figure 5
Figure 5
Figure 5
Figure 5
Figure 5
Figure 6
Figure 6
Figure 6
Figure 6
Figure 6
Figure 3
R V
Roof
Solar
Module
Mounting
Foot
Common RV Battery
Common RV Battery
Common RV Battery
Common RV Battery
Common RV Battery
C o n f i g u r a t i o n s
C o n f i g u r a t i o n s
C o n f i g u r a t i o n s
C o n f i g u r a t i o n s
C o n f i g u r a t i o n s
Positive
Connection
Negative
Connection
Single 12 Volt Battery
12 Volt Configuration
Positive
Connection
Negative
Connection
T
wo 12 Volt Batteries
12 Volt Parallel Configuation
Positive
Connection
Negative
Connection
T
wo 6 Volt Batteries
12 Volt Series Configuation