Installation guidelines, Installation instructions, Installation – DuraVent Ventinox Rigid Factory-Built Lining System User Manual
Page 5: New chimney lining (fig.4)
INSTALLATION GUIDELINES
DuraVent Liners venting gas or oil appliances do not require a minimum clearance or
insulation between the outside of the liner and inside of the masonry shell*. Leave enough
clearance for the liner to slide into place without difficulty.
For Venting Solid Fuel Appliance, a minimum of ½` clearance is require between the outside
of the liner and inside of the masonry. To meet Zero Clearance to combustible, insulation must
be used. (See insulating liner section for instruction).
*Please note: While insulation is not required for every installation (refer to UL1777 or ULC-S635 for appropriate
listings or standards), the performance of the entire heating system is greatly enhanced when installing insulating materials.
The venting system acts and reacts in step with the heating unit`s operation. Insulation improves draft and minimizes
condensation, helping flue surfaces warm up more quickly to achieve a heater’s rated efficiency. Insulation is particularly
important for exterior chimneys.
Read the sections outlining insulating procedures before beginning the installation.
INSTALLATION INSTRUCTIONS
•
The chimney lining system can be installed in a masonry or concrete chimney that complies with the building code.
•
In Canada, a new masonry or concrete chimney construction must comply with CAN/CSA A405: Design and
Construction of Masonry Chimneys and Fireplaces.
INSTALLATION
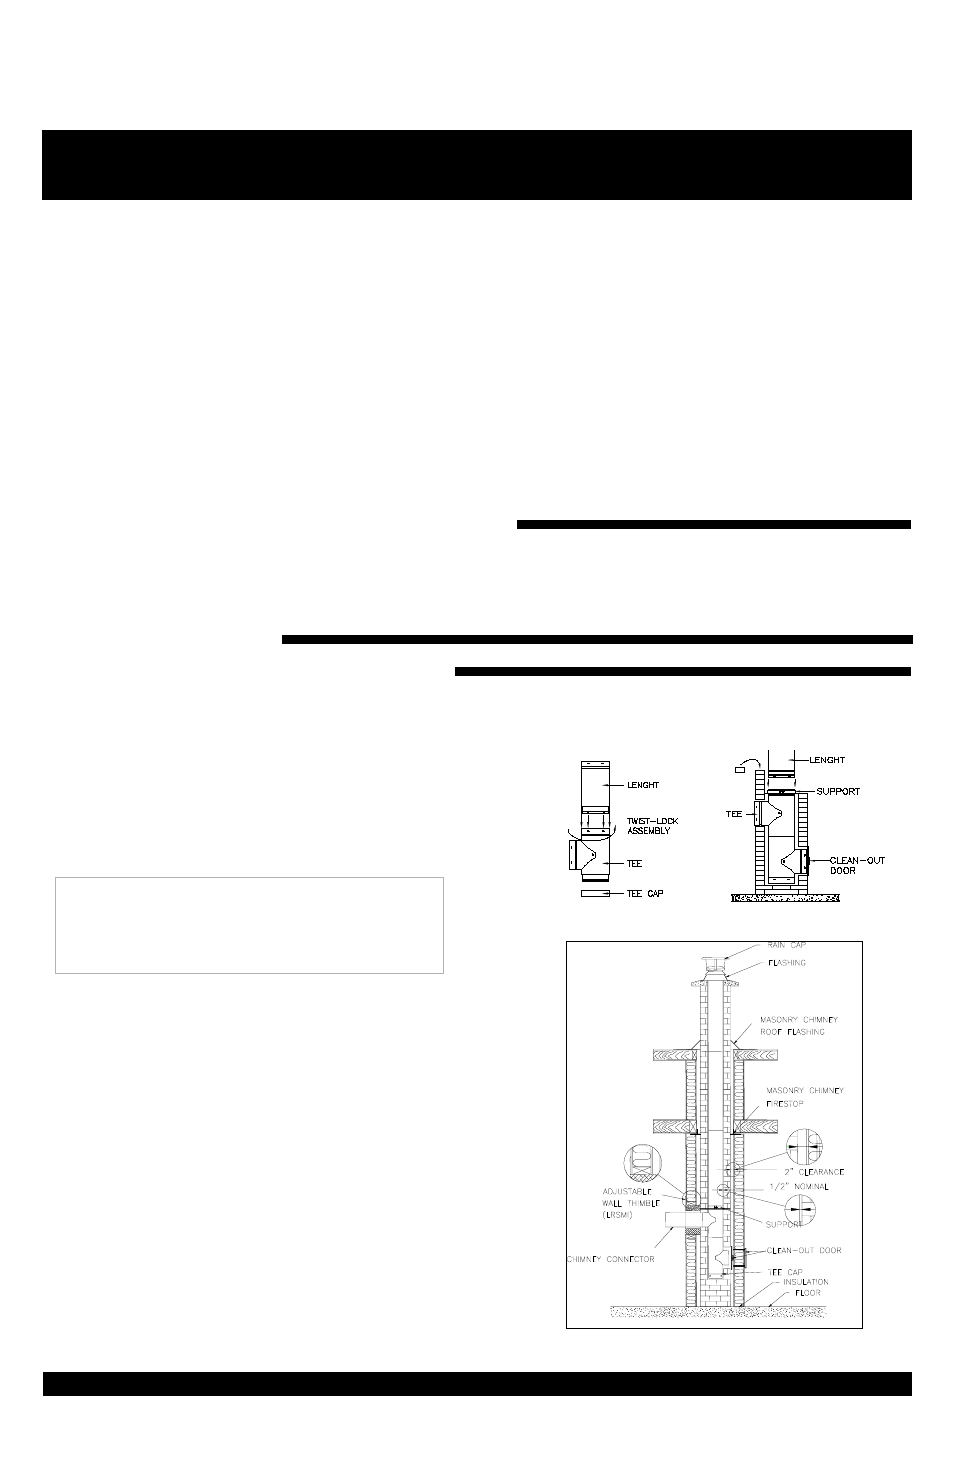
• NEW CHIMNEY LINING (fig.4)
1. To install a liner into a new masonry chimney, we
suggest that you install the liner as the chimney is
being constructed.
2. Start the masonry chimney construction, making
sure that the dimension and manufacture of the
bricks and mortar conform to the Building Code.
3. To start the liner installation, attach the tee to the
first length. Insert the liner with the male (smaller
connection) end down. Twist lock the part together
(fig.2). Attach the tee cap to the base of the tee.
•
NOTE: Each joint takes 1 1/2" (38 mm) overlap.
4. Place the tee and length assembly on the support
base, then add lengths along the chimney
construction until the liner protrudes about 10 in.
(254 mm) above the masonry chimney (fig.3).
5. Install the top support on top of the masonry
chimney using lag bolts and/or cement (Fig. 5).
6. Slip the support collar over the liner until it rests on
the support.Tighten the bolt to fasten it to the liner.
(Fig. 5)
7. Twist lock the rain cap to the top of the liner.
Fig. 2
Fig. 3
Fig. 4 - New masonry liner installation for interior chimney
VENTINOX LINING SYSTEM - 5
If you choose to insulate the liner.
See insulating liner section (Page 8) to
size the masonry chimney.