Suggested screen frame building instructions – Da-Lite Lace and Grommet Screen Surfaces User Manual
Page 4
4
Suggested Screen Frame Building Instructions
NOTE: Inside width and height of screen frame should be
12" greater than picture size or 7" greater than over-all size
(including the webbing).
Lumber – Redwood, Spruce, Pine, White Fir. Use 2" x 4" stock
for frames to hold screens 11' x 14' or under. Use 2" x 6" stock
for screens of larger sizes.
Cutting Lumber – 2" x 4" stock-Cut sides or vertical pieces
1' 8" longer than over-all vertical measurements of screen.
Cut top and bottom or horizontal pieces 1' 3" longer than
over-all horizontal width of screen. 2" x 6" stock-Cut vertical
pieces 2' longer than over-all vertical measurements of screen.
Cut top and bottom of horizontal pieces 1' 6" longer than
over-all horizontal width of screen.
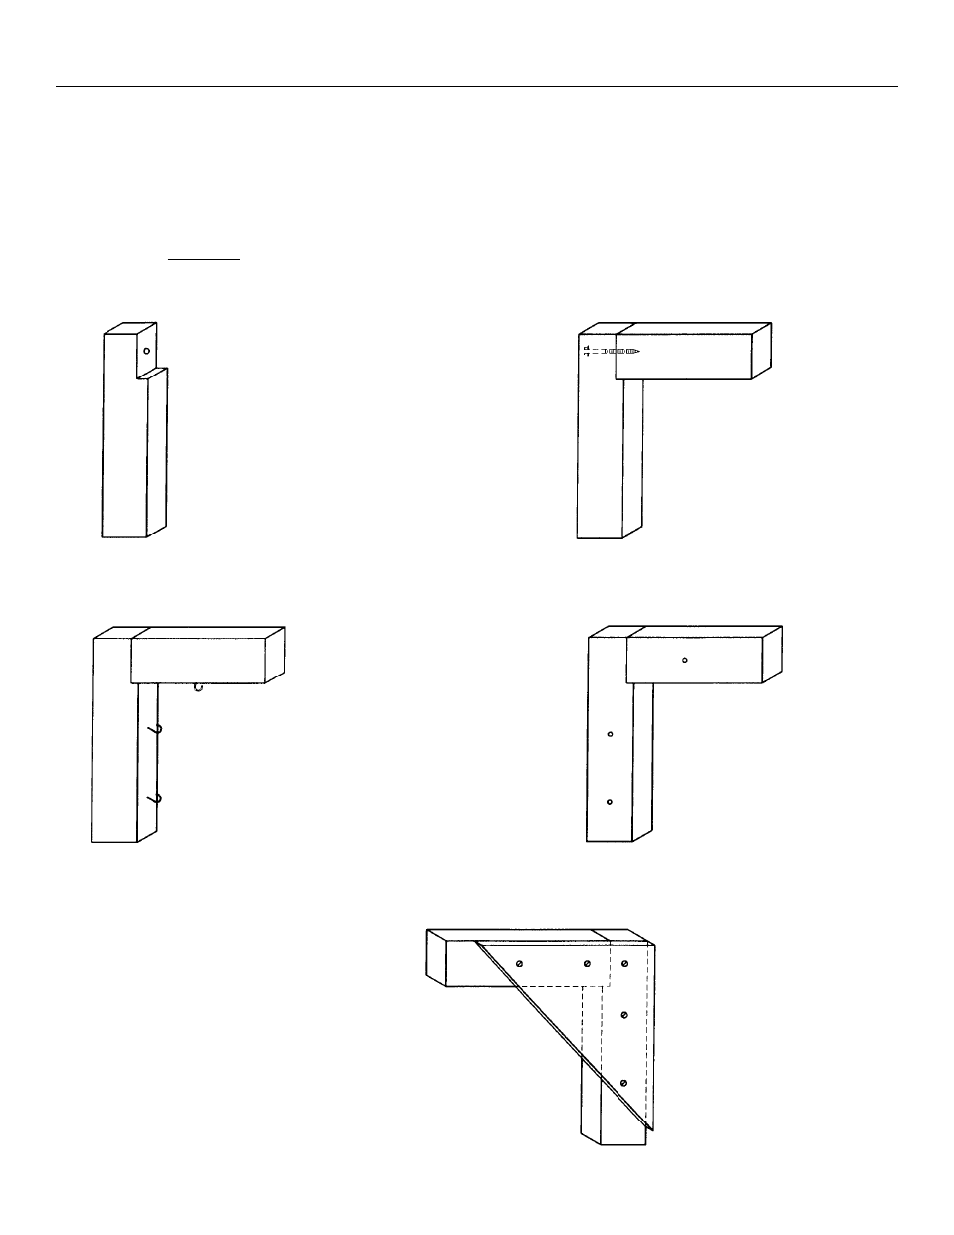
Notching
2" x 4" stock. Notch 2 vertical
(shortest) pieces as shown.
2" x 6" stock is notched
longer and deeper.
Bolting Frames
Drill 7/16" hole through notched
pieces. Drill 1/4" hole into ends of
horizontal pieces. Use 3/8" lag bolt
with washer on 2" x 4" frames at
corners. Use same lag bolts and
washers for 2" x 6" stock.
Lacing Hooks
Place #8 screw hooks 4-1/2" from
inside of corners. Space all others
6" apart. Measurements are same
for frames of 2" x 4" and 2" x 6" stock.
Lacing With Roofing Nails
Use large head roofing nails on face
of frame. Frame is now ready for
lacing screen into position.
Bracing
Bolt 2" x 4" corner braces to
back of frame at all corners
or gusset plates as illustrated.
On 2" x 6" stock frames, up to
20' width, uses braces 8' long.
10' braces for 20' to 24' widths
and 12' braces for widths
over 24'.