Suggested methods of installation – Da-Lite Tensioned Horizon Electrol User Manual
Page 6
6
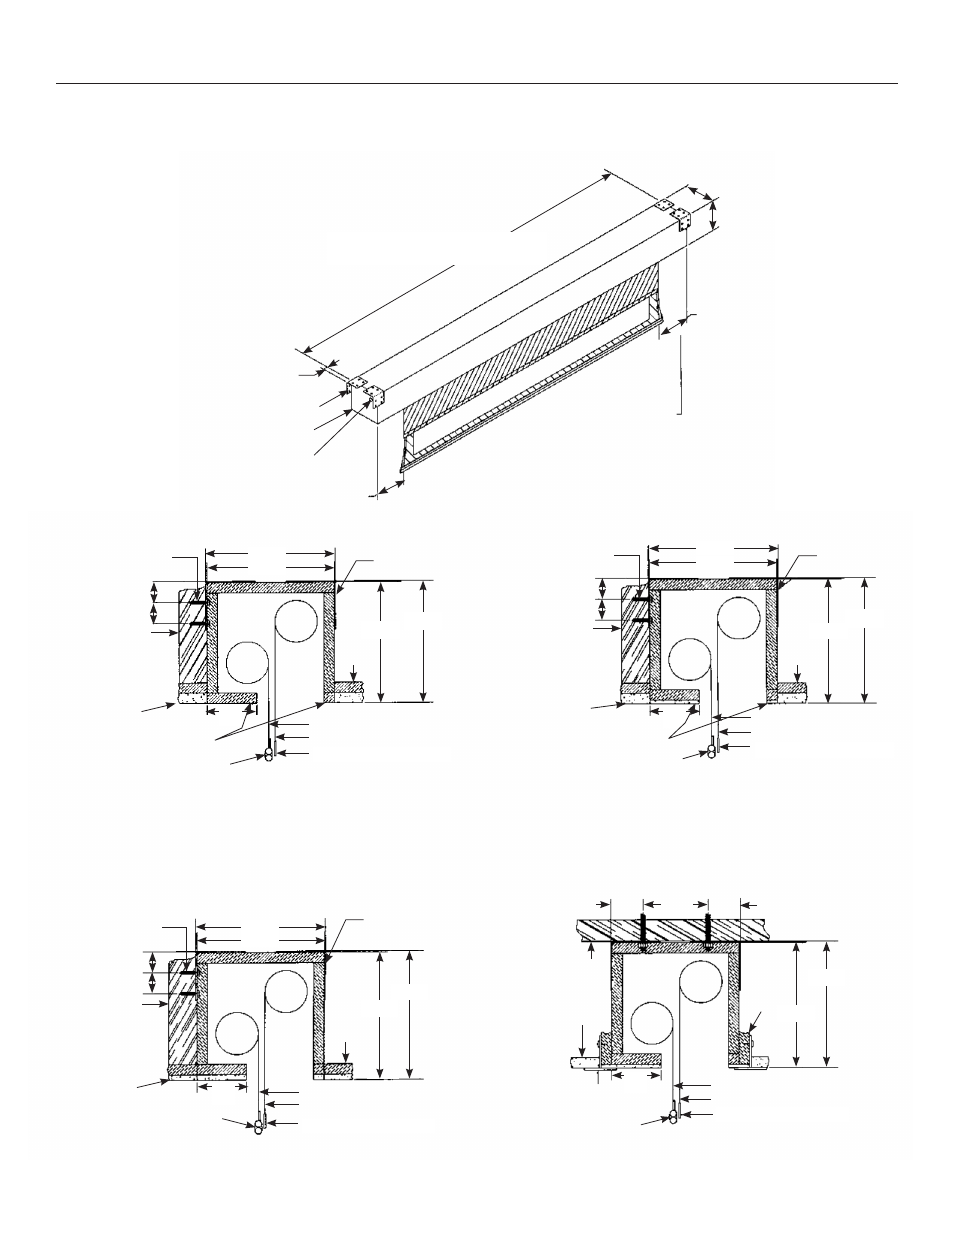
Suggested Methods Of Installation
1 1/2"
Mounting Bracket
Motor End
9"
Control Wire Outlet
7 7/8"
8 11/16"
7 7/8"
Electrical Outlet
On This End Of Case
Case Length = Screen Fabric Width
+ 15 3/4", All Sizes
Offset mounting, recessed above ceiling. For plaster, dry wall,
tile or paneling. Bottom of case painted same finish as ceiling.
Offset mounting, recessed above ceiling. May be adapted for
3/4" ceiling, but cut to 1/4" thick under screen case and panel.
Offset mounting, recessed above ceiling. May be adapted for
1/4" paneling for ceiling.
(Suggested)
1/4" Lag Screws
Finished
Ceiling
Aluminum Slat
Mounting Joist
Mounting
Bracket
Furring
Strip
Picture Surface
Masking Surface
1 1/2"
1 1/2"
METHOD C
3/16" x 1" Alum. Bar In Pocket
8 15/16"
9 1/16"
9 3/16"
9"
3 1/2"
Panel
Can Be Painted Same As Ceiling
or Removed And Replaced With
Finished Ceiling
(Suggested)
1/4" Lag Screws
3/4" Finished
Ceiling
Aluminum Slat
Mounting Joist
Mounting
Bracket
Furring
Strip
Picture Surface
Masking Surface
1 1/2"
1 1/2"
METHOD A
1/4" x 1" Alum Bar In Pocket
8 11/16"
8 13/16"
9 1/4"
9"
3 1/2"
Panel
METHOD B
Ceiling Tile Cut To 1/4" Thick
(Attach With Mastic)
(Suggested)
1/4" Lag Screws
3/4" Finished
Ceiling
Aluminum Slat
Mounting Joist
Mounting
Bracket
Furring
Strip
Picture Surface
Masking Surface
1 1/2"
1 1/2"
1/4" x 1" Alum Bar In Pocket
8 15/16"
9 1/16"
9 1/4"
9"
3 1/2"
Panel
METHOD D
Flush mounting, recessed above ceiling. For use with dropped
ceiling. May also be adapted for use with acoustical or other
ceiling 3/4" thick but cut to 1/4" thick under screen case and panel.
(Suggested)
1/4"
Bolts
Suspended
Ceiling Tile
T-Bar Furnished
With Ceiling
Aluminum Slat
Mounting
Joist
Furring
Strip
Picture Surface
Masking Surface
1 1/2"
1 1/2"
1/4" x 1" Alum Bar In Pocket
3 1/2"
Panel
8 15/16"
9 1/16"
Select Installation Method According To Ceiling Type.
NOTE: Must mark hole location of screws in 3-1/2" panel for removal, if covering with tile.