Troubleshooting, Video head cleaning – Aiwa HV-DH1EH User Manual
Page 33
Attention! The text in this document has been recognized automatically. To view the original document, you can use the "Original mode".
Troubleshooting
Check the following guide for the possible cause of a problem before contacting service.
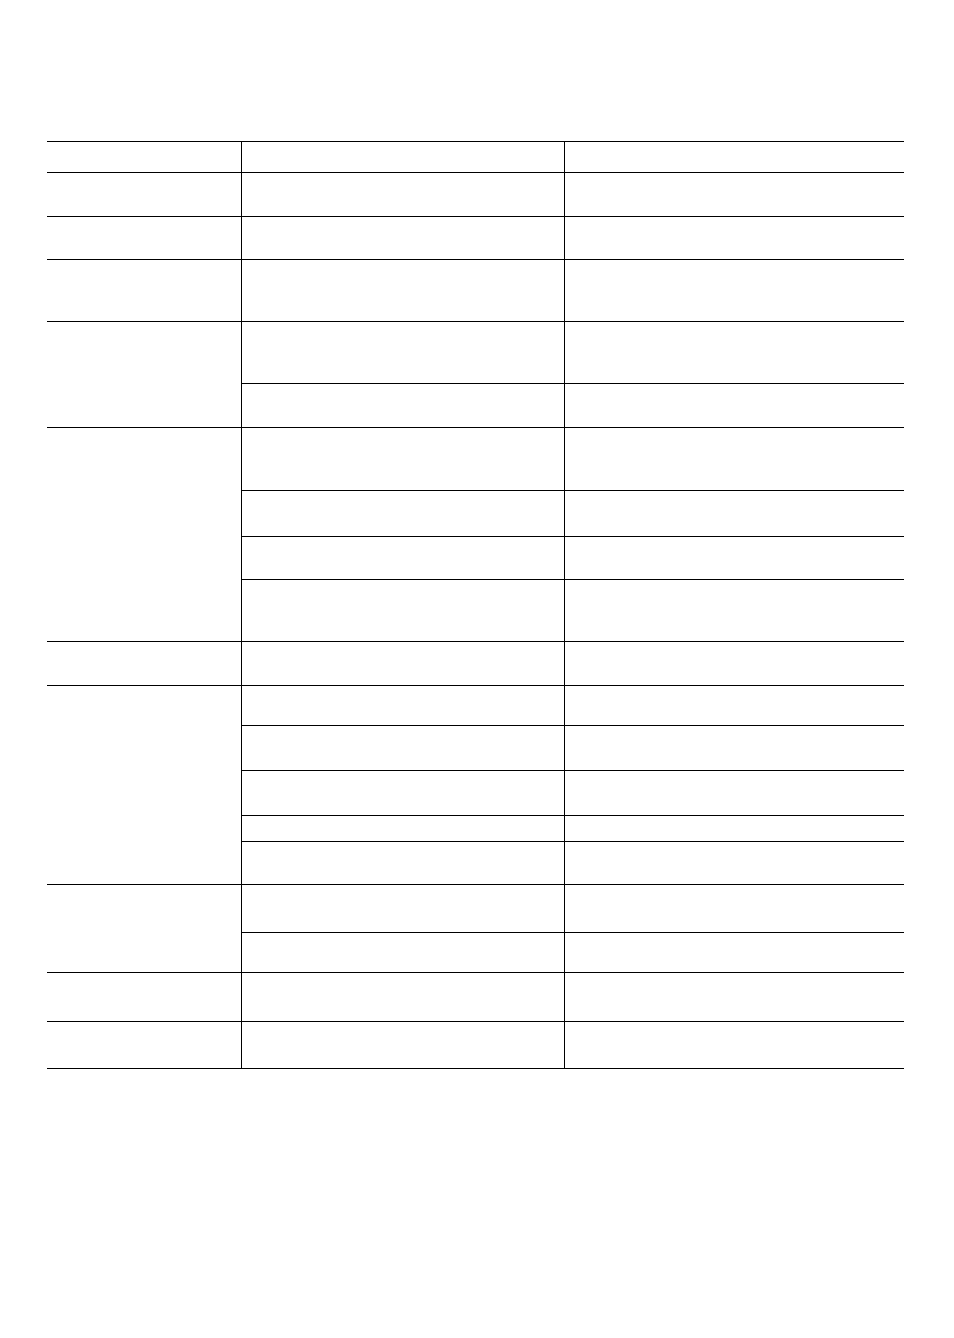
Symptom
Cause
Correction
DVD or VCR do not
work properly.
• DVD or VCR button is not switched
properly.
• Refer to page 2.
No power.
• The power cord is disconnected.
• Plug the power cord into the wall outlet
securely.
The power is on, but
the D
v
D player does
not work.
• No disc is inserted.
• Insert a disc. (Check that the DVD or,
audio CD indicator in the display
window is lit.)
No picture.
• The TV is not set to receive DVD signal
output.
• Select the appropriate video input mode
on the TV so the picture from the DVD
player appears on the TV screen.
• The video cable is not connected
securely.
• Connect the video cable into the jacks
securely.
No sound.
• The equipment connected with the
audio cable is not set to receive DVD
signal output.
• Select the correct input mode of the
audio receiver so you can listen to the
sound from the
d
V
d
player.
• The audio cables are not connected
securely.
• Connect the audio cable into the jacks
securely.
• The power of the equipment connected
with the audio cable is turned off.
• Turn on the equipment connected with
the audio cable.
• The Digital Audio Output is set to the
wrong position.
• Set the Digital Audio Output to the
correct position, then turn on the DVD
player again by pressing POWER.
The picture is poor.
• The disc is dirty.
• The TV channels are not tuned in properly.
• Clean the disc.
• Check tuning, carry out tuning again.
The DVD player does
not start playback.
• An unplayable disc is inserted.
• Insert a playable disc. (Check the disc
type and Regional code.)
• The disc is placed upside down.
• Place the disc with the playback side
down.
• The disc is not placed within the guide.
• Place the disc on the disc tray correctly
inside the guide.
• The disc is dirty.
• Clean the disc.
• The Rating level is set.
• Cancel the Rating function or change
the rating level.
The remote control
does not work properly.
• There is an obstacle in the path of the
remote control and this unit.
• Remove the obstacle.
• The batteries in the remote control are
exhausted.
• Replace the batteries with new ones.
Video tape cannot be
inserted.
• Is the cassette compartment empty?
• Eject the tape in.
No Hi-Fi sound
• Audio mode is not set properly.
• Select “STEREO” by repeatedly pressing
“AUDIO” on the remote control.
13
m
■n
m
13
m
z
o
m
Video Head Cleaning
Dirt accumulating on the head after a long period of time can cause the playback picture to become blurred or broken
up. High quality video cassette tapes will not normally deposit dirt onto the video head, but old or damaged tapes
might. Clean the video heads with a commercially available video heads cleaning tape.