The front panel, Thunderbass amplifier, Bx-2115 – Crate Amplifiers BX-2115 User Manual
Page 4
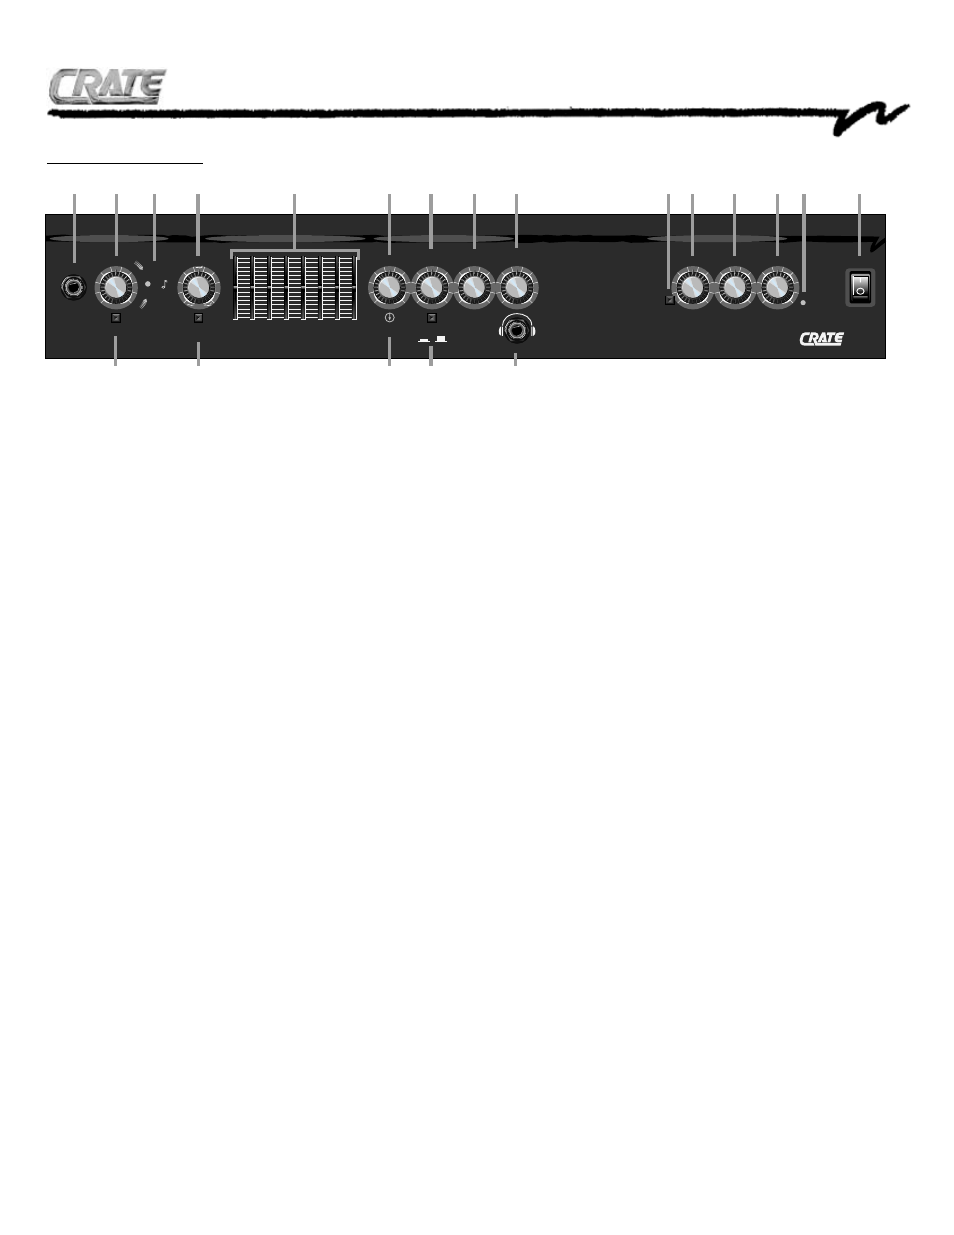
1. INPUT:
Connect your bass to the
amplifier here.
2. GAIN:
Use this control to properly
match the output of your bass to the
amplifier. With the amp’s Master level
control at “0”, begin playing your bass as
you normally would. Watch the adjacent
LEDs (#4) as you turn up the Gain con-
trol: the proper setting for the Gain con-
trol is the one where the “OK” LED lights
most often while playing. If the
“Decrease Gain” LED stays lit even with
the Gain control turned down low, press
in the -15dB button (#3) and continue
adjusting the Gain control until the prop-
er setting is obtained.
3. -15dB:
If your bass has active elec-
tronics or “hot” pickups, its output signal
may need to be padded to get the best
signal to noise setting from the Gain con-
trol. If the “Decrease Gain” LED stays lit
with the Gain control turned down low,
press in the -15dB button.
4. LEDs:
These three LEDs are your
guide to properly setting the Gain con-
trol. Follow the steps given for the Gain
control (#2) until the “OK” LED lights
most often while you play.
5. CONTOUR:
This control allows you
to make additional changes to your tone
and is active only when the Contour
On/Off switch (#6) is pressed in. As the
“wave” icons indicate you can enhance
both the lows and highs at the same
time, or add mid punch.
6. CONTOUR ON/OFF:
Use this
switch to engage the contour circuitry.
With the switch pressed in, the Contour
control (#5) is active.
7. EQUALIZATION:
This eight-band
graphic equalizer allows you to custom
tailor your tone. Each slider controls the
frequency indicated directly below it and
offers a cut or boost of 10dB at various
frequencies from 40Hz to 16kHz
8. MASTER LEVEL:
Use this control
to set the output level of the amplifier.
This controls the signal level at the
Speaker Output jacks (#24), as well as
the Preamp Out jack (#22).
9. LIMIT:
The amplifier employs
Crate’s
APM
Automatic
Power
Maximizer protection circuitry to keep
the output distortion-free even at high
volume levels. Whenever the output
nears its clipping point, the limit circuit
kicks in to keep the output clean. The
Limit LED lights up when the APM lim-
iter circuit is activated. Occasional flash-
ing of the LED is normal. Very frequent
flashing or constant illumination indicates
the output level is too high; reduce the
Master level control and/or your instru-
ment’s output until the LED flashes less.
10. LINE OUT LEVEL:
This controls
the level of the signal at the Balanced
Line Out jack (#25). You may also use
this output (or the headphone jack, #14)
to run a signal to a tuner.
11. POST/PRE :
This switch selects the
tap point for the signal at the Balanced
Line Out jack. With the switch out, the
signal is tapped before the eq, contour
and effects loop (“pre”). With the switch
pressed in, the signal is tapped after the
eq, contour and effects loop (“post”).
12. EFFECTS BLEND:
This control
proportions the amount of effect added
to the signal going to the power amp
stage. At the “0” position the signal is
“dry” (no effect added); as you bring the
control towards “10” the amount of
effect applied increases. (“5” is a 50/50
blend of dry signal and effects.)
13. HEADPHONES LEVEL:
This con-
trol adjusts the signal level at the
Headphones jack (#14).
14. HEADPHONES:
Plug a pair of
stereo headphones in here for private lis-
tening. The signal at this jack is post Gain
and post EQ. The level of the signal here
is determined by the setting of the
Headphones Level control (#13). Using
headphones does not disable the speak-
er outputs or the internal speaker (BX-
2115). You may also use this output (or
the line out jack, #25) to run a signal to
a tuner.
15-19, Chorus Section, BX-2115/2115L
Only
15. CHORUS ON/OFF:
This switch
turns the Chorus section on when
pressed in, off when switched out.
16. SPECTRUM:
This control allows
you to adjust which frequencies (from
the entire range to only above 500Hz)
are enhanced by the chorus effect. The
further to the left (toward “Full”) you
turn the control the broader the spec-
trum of the chorus effect.
17. DEPTH:
This control sets the
amount
of
chorus
enhancement:
towards “0” for less, towards “10” for
more.
18. RATE:
This control sets the speed for
the chorus effect: towards “0” for slower,
towards “10” for faster.
19. ACTIVE:
This LED lights when the
chorus effect is engaged. The LED puls-
es in relation to the rate of the chorus.
20. POWER:
This two-position switch
turns the amp on and off, “on” being the
UP position. The switch lights up when
the amp is turned on.
The Front Panel:
BX-2115
E Q U A L I Z A T I O N
M A S T E R
C H O R U S
I N P U T
INPUT
CONTOUR
GAIN
CONTOUR
ON/OFF
– 15dB
MASTER
LINE OUT
LEVEL
EFFECTS
BLEND
HEADPHONES
LEVEL
LIMIT
®
SPECTRUM
DEPTH
RATE
ACTIVE
CHORUS
ON/ OFF
HEADPHONES
POWER
POWER
OK
INCREASE
GAIN
DECREASE
GAIN
0
1
10
2
3
5
7
9
8
4
6
1
2
3
7
9
8
4
6
0
1
10
2
3
5
7
9
8
4
6
0
1
10
2
3
5
7
9
8
4
6
0
1
10
2
3
5
7
9
8
4
6
0
1
10
2
3
5
7
9
8
4
6
0
1
10
2
3
5
7
9
8
4
6
FULL
500
250
0
1
10
2
3
5
7
9
8
4
6
40
100
225
625
1.6k
4k
8k
16k
POST/PRE
1
4
4
2
4
5
7
8
10
12
13
16
17
18 19
15
20
3
6
9
11
14
BX-220H / BX-2115
BX-220H / BX-2115
ThunderBass Amplifier