Turn off at the mains before cleaning, Control panel, Oven section – Beko BE61FS User Manual
Page 6: Models with removeable inner glass panels, Warning, Door, Over time, Manual cleaning, Mains cable routing, Important
Attention! The text in this document has been recognized automatically. To view the original document, you can use the "Original mode".
care £j cleaning
I
Turn OFF at the mains before cleaning.
• Before switching on again ensure that all
controls are in the OFF position.
• Make sure that the oven and grill are
sufficiently cool before you start cleaning.
Control panel
Wipe over the control panel with a damp cloth
and polish with a dry cloth. Do not use oven
cleaners or aerosols, scouring pads or abrasive
powder for cleaning the plastic knobs or end
caps as damage will occur. Do not attempt to
remove any of the control knobs from the
panel as this may cause damage and is a safety
hazard.
Oven Section
Before switching on again ensure that all
controls are in the OFF position. Remove all
trays and the grill pan out of the oven. Clean
out the interior with moist, soapy cloth. Then,
clean it once more with a wet cloth and let it
dry.
Do not use dry powder agents for cleaning.
Special cleaners that are commercially available
may be used after carefully reading the warning
that are written on the labels.
Models with removeable inner glass
panels
When you wish to clean the interior glass of the
oven door, use a screwdriver to remove the top
and bottom washers that secures the interior
glass to the door, remove the glass with care.
Clean as above, but do not use house hold
detergents, bleach, scouring pads or rust
re movers. After drying, position the gasket back
into its place, reinstall the glass panels carefully
preventing sudden shocks.
Warning!
Never clean the inside of the oven and trays
with hard brushes, steel pads or knives.
Do not use cleaning agents containing acid or
chlorine on stainless steel surfaces or the
handle. Cleaning can be accomplished using
a soft cloth wetted with soapy water or with
commercially available special surface cleaners
and a soft cloth.
Door
Wipe over the door outer panels with a cloth
wrung out in hot soapy water, then after wiping
with a cloth wrung out in clean water, dry with
a soft clean cloth. Do not use scouring pads or
abrasive powder which may scratch the surface.
Take care during cleaning not to damage or
distort the door seal. Ensure that the door seal
is dry after cleaning. Do not lift the door seal.
Over time...
• Slight discolouration of liners and other
surfaces may occur in time. This does not
affect the functioning of the appliance.
• Discolourations and marks that occur on
the ceramic hob are normal and not a fault.
Manual cleaning
The wire-shelves supports can be removed for
cleaning.
Un hook the supports to the side walls wipe
over with a soapy cloth.
Do not use oven clearners aerosols, scoring pads
or scoring powders, polish with a dry cloth.
13
electrical connection
f
f
Do not connect the appliance to the
electricity supply until all packing and
transit protectors have been removed.
Before your appliance is connected to the
mains electricity supply, check to ensure
that the voltage and frequency shown on
the rating label corresponds with your power
supply. You can see the label below the
cavity when you open the oven door.
This product must only be installed by a
qualified electrician, eg local electricity
company or a NICEIC registed contractor,
to a suitable double-pole control unit with
a minimum contact clearance of 3 mm in
all poles and with a minimum rating of 16
A which should be filted adjacent to ( but
not above) the appliance in accordance with
lEE regulations. Failure to observe this
instruction may result in operational
problems and invalidation of the product
warranty.
This appliance must be earthed.
The mains cable must pass through the cable
clamp.
If the supply cord is damaged, it must be
replaced by a similarly qualified person in
order to avoid a hazard.
The cable length should be 2m max for
isolation safety.
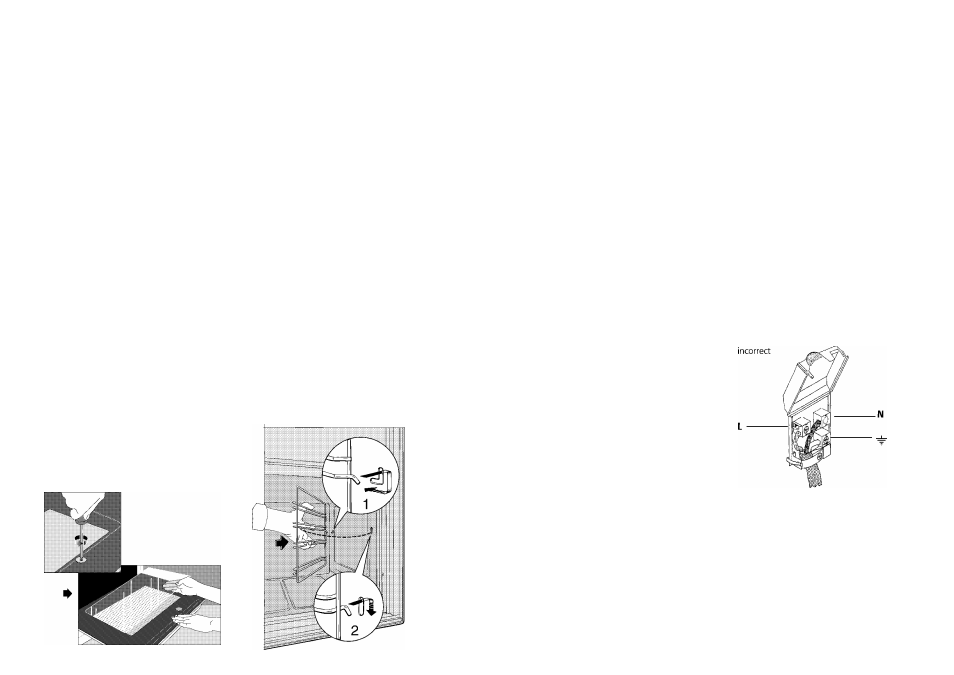
Mains cable routing
The mains cable should be routed away from
the appliance, the ventilation slots and the vent
outlet.
It should not be obstructed when pushed in to
position between the appliance and the wall
or cabinet.
A cable of the correct size rating must be used.
Cable type N05 V V-F 3x1.5 mm2
As the coloured wires in the mains lead for the
appliance, may not correspond with the coloured
markings identifying the terminals in your spur
box, proceed as follows:
The earth wire must be connected to the
terminal which is marked with the letter E or by
the earth symbol ~ .
The wire coloured black/blue must be connected
to the terminal which is marked with the letter N
(Neutral).
The wire coloured brown/red must be connected
to the terminal which is marked with the letter L
(Live).
Important
This appliance is intended to be permanently
connected to fixed wiring.
We will not be liable in the event of an accident
resulting from non existent, faulty or