Safety rules for staplers, Power supply, Trigger lock – Black & Decker 9701 User Manual
Page 2: Controlled power, Jamming, Staples, M ^ yi, Vl\n, Double-insulation, Extension cords
Attention! The text in this document has been recognized automatically. To view the original document, you can use the "Original mode".
Safety Rules for
Staplers
1.
DONOTAnEMPTTODRIVE
STAPLES WITHOUT FIRMLY
ENGAGING THE WORK SURFACE.
2. UNLOAD STAPLES BEFORE
STORAGE.
CAUTION: When stapling into walls,
floors or wherever "live" electrical wires
may be encountered, DO NOT TOUCH
ANY METAL PARTS OF THE TOOL! Hold
the tool only by the plastic handle to
prevent electrical shock if you staple
into a "live" wire.
Double-Insulation
Your Stapler is DOUBLE-INSULATEB
to give you added safety. This means
that it is constructed throughout with
TWO separate “layers" of electrical
insulation or one DOUBLE thickness of
insulation between you and the tool's
electrical system.
Tools built with this improved
insulation system are not intended to be
grounded. As a result, your tool is
equipped with a two-pronged plug
which permits you to use any
conventional 120 volt electrical outlet
without concern for maintaining a
ground connection.
NOTE: DOUBLE-INSULATION does
not take the place of normal safety
precautions when operating this tool.
The improved insulation system is for
added protection against injury resulting
from a possible electrical insulation
failure within the tool.
CAUTION: When servicing Double-
Insulated Tools, USE ONLY IDENTICAL
REPLACEMENT PARTS. Replace or
repair damaged cords.
Power Supply
Make sure that your power supply
agrees with the nameplate marking on
your stapler. Your stapler was designed
to operate on 120 Volts AC Only. This
means standard 120 volt household
power. All Black & Decker tools are
factory tested, if this tool does not
operate, check the power supply.
Extension Cords
Double-Insulated tools have 2 wire
cords, and can be used with 2 wire or 3
wire extension cords. Only round
jacketed extension cords should be used,
and we recommend that they be listed by
Underwriters' Laboratories (U.L.j. If the
extension will be used outside, the cord
must be suitable for outdoor use. Any
cord marked as outdoor (the letters
"WA"
on the cord jacket indicate a cord
recommended for outdoor use) can also
be used for indoor work.
An extension cord must have
adequate wire size (AWG or American
Wire Gauge) for safety, and to prevent
loss of power and overheating. The
smallerthe gauge number of the wire
the greater the capacity of the cable,
that is 16 gauge has more capacity than
18 gauge. When using more than one
extension cord to make up the total
length, be sure each individual extension
contains at least the minimum wire size.
MINIMUM WIRE GAUGE
REQUIREMENTS FOR THIS STAPLER:
UP TO 25 FEET —16 GAUGE
UPTO 50 FEET —14 GAUGE
Before using an extension cord
inspect it for loose or exposed wires,
damaged insulation, and defective
fittings. Make any needed repairs or
replace the cord if necessary. Black &
Decker has extension cords available
that are U.L. listed for outdoor use.
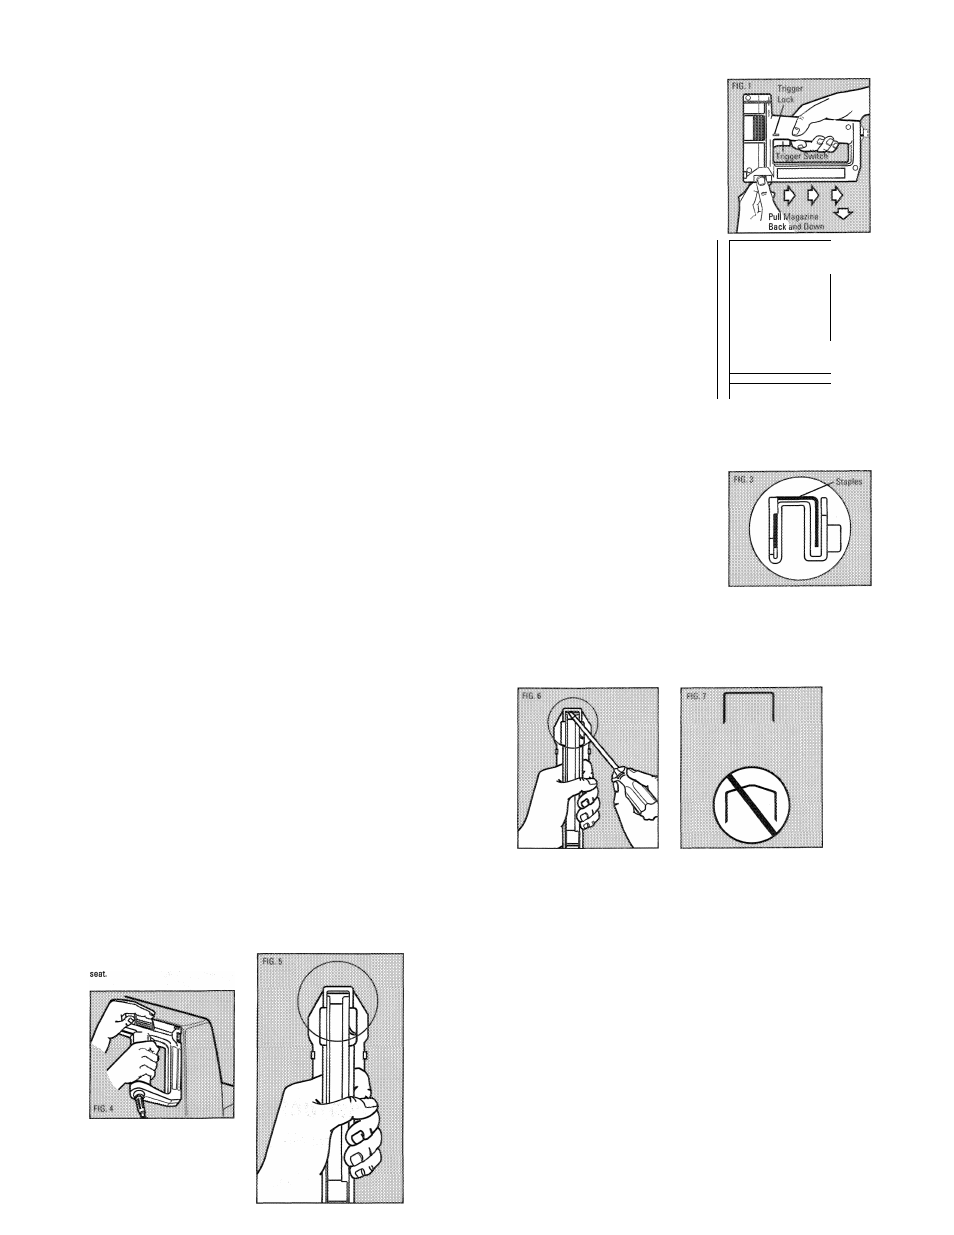
Loading Staples
(UNPLUG Stapler From
Power Supply)
1. Grasp the stapler as shown in
Figure 1 and pull the magazine
back and down as indicated by
the arrows. This will unlock and
open the magazine.
2. Load the staples as shown in
Figures 2 and 3.
3. Close the magazine by swinging it up
into place and pulling it back as you
did in Figure 1. When released, it will
lock itself automatically.
m ^ Yi '
Trigger Switch
L t
The trigger switch is located on the
1 I
k
underside of the handle, as shown in
\Vl\N
Figure 1. A staple will be driven each
time the trigger switch is depressed.
NOTE: The switch must be released after
each staple.
VI
MAKE SURE YOUR FINGER IS NOT
\\
DEPRESSING THE TRIGGER SWITCH
\
WHEN PLUGGING THE TOOL INTO THE
Itsplci
\
POWER SUPPLY. THIS WILL CAUSE THE
STAPLER TO FIRE IMMEDIATELY.
\ \\
Trigger Lock
Your stapler is equipped with a trigger
lock to prevent accidental firing. It is
located just above the trigger switch as
shown in Figure 1. To unlock the trigger,
push the lock button to the right until it's
flush with the stapler body. To lock the
trigger, push the lock button (from the
right side of the tool) to the left.
DO NOT ATTEMPT TO DISABLE OR
OVERRIDE THE TRIGGER LOCK IN ANY
WAY.
liiilllliiil
Controlled Power
Your stapler has been engineered to
deliver the optimum power for each
stroke in practically any material. What
this means is that when you're working
with hard materials, the tool has plenty
of power to drive most staples flush to
the surface. When you're working with
soft fabric or plastic foam, the stapler
will drive staples flush to the surface but
no deeper. Material is held firmly but not
torn through.
Stapling
Hold the stapler as shown in Figure 4
with one hand holding the handle and
the other hand pressing firmly down on
the top of the tool to hold the base
against the material being stapled.
If you find that the tool is not driving
the staples fully into the wood, use a
shorter length staple. Generally
speaking, the optimum staple length is
the longest that the stapler will fully
Jamming
In the event that your stapler should
ever become jammed, it's a very simple
task to clear the jam and continue the
job.
Follow the steps below to clear a
jammed stapler.
1. UNPLUG the stapler.
2. Closely examine the underside of the
tool and compare it to Figures. If the
striker is stuck down as shown in
Figure 5, gently push it back in with a
screwdriver as demonstrated by
Figure 6.
3. If the striker is not stuck down and
the stapler is jammed, a staple must
be misaligned in the magazine. Clear
the stapler by opening the magazine
and removing any misaligned or
jammed staple.
4. Close the magazine and continue
working.
Staples
For best results, the use of Black &
Decker staples is recommended.
However, your stapler has been
designed to accept most major brands of
staples that are commonly available.
The accessories and fasteners listed
in this manual are available at additional
cost from your local dealer or Black &
Decker Service Center.
If you need assistance in locating any
accessory or fastener, please contact;
Black & Decker (U.S.) Inc., User
Services Dept, Black & Decker (U.S.),
Inc. 701 E. Joppa Rd. Towson, MD 21286
Recommended accessories and
fasteners for use with your tool are
listed below. CAUTION: The use of any
other accessory or attachment might be
hazardous or cause damage to the tool.
A few staple manufacturers produce
staples like the one shown in Figure 7.
Your stapler will drive these staples but
they will not feed properly and their use
is not recommended.
For best results, use only Black &
Decker staples. Black & Decker makes
staples in five different leg lengths and
three widths. All of them fit in your 9701
Stapler.
STAPLES (Box of 1,000)
.50 ".WIDE .050" WIRE
1/4" H-Duty Staple
5/16" H-Duty Staple
3/8" H-Duty Staple
1/2" H-Duty Staple
9/16" H-Duty Staple
9/16" Ceiling Tile Staple
.42" WIDE (also fit Arrow
Staplers)
.050" WIRE
1/4" H-Duty Staple
5/16" H-Duty Staple
3/8" H-Duty Staple
1/2" H-Duty Staple
9/16" H-Duty Staple
9/16" Ceiling Tile Staple
.52" WIDE (also fit Swingline
Staplers)
.050" WIRE
1/4" H-Duty Staple
5/16" H-Duty Staple
3/8" H-Duty Staple
1/2" H-Duty Staple
9/16" H-Duty Staple
9/16" Ceiling Tile Staple
CAUTION: THE USE OF ANY OTHER
FASTENERS MIGHT BE HAZARDOUS.
We strongly recommend that Safety
Glasses be worn when using this tool.