Maintenance by qualified service personnel, Starting a boiler that has a manual pilot ignition – Bryant 39006DP4-A User Manual
Page 5
Attention! The text in this document has been recognized automatically. To view the original document, you can use the "Original mode".
step 8
Step 9
Step 7— Replace the control access door (if applicable).
Step 8— Set the room thermostat temperature selector
slightly above room temperature to start your
boiler.
Step 9— The pilot ignition system now begins sparking and
the pilot flame lights. After a 40- to 70-second time-
delay that takes place while the system is auto
matically verifying that a pilot flame has been es
tablished, the gas valve opens, permitting gas to
flow to the main burners, and the pilot lights the
burners. Now set the temperature selector on your
room thermostat to your personal comfort setting.
\VAIl\I.\(r:
If
tlie
uiloi
faiN
lo
light,
or
the
rnmn
burners fail In light, 'hut nownyour linile>‘iSeo iirn-
eedures in this section, i .nticl call \'our ilt'.ale'’ for service.
Starting a boiler that has a manual pilot
ignition
After you have familiarized yourself with the procedures
that must be followed, and all the applicable warnings and
cautions that appear in the “Boiler Startup and Shutdown”
section of this manual, proceed as follows to start your
manual-ignition-type boiler.
\
Step 1
Step 2
Step 1-
Set your room thermostat to the lowest tempera
ture setting.
Step 2— Turn OFF the electrical supply to your boiler
(if applicable).
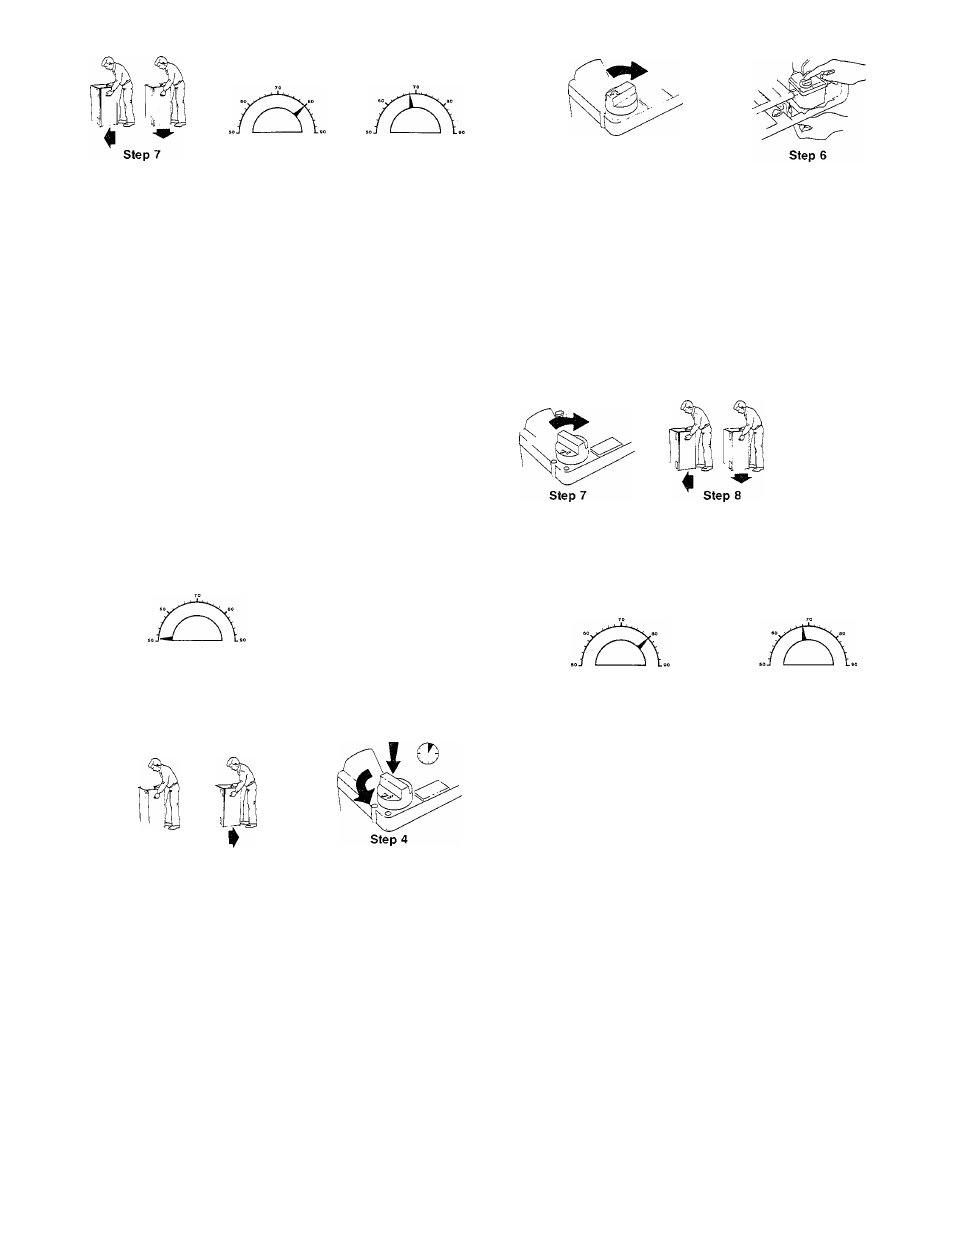
Step 3—
Step 4—
Step 3
Remove the boiler control access door (if appli
cable). See Figure 3.
Depress the control dial on the gas valve and
turn the control dial to the OFF position. Wait
5 minutes.
Step 5
Step 5— After waiting 5 minutes, turn the control dial on
the gas valve to PILOT position.
Step 6— Place a lighted match or other suitable source of
flame near the top of the pilot, depress the con
trol dial on the gas valve, and hold it down. Pilot
will light. Continue to hold dial down for at least
60 seconds. Release the control dial. The pilot will
remain lit.
NOTE: if the pilot flame does not remain lit, repeat steps 1
through 5; however, hold control dial down for a longer
period of time (at least 90 seconds). If the pilot flame does not
remain lit after this second attempt, the thermocouple
should be checked for a possible malfunction. Call your
dealer for service.
Step 9
Step 7 — After a pilot flame has been established, turn the
control dial on the gas valve to the ON position.
Step 8— Replace the boiler control access door (if
applicable).
Step 9— Restore power to your boiler (if applicable).
Step 10-
Step 11—
Step 10
Step 11
Set the room thermostat temperature selector
slightly above room temperature to start your
boiler.
Boiler main burners should light shortly after
your room thermostat is set to “call for heat.”
Now set the temperature selector on your room
thermostat to your personal comfort setting.
W.MJNINC: If ihc main burners fail lo lighi, >niil
down your boiler ami call yoiii' dealer for .-ierviee.
NOTE: To conserve energy when the heating season has
ended, you should shut down your manually ignited pilot.
Follow the procedures in “Shutting Down Your Boiler” at
the beginning of this section.
Maintenance by Qualified Service Personnel
At least once every year, your boiler should be inspected by a
trained and equipped service person. During this inspection,
the qualified service person should at least:
1. Inspect, clean, and lubricate pump motor as required on a
PW Boiler.
2. Inspect all flue product passages including the burners,
pilot, heat exchanger drafthood, vent pipe, and vent
damper (if installed).
3. Inspect all combustion and ventilation air passages and
openings.
4. Inspect electrical wiring, connections, and components
for loose connections.
5. Check gas pipes leading to, and inside of, your boiler for
leaks.
6. Readjust the air/gas mixture if the burner flames are not
bright blue.
7. Perform an operational checkout to determine whether
your boiler is working properly, and if it requires
adjustments.
8. Check all safety controls such as safety pilot, limit switch,
pressure relief valve, etc. for proper operation.
9. Blow down low-water cutoff and check it for proper
operation.