MTD 439-305 User Manual
Parts list for spreader, Mtid t^roducts i3src
Attention! The text in this document has been recognized automatically. To view the original document, you can use the "Original mode".
MTD
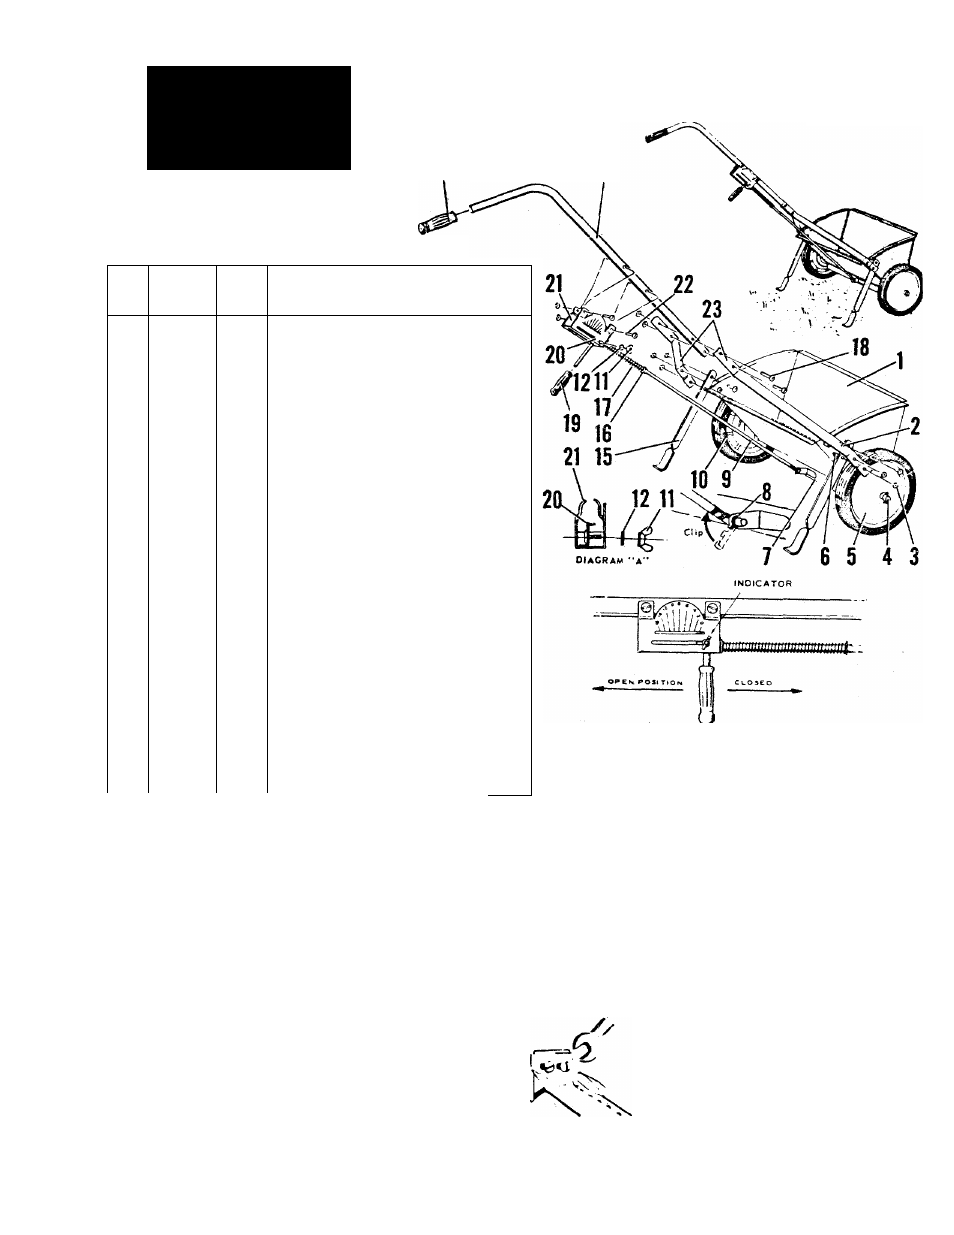
PARTS LIST FOR SPREADER
MODEL 439-305
13
!4
10 CENTS
Ulus.
No.
Part
No.
Price
Description
( ) - No. Required Per Assembly
1
371-2075 $5.00
Hopper - Complete with Agitator, axle
and bearings
305-1387
.20
Bearings in Hopper
2
710-192
.20* 10-24
X
3/8" Lg. Truss Hd. Mach.
Sew. (8)
3
712-425
.20* 10-24 Square Nut (14)
4
714-507
.20* 3/32
X
3/4 Lg. Cotter Pin (2)
5
503-4009
2.30
Drive Wheel with tire
6
710-473
.20* 10-24x1/^ Lg. Truss Hd. Mach. Sew. (2)
7
310-2080
.90
Shutter Bar
8
716-508
.20
Clevis Clip
9
310-2083
.80
Control Rod
10
503-4006
2.30
Free Wheel with Tire
11
712-148
.20* 10-24 Wing Nut
12
736-147
.20* No. 10 External Lock Washer (5)
13
305-2091
.30
Grip - Handle
14
312-2081
1.00
Handle
15
312-2087
1.00
Leg (2)
16
736-235
.20* Flat Washer (2)
17
732-497
.50
Spring
18
710-144
.20* 10-24x1%” Lg. Rd. Hd. Mach. Sew. (2)
19
720-500
.30
Grip - Control Rod
20
310-4357
.50
Indicator Bracket
21
310-2084
.50
Control Bracket
22
710-467
.20* 10-24x1" Lg. Truss Hd. Mach. Sew. (2)
23
312-2082
.50
Handle Braces (2)
+
312 ■awa:
.80
Pivot Bracket (2)
+
»37$
l.SO
Screw Pack
+ Not shown in illustration
* Available locally
ASSEMBLY INSTRUCTIONS
1. Attach top hole of legs to hooper with 3/8 long bolts and
nuts.
2. Lap arms over legs, as shown, and fasten with two 3/8
long bolts and two Vi bolts and nuts.
3.
Assemble control bracket and indicator as shown in
diagram “A”.
4. Slip control bracket on handle and fasten with the two
1” long bolts and nuts. (Do not reverse control bracket).
5. Secure handle to arms with two 1(4 long bolts and nuts.
5. Washer, spring, washer should be on rod as shown. Insert
this into control bracket from bottom and swing rod into
position.
7. Straddle clip over shutter bar hole. Slip rod thru clip and
shutter bar. Then swing clip up on rod. This must be on as
shown in order to have free shutter action.
8. Complete assembly by^adding both grips.
• Spreader should always be in closed position when
setting is made or when loading hopper. • When rod is
off indicator hook and down, it’s in closed position.
• Make setting by sliding indicator to desired opening
and tightening wing nut. When ready to operate just
hook rod on indicator. • To determine setting refer to
chart. Some experimentation may be necessary be
cause of variations of different products.
CARE OF SPREADER
- Before putting spreader away
flush hoppeiK agitator, and shutter with water. If seed is used,
washing is not necessary. Cover bottom of hopper with a
light film of oil to prevent corrosion...When spreader is not in
use store in closed position. This prevents prolonged tension
on spring...Avoid using damp materials or exposing spreader
to rain.
Shutter should open evenly and be snug
on entire length of hopper.
If adjusting your shutter becomes nece
ssary, invert the spreader and loosen
the four bolts slightly. Tap shutter into
correct position and retighten.
Shutter opening should be V4” at #8 indi
cator setting.
MTID T^RODUCTS I3SrC
5389 WEST 130th ST.
P.O. BOX 2741
CLEVELAND, OHIO 44111
FORM NO. 770-1873
IITHO IN U.S.A.