B. extension coed, E. pre-opeiution checks – Sears 257.796362 User Manual
Page 8
Attention! The text in this document has been recognized automatically. To view the original document, you can use the "Original mode".
B. EXTENSION COED
1. Use only a 120 A,C. voltage supply as shown on
the nameplate of the unit to power your blower.
2. The extension cord used to reach the power
source must be:
a. Specifically marked as suitable for out
door use (WA).
b. Heavy enough to carry the current from
the power source the full length of the ex
tension cord to the unit. Otherwise, loss of
power and overheating can occur causing dam
age to the unit. Refer to Figure 8 for minimum
wire gauge recommendations. The cord must be
mar^d with the proper wire gauge. (Appropri
ate extension cords are available.)
c. In good condition. Cord insulation must be
intact with no cracks or deterioration. Plug con
nectors must be undamaged.
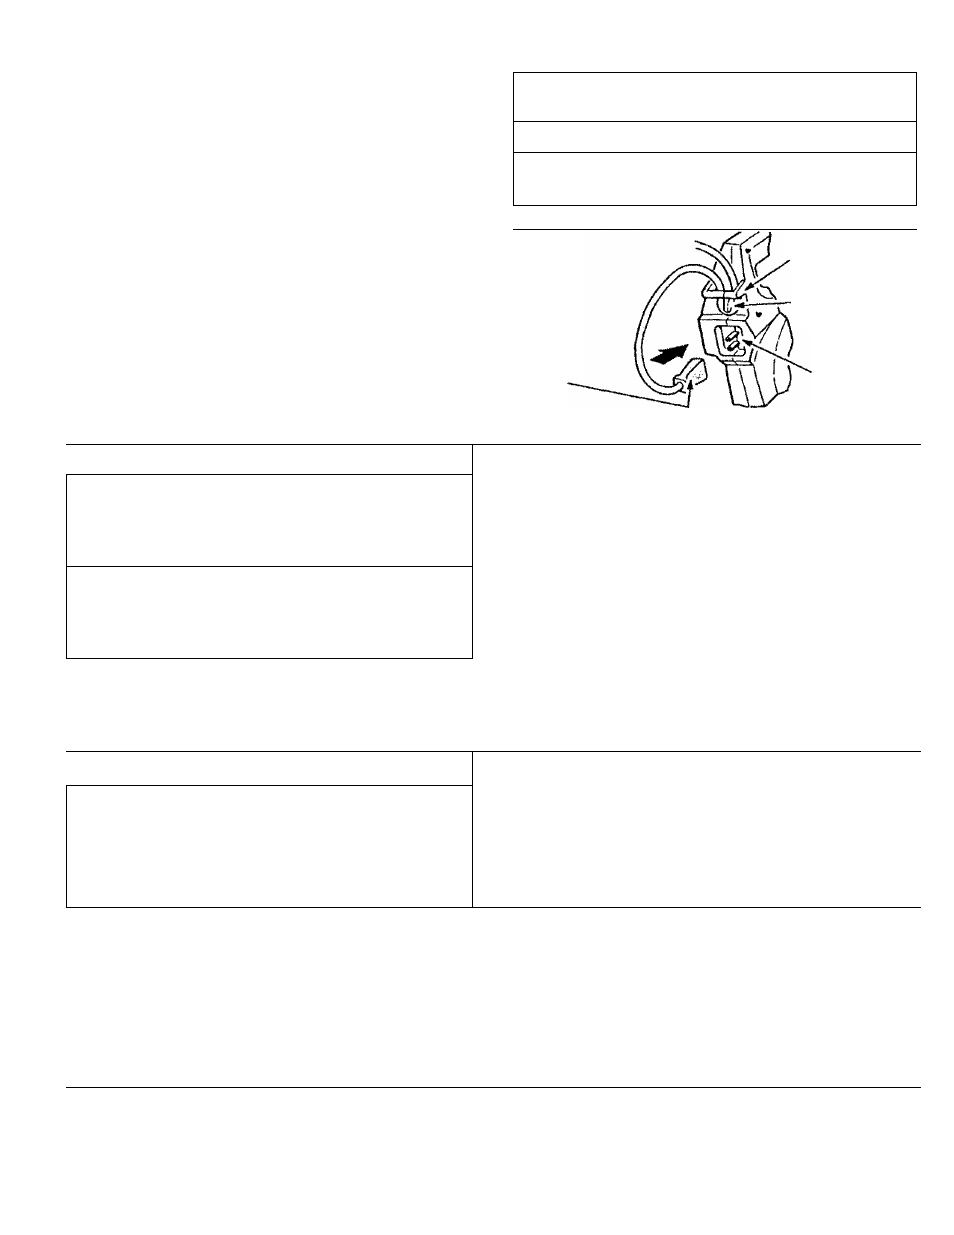
3. Secure extension cord to unit as follows;
a. Loop the extension cord though the cord retain
er and around the hook. Figure 9.
b. Insert cord socket into recessed plug. Figures.
MINIMUM WIRE GAUGE
RECOMMENDATIONS
VOLTS
25 FT.
SOFT.
100 FT.
120
18
16
14
A.W.G.*
A.W.G.*
A.W.G.*
*AiïMïri<»ii Wire Gâug«
Figure 8
Cord
Socket
Cord Retainer
Hook
Recessed
Plug
Figure 9
C. OPERATING TIPS — BLOWER
3. Be careful when working near plants. The
force of the air could damage tender plants.
4. Direct air flow by directing the nozzle down or to
one side.
5. Vary air flow by adjusting the position of switch.
Use low speed when blowing in comers, against
walls, around tender plants, etc. Use high speed
A
WARNING
Do not use the unit as a blower without the blower
tubes properly attached to avoid flying debris
and/or impeller contact which can cause serious
A
WARNING
Always wear eye protection to prevent rocks or de
bris from being blown or ricocheting into the eyes
and face which can result in blindness or other se
rious iiyury.
when blowing in open areas or when vacuuming.
6. Use the assist handle located on the side of the
unit when working above the waist or when a two-
handed grip is desired.
7. Uses For Your Blower;
a. Sweeping debris or grass clippings from drive-
ways, sidewalks, patios, parks, parking lots,
bams, stadiums, etc.
b. Piling grass clippings, straw, or leaves.
c. Removing debris from comers, around joints,
and between bricks.
1.
Always work going away from solid objects
such as walls, large stones, automobiles and fences
2, Clean comers by starting in comers and moving
outward to straight areas to prevent an accumula
tion of debris which could fly into face.
D. OPERATING TIPS — VACUUM
a. Stop the motor and disconnect the power source.
Do not attempt to remove obstructions with the
motor running.
b. Wait until the impeller has completely stopped
turning, then remove the vacuum tube.
c. Carefully reach into the vacuum opening and
clear out debris.
5. The collection bag must he properly emptied
and maintained to avoid deterioration and obstmc-
A
WARNING
Do not use the unit a vacuum without the vacu
um tubes and collection bag properly attached to
avoid flying debris and/or impeller contact which
can cause serious itgury. Always make sure the
collection bag is completely zipped before the unit
is started.
Liuii ui eui iiuw wiuuu wm reuuuu uiu puriui iuaiiuu ui
1. When using your unit as a vacuum, best results the vacuum.
are achieved when the unit is operated at full speed. a. Remove the bag from the unit. Empty after each
2.
Move the unit slowly back and forth over de- use by turning the bag inside out and shaking out
bris to be vacuumed. Avoid forcing the vacuum debris. Do not store bag containing leaves, grass,
tube into a pile of debris as this can clog the unit, etc.
3.
The vacuum can pick up objects that are too b. Wash the bag once a year as follows:
bi^ to pass through the impeller. This type of 1) Turn the bag inside out.
object will fall out of the vacuum tubes when the unit 2) Hang it up.
is stopped. 3) Thoroughly hose it down.
4.
If the unit becomes clogged; 4) Let bag hang until dry.
E. PRE-OPEIUTION CHECKS
Before operating your unit, always;
1, f^CHECK OVER WARNINGS AND SAFETY
INSTRUCTIONS in this Operator’s Manual.
Make certain you completely understand and fol
low each one.
2. »-'CHECK THE UNIT FOR LOOSE BOLTS,
NUTS, OR FITTINGS. Tighten, repair, or re
place parts as necessary. Use only genuine replace
ment parts as recommended by Sears.
-8-