Automatic icemaker and ice & water dispenser – Sears KENMORE 53475 User Manual
Page 9
Attention! The text in this document has been recognized automatically. To view the original document, you can use the "Original mode".
Automatic Icemaker and Ice & Water Dispenser
How it Works
Your refrigerator has
an automatic icemaker
and a dispenser thot
dispenses water, ice
cubes and crushed
ice (on some models)
through the freezer
compartment door
Here's how they work
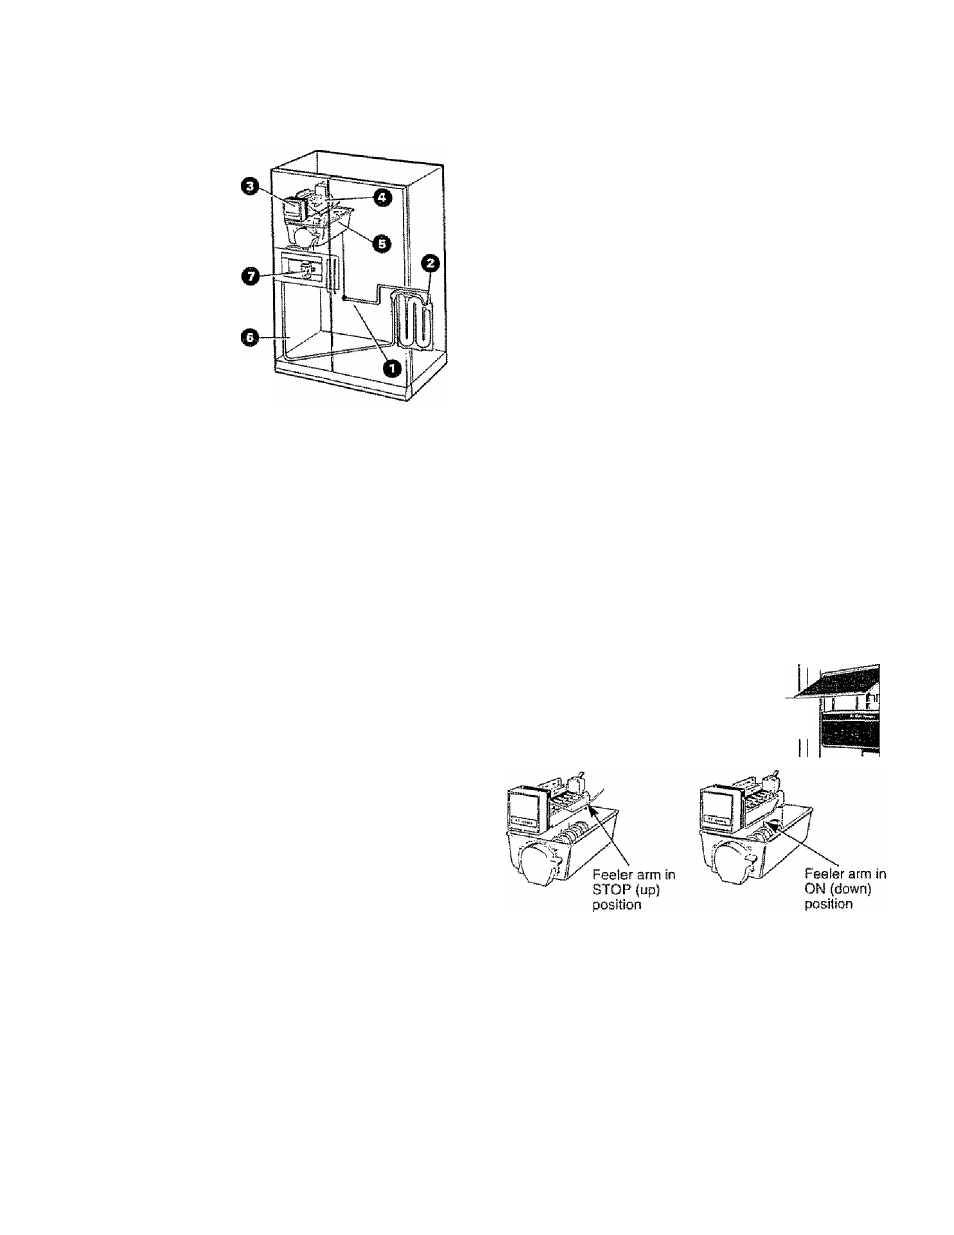
Water flows from the
household supply
through a
{1 j dual solenoid valve to the
(2) water tubing and to the
(3) automatic icemaker as needed
Water is frozen in the
(4) cube mold and ejected into the
¡5) storoge bin where a motor-powered auger moves
cubes forward-
Cubes dispense through the chute in the door when the
pad is pressed-
When the switch is moved to CRUSHED (on some
rrrodelsj, a baffle channels cubes through the crusher
and crushed ice falls through a chute into the glass
Water flows through the
¡6) tubing in the door and Is dispensed when the pad
is pressed,
(7j A light switch (on some models) turns the night light in
the dispenser on or off. The light also comes on when the
pad is pressed
The light in the dispenser should be replaced with a
7 watt maximum bulb when it burns out
Important Facts about Your Ice & Water
Dispenser
• If this is your first icemaker you'll hear occasional
sounds that may be unfamiliar. These are normal
icemoking sounds and are not cause for concern .
• Your icemaker will produce eight cubes per cycle—
approximately 120 cubes in a 24-hour period—^
depending on freezer compartment temperature,
room temperature, number of door openings and
other use conditions.
•
Intermittent dispensing of ice is normal. If ice flow
interruption is more than brief, ice clump(s) may be the
cause and should be removed following instructions in
this section.
• Avoid over filling glasses with ice and using
narrow or extra-tail glasses. This can jam the chute
or COUS3 the door in the chute to freeze shut
Periodically open the freezer compartment door and
look down into the chute If ice is blocking the chute,
poke it through with a wooden spoon
• To help keep bits of ice from being sprayed
beyond the glass, place the glass close to the ice
chute—but not so dose that it blocks out coming ice
• ke should not be dispensed into thin glasses, fine
china or delicate crystal—they can crack or chip
from the combined pressure of your hand pressing
them against the pad and ice dropping into the
container
■ Fill glasses with ice before adding soda or other
beverage mixes. This will prevent splashing which
could cause the ice and water selector switch to stick
• Beverages and foods should not be quick-chilled
in
the ice storage bin. Cans, bottles or food
packages in the storage bin may cause the icemaker
or auger to jam,
• Do not add ice from trays or bags to the storage
bin. It may not crush or dispense well
Before Using Your Icemaker and Dispenser
)f you use your refrigerator before the
water connection is made, raise the
ice access door and make sure the f'f^'
icemaker feeler arm is in the STOP
(up) position
When the water supply has been connected to the
icemaker, move the feeler arm to ON (down) position.
Select WATER then press the dispenser pad for about two
minutes to remove trapped air from the water line and to
fill the water reservoir The ice cube mold automatically
fills with woter after cooling to freezing temperatures. First
cubes normally freeze after several hours..
NOTE: With a newly-installed refrigerator, allow about
24 hours for the Freezer compartment to cool down to
the proper ice-making temperature.