Alignment settings, Transmission tuning – Traxxas 49077 User Manual
Page 24
24 • T-MAXX 3.3 OWNER’S MANUAL
while thicker oils provide more dampening. Use only 100% pure silicone
shock oil to prolong seal life. From the factory, the T-Maxx 3.3 uses 40W oil.
The ride height for the T-Maxx 3.3 can be adjusted by adding or removing the
clip-on spring pre-load spacers. Note that changes in ride height will occur
when changes in shock angle or spring rates are made. You can compensate
for ride height changes by changing the pre-load spacers on the shocks.
Adjusting the Pivot Ball Caps
The pivot ball caps should be adjusted
so that the pivot balls operate freely in the axle
carriers with no excess play. Use the provided
four-way suspension multi-tool to tighten or
loosen the pivot ball cap.
Caster Adjustment
The T-Maxx 3.3 offers the ability to adjust the caster angle of the front
suspension. Caster adjustment may be used to influence the understeer/
oversteer handling characteristics of the T-Maxx 3.3. Increasing the caster
angle will increase the tendency of the truck to oversteer (less traction on
the rear tires, more traction on the front tires), while decreasing the caster
angle will cause the truck to have a tendency to understeer (push in the
turns). This effect becomes more pronounced at higher steering angles
and higher spring rates. Caster is adjusted by repositioning the shims on
the pivot point of the upper suspension arms.
The stock caster setting is 7-degrees with one shim at each end of the
arm. Reduce the caster angle to 4-degrees by removing the rear shim
and inserting it next to the front shim. The caster angle can be increased
to 10-degrees by removing the front shim and inserting it next to the
rear shim.
ALIGNMENT SETTINGS
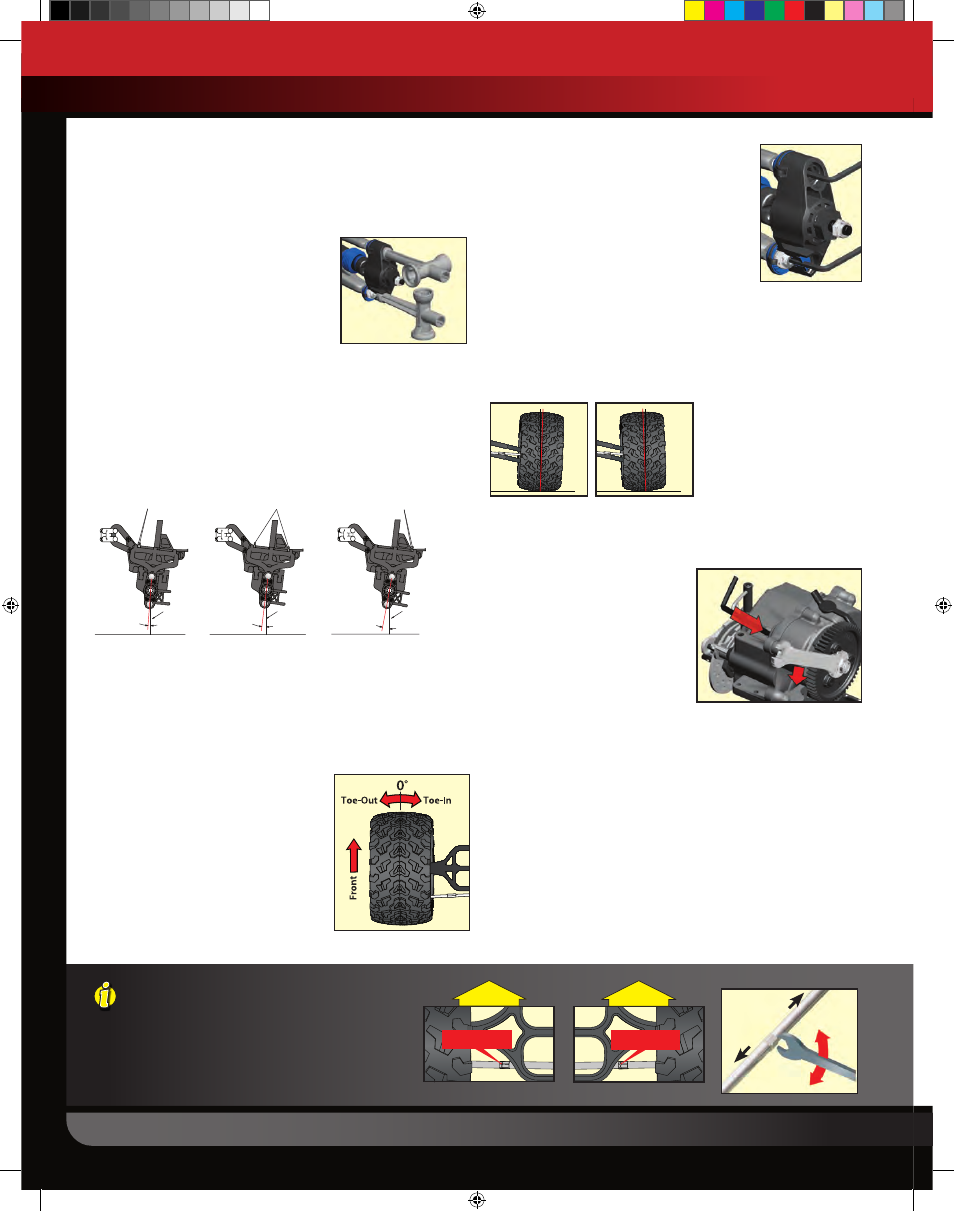
Adjusting the Toe-in
Your T-Maxx 3.3 comes from the factory with
zero degrees of toe-in in the front, and one
degree of toe-in in the rear. You can adjust the
toe-in on the front and rear of the truck. Set the
steering trim on your transmitter to neutral.
Next, adjust your steering turnbuckles so that
both front wheels are pointing straight ahead
and are parallel to each other (0 degrees toe-in).
This will ensure the same amount of steering in
both directions. Adjust the rear toe control links
so that the rear wheels have 1˚ of toe-in.
Static Camber Adjustment
The wheels can be set to have either positive or
negative camber (see illustration below). The camber
angle changes as the wheel moves up and down
through its range of travel. Static camber is the
camber angle at the wheel when the vehicle is set at
its normal, stationary ride height.
The suspension pivot balls located in the axle
carriers adjust the static camber. The pivot balls are
protected by blue dust plugs. To adjust your static
camber, insert the supplied 2.5mm hex wrench through the slit in the dust
plug and engage the end of the pivot ball (compressing the suspension
until the arms are parallel to the ground will allow for easier hex wrench
engagement). The upper pivot ball is normally screwed all the way in.
Negative camber is achieved by screwing the pivot ball of the lower control
arm out. Note: When camber is changed, the toe angle of the wheel has to
be reset.
Static Camber Base
Factory Settings
Front: 1-degree negative
camber each side
Rear: 1-degree negative
camber each side
TRANSMISSION TUNING
Adjusting the Slipper Clutch
Your T-Maxx 3.3 is equipped with an
adjustable Torque Control slipper
clutch. The slipper clutch is integrated
into the main spur gear on the
transmission (see page 5). The slipper
clutch is adjusted using the spring-
loaded locknut on the slipper shaft.
Use the supplied 8mm open-end
metric wrench. To tighten or loosen
the slipper nut, insert the 2.0mm hex
wrench into the hole in the end of the slipper shaft. This locks the shaft
for adjustments. Turn the adjustment nut clockwise to tighten (less
slippage) and counter-clockwise to loosen (more slippage). The slipper
clutch has two functions:
1. Limiting the engine’s torque output to the wheels to prevent
wheelspin on low traction surfaces and help to prevent damage
to the gears in the transmission during on-throttle landings.
2. Protecting the drivetrain from sudden impact or shock loads (such as
landing from a jump with the engine at full throttle).
From the factory, the slipper clutch is set for minimal slippage, to protect
the drivetrain from shock loads. On slippery, low traction surfaces such as
a hard-packed, dry racetrack you may benefit from loosening the slipper
adjustment nut to allow for more clutch slippage. This will make the
All of the toe links are installed on the truck so that
the left hand thread indicators point in the same
direction. This makes it easier to remember which way to
turn the wrench to increase or decrease toe link length
(the direction is the same at all four corners). Note that the
groove in the hex indicates the side of the toe link with the
left-hand threads.
Front of Truck
Left Hand Thread
Indicator
Front of Truck
Left Hand Thread
Indicator
Left Side
Right Side
Front of Truck
Left Hand Thread
Indicator
Front of Truck
Left Hand Thread
Indicator
Left Side
Right Side
Left Hand
Threads
Right Hand
(Normal) Threads
Decrease
Length
Increase
Length
Positive Camber
Negative Camber
TUNING ADJUSTMENTS
Caster adjustment shims (1 Front, 1 Rear)
Caster adjustment shims (2 Front)
Caster adjustment shims (2 Rear)
Vertical
4
Ground plane
7
Vertical
Ground plane
Vertical
Ground plane
10
KC2077-49077-T-Maxx-TQi-Owners.indd 24
6/6/14 11:50 AM