Page 01 – Santec Modern kitchen faucet User Manual
Page 2
PAGE 01
Dear Customer,
Before Proceeding with the assembly it
is advisable to purge the hot and cold
water piping to prevent accumulation of
dirt and residues which could cause
malfunctioning of the mixer.
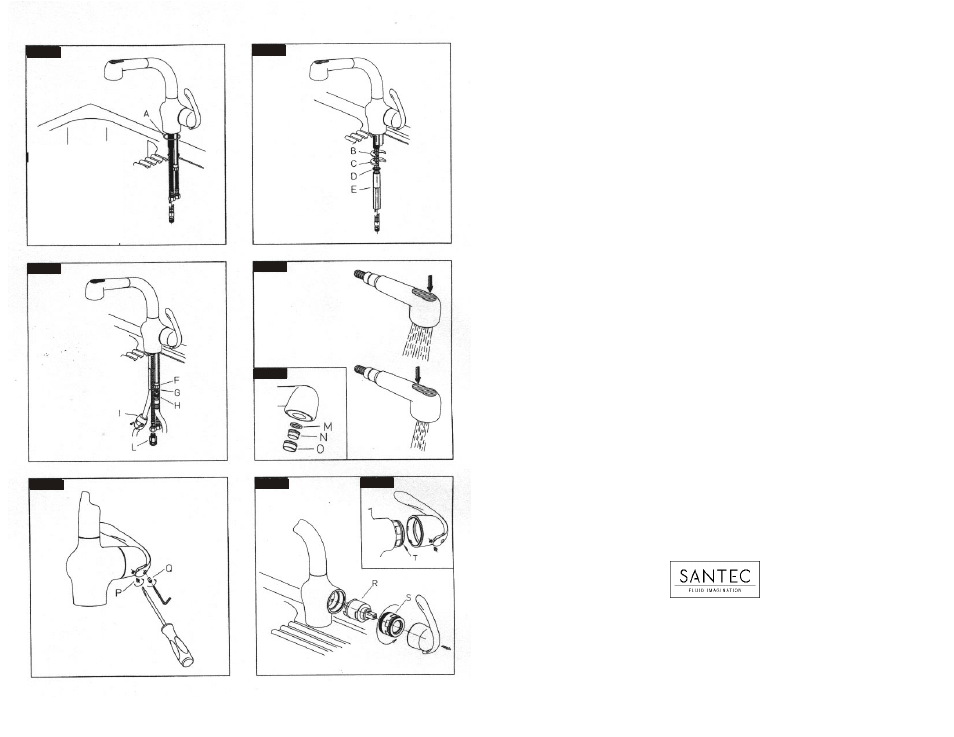
INSTALLATIONS
Fig.1:
Insert the mixer into the hole of the sink
after placing the gasket (A) into the base
of the mixer unit.
Fig. 2:
Fit the flexible tube of the Shower into the
washer (D) and the threaded pipe (E),
interposing the performed gasket (B), and
the flange (C), then block the mixer in
position.
Fig. 3:
Connect the flexible tube of the
shower (H) with the outlet (F) interposing
the gasket (G). Connect the pipe
fittings (L) to the water supply tube (L);
to complete the installation hook the
counter weight on (I) and make
sure the pipe run is long enough to pull
out the hand shower.
Fig. 4:
Test the functioning of the mixer: while
turning the water on the jet flows from
the spout/aerator;press on the front side
of the push button to deviate the flow
back to the aerator; pres on the rear of
the push button to return the flow to the
original position.
MAINTENANCE
Fig. 5:
It’s been advise to periodically clean
the aerator/spout to avoid accumulation
of dirt and residues which could in time
reduce the flow capacity. To dissemble
the aerator unscrew the gasket (o) and
clean the filter (N) of all residues.
To reassemble it, proceed in reverse
making sure to correctly insert the
washer (M). Clean the mixer only with
water and a soft cloth. It is absolutely
not advisable to use solid or liquid
detergents, or in any case soaps of
any kind because they could damage
the treated surface.
Fig. 6- 7 - 8:
If it becomes necessary to replace the
cartridge loosen the screw (P) and the
screw bolt (Q) on the bottom part of
the handle; remove the handle and
the mixer unit and then the fastening
sleeve (S). Remove the cartridge (R)
to reassemble the whole unit proceed
in reverse making sure to clean the
base of the gaskets.
To reassemble the handle check that
the screw (O) be exactly in line with
the threaded ring (T) on the fastening
sleeve.
Fig. 3
Fig. 2
Fig. 4
Fig. 5
Fig. 6
Fig. 7
Fig. 8
Fig. 1