Santec 6580VO User Manual
Spout, Pop-up drain, Spout installation
DESIGNER SERIES VOGUE COLLECTION
SINGLE CONTROL LAVATORY
MODEL: 6580VO10
6580VO75
KEEP THIS INSTRUCTION BOOKLET FOR FUTURE REFERENCE
Important : Please register your product online at www.santecfaucet.com within
30 days of purchase. Santec reserves the right to request additional documents
before servicing warranty requests.
0 3
0 4
0 1
0 2
Effective 01/01/09 - Replaces and supersedes any previously issued warranty
FINISH CARE INFORMATION
SANTEC LIFETIME LIMITED WARRANT
Y
PLEASE REGISTER YOUR PRODUCT ONLINE FOR WARRANTY SERVICE
S
www.santecfaucet.com/registration
1.
2.
3.
4.
Finishes: Santec Polished Chrome, Polished Nickel and Satin Nickel finishes carry a Lifetime
Limited warranty against manufacturing defects and tarnish to the original purchaser with the
exclusion of kitchen drain assemblies which, due to the nature of their use, are not warranted.
Santec recommended custom finishes carry a ten (10) years limited warranty against
manufacturing defects and tarnish to the original purchaser with the exclusion of kitchen and
pop-up drain assemblies which, due to the nature of their use, are not warranted. Kitchen
products carry a three (3) year limited warranty.
Cartridges: Santec Cartridges carry a lifetime limited warranty against manufacturing defects for
the life of the product to the original purchaser.
Parts: Santec parts carry a ten (10) year limited warranty against manufacturing defects, to the
original purchaser. Kitchen products carry a five (5) year limited warranty.
Warranty exclusions and limitations: This warranty does not cover: damage due to negligence,
accident, abuse, improper installation, or improper maintenance such as, but not limited to: heat
from soldering during installation, the use of plumbers putty, damage from tools used during
installation, the use or exposure to chemicals or cleaning products either abrasive or non
abrasive or the use of any cleaning tool or product other than a soft, clean cloth. Pop-up
assemblies are not covered under warranty. This warranty does not cover: changes in the finish
or in the product due to normal wear or aging and does not cover any products or parts which
have been altered or used in a manner not typical for the product. This warranty does not cover
and Santec will not be held liable for damage to products caused by the freight carrier and a
claim should be made immediately to the freight carrier should this occur. This warranty does
not cover any cost involved in the installation, repair, or replacement of any Santec product or
part. This warranty does not cover and Santec will not be held liable for any loss, damages, or
expenses, incidental or consequential whatsoever, originating from the purchase, installation,
use, repair, failure, or replacement of any Santec product or part, as allowed by law. The
product or components of the covered product will either be repaired, refinished or replaced, at
the sole discretion of Santec. Santec reserves the right to examine any product claimed
defective prior to any warranty claim being accepted or processed, at its sole discretion. This
warranty gives you specific legal rights and you may have other rights which may vary from state
to state.
For clear coated or enamel color finishes:
We recommend that all faucets, drains, etc
be gently wiped dry with a soft cloth after use
to avoid water spotting and water deposit
buildup. A mild liquid hand soap, such as
Ivory may be used occasionally if desired.
Use of non-abrasive carnauba wax will add
protection to the finish and should be used if
the faucets will not be dried after use.
For non-clear coated and specialty finishes:
We recommend that all faucets, drains, etc be
gently wiped dry with a soft cloth after use to
avoid water spotting and water deposit
buildup. Use of a non-abrasive carnauba wax
is required occasionally.
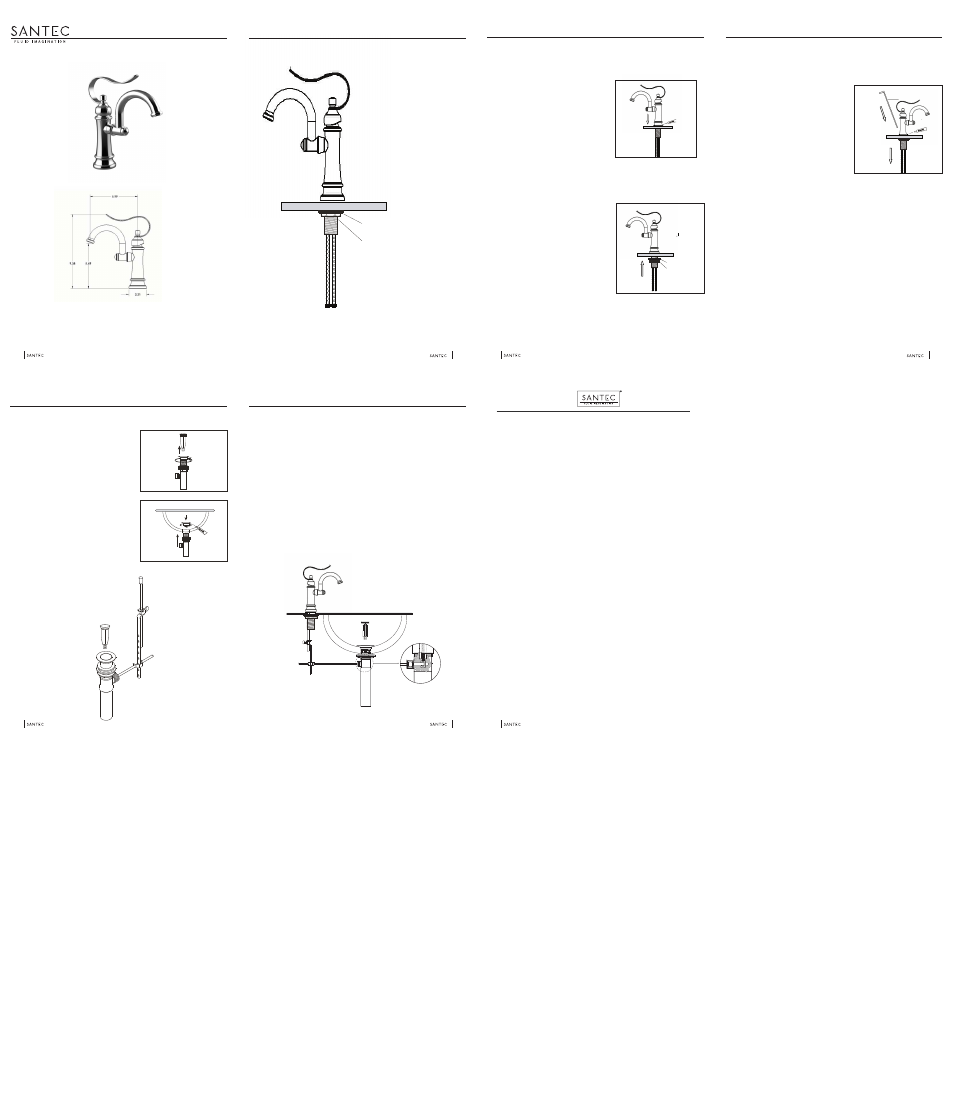
Spout
Hole size for the spout is a minimum of 1-3/8” and a maximum of 1-7/16”.
SPOUT ASSEMBLY IS READY FOR SIMPLE DROP-IN INSTALLATION.
DO NOT DISASSEMBLE.
Spout
Spout Installation
Spout Installation
Remove the washer and lock nut from the valve body.
Apply a ring of silicone caulking around the spout hole on
the sink or counter top (do not use plumber’s putty which
can damage the finish of your faucet).
Insert lavatory assembly through the spout hole. Make
sure to center the lavatory over hole.
A
Re-install the washer and lock nut from below.
Hand tighten lock nut from below while properly aligning
the fixture.
Secure from below with an adjustable wrench and
connect the inlet hoses to the supply lines. Make sure that
the hot inlet hose connects to the hot supply line, and the
cold inlet hose connects to the cold supply line.
B
Carefully fit the lift rod into the back of the fixture.
C
IMPORTANT:
After all the connections have been made from inlet supplies to angle stop, remove the
aerator. Open the lever on the lavatory. Slowly open angle stop from below and flush the lines for
approximately 45 seconds to clean any debris. Turn off the water and reinsert aerator. Debris present in
the line will damage fixture and cause leaking. Failure to flush fixture could result in possibly voiding
warranty.
D
Washer
Lock nut
Spout
0 5
0 6
0 7
Pop-Up Drain
Pop-Up Drain Installation
Remove the drain flange and drain plug from pop-up
assembly.
Do not remove the gasket, washer and lock nut.
Pop-Up Drain
Pop-Up Drain Installation
Insert drain plug into drain flange. Make sure the adjustable eye-screw of the drain plug is
facing back so that the ball rod will properly fit into it.
Insert ball rod washer into drain body followed by the ball rod, 2nd washer and ball rod nut.
Tighten the ball rod nut so that the ball rod moves freely.
Slip the faucet’s lift rod through the holes at the top of the lift rod strap and hand tighten the
thumb screw. Push the ball rod down so the drain plug is in the up position.
Slip one leg of the ball rod clip onto the ball rod and slide the lift rod strap onto the ball rod
using the nearest hole. Then slide the second leg of the clip onto the rod.
Test pop-up for smooth operation and adjust the strap if necessary.
C
A
B
Apply a ring of silicone caulking underneath the drain
flange (do not use plumber’s putty).
Insert the threaded end of the assembly up from under
the sink. Completely thread the drain flange onto the top
of the drain tube.
Tighten the locknut from under the sink.
Drain Plug
Drain Flange
Lift Rod S trap
Ball Rod
Drain Tube
Ball Rod Nut
Ball Rod Clip
Thumb Screw
Lock Nut
Washer
Gasket
Side hole
Lift Rod & Knob
Washer
Lock nut
Lift rod