Component check, Pre-assembly, Assembly – phil&teds kiwi traveller cot User Manual
Page 2: Disassembly, Outside use
Component Check
Open the carry bag of your Kiwi
T
raveller
TM
and check that you have all
components:
•
one Kiwi
T
raveller
TM
•
two thick aluminium pole sets, each of
2 sections
•
four black pre-bent flexi-poles, with
four sections joined with shock-cord
•
one inflatable mattress
•
four pegs
•
optional sun/insect mesh
Check that no component appears
damaged
.
Pre-assembly
Mattress:
•
Remove the elastic strap and unfold
the mattress. Open the inflation valve,
and leave to self inflate. New mat-
tresses often require manual inflation
too.
2 side poles:
•
Assemble each of the two thick
aluminium poles. Each is made up of
two sections - the thin section is
stored within the thick section when
not in use.
•
Remove the black plastic bung from
the end; remove the thin section
inside. Replace bung.
•
Insert the open end of the thin section
into the indented end in the thick
section.
4 flexi-poles:
•
Assemble the four black, pre-bent
poles. Each pole is joined with shock-
cord.
Align each section with the next;
click and form a smooth curve.
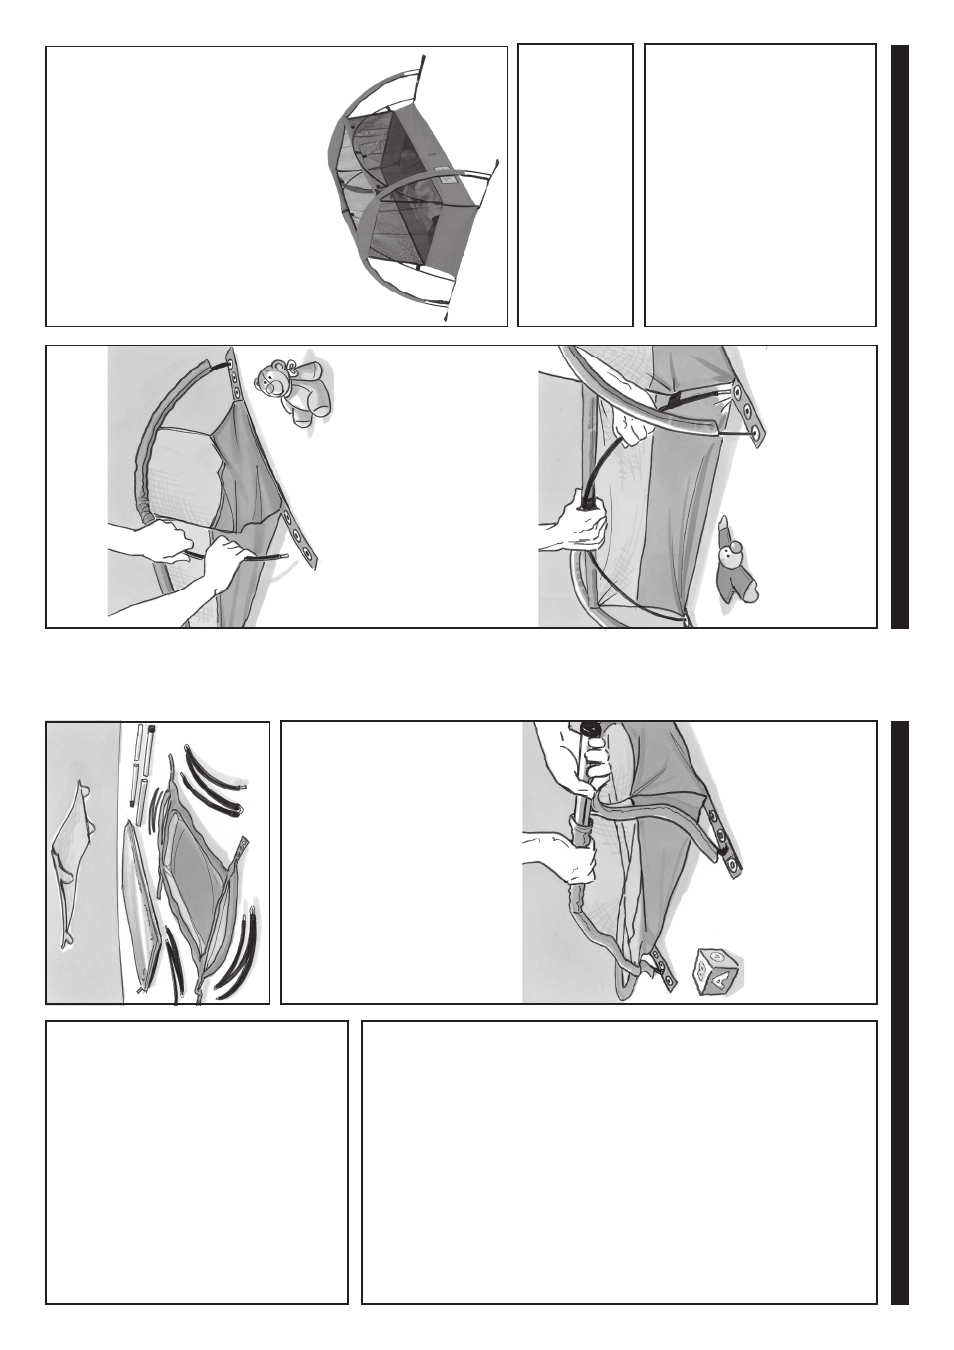
Assembly
Side poles:
1
Insert the two side poles into the fabric
sleeves running along the top sides of
the Kiwi
T
raveller
TM
2
Insert the thin end of each side pole
first, and, when poles are fully in-
serted, fasten velcro end pieces.
These keep the poles in place, which
support the top sides of your Kiwi
T
raveller
TM
3
Unbuckle the clip on each webbing
strap attached to the fabric sleeves
at each end of your Kiwi
T
raveller
TM
Flexi-poles:
1
Insert a flexi-pole into each sleeve.
2
Guide all the way through to the other
side. Insert each pole end into the
outside eyelet on the webbing straps.
3
If you find the pole meets with
resistance at a seam, stop and feed
the end of the pole gently past the
seam. Do not force the pole!
4
Clip buckles together
.
5
Attach two other flexi-poles to the
sides of your Kiwi
T
raveller
TM
6
Pass the pole up through the webbing
loop located where the mesh sides
meet the fabric corner
.
7
Continue, passing the pole through
the webbing loop at the centre of
each side.
8
Continue down, passing the pole
through the webbing loop on the other
end.
9
Guide each pole through the eyelets
on the webbing strap, closest to the
cot .
10
Place the mattress inside. If not fully
self-inflated, manually add air before
closing the valve.
Y
our Kiwi T
raveller
TM
is now assembled.
Check that it matches the diagram.
Disassembly
1
Reverse the procedure above.
2
Store in carry bag
3
Ensure your Kiwi
T
raveller
TM
is not
stored damp.
Outside Use
•
Always use pegs to secure Kiwi
T
raveller
TM
outdoors.
•
Pass pegs through the middle eyelet
on each webbing strap.
•
Attach the optional sun/insect mesh to
help protect your child from the
elements. Fasten the velcro on the
ends of the mesh around the top
corners of Kiwi
T
raveller
TM
.
•
Use the carry bag.