Philips 0351.0US.77G User Manual
Operating instructions, Adjust, For household use only
Attention! The text in this document has been recognized automatically. To view the original document, you can use the "Original mode".
CD 1
.
co
Lock turning ring
if necessary
Remove accessories
Mount drip tray and
drip grid
Danger of burns
if the cappuccinatore
is not installed
instaii cappuccinatore Attach tube
iaterai
3
.
Coffee beans
Fresh water
4
.
Measure water
hardness
Read strip after I min.
■
Hardness 1
■ ■
Hardness 2
■ ■■
Hardness 3
■ ■■■
Hardness 4
CO
Piug in
Switch on
5
.
Piace receptacie
under nozzie
6. Adjust
Draw off hot water
until no more air escapes
see page 5
Supplied accessories
Key for mounting and
dismounting the sieve
Measuring dipper
Technical data
- Type
- Nominal voltage
- Mains cable
- Nominal output
- Pump pressure
- Preparation time
- Coffee grounds ejection
- Dosage of water quantity
- Capacity
- Steam volume
- Dimensions (L
X
H
X
D)
- Weight (net)
Cieaning brush
Test strip for water hardness
SUP 016 RE
see type plate on machine
1.2 m
see type plate on machine
approx. 15 bar
Espresso approx. 20 sec/cup, coffee approx. 30 sec/cup
automatic
electronic, continuous
water tank: approx. 2.4 I
dregs drawer: approx. 300 g
continually adjustable
approx. 33 X 45 X 40 cm
approx. 70 X 45 X 40 cm with opened service door
approx. 16 kg
This TSM SUCCESS MANUAL® has been examined by SEV for conformity
with the safety-relevant standards, and has been analysed by an application-
oriented risk analysis for the completeness and correctness of the indications
for a safe use of the appliance. Thereby we assume a use with which can
be reckoned based on common sense.
TOT«. SECUMTY MMIAGEMENT
A
V
TSM SUCCESS MANUAL® - safe to use - easy to understand due to TSM®-Total Security Management and ergonomic communication®
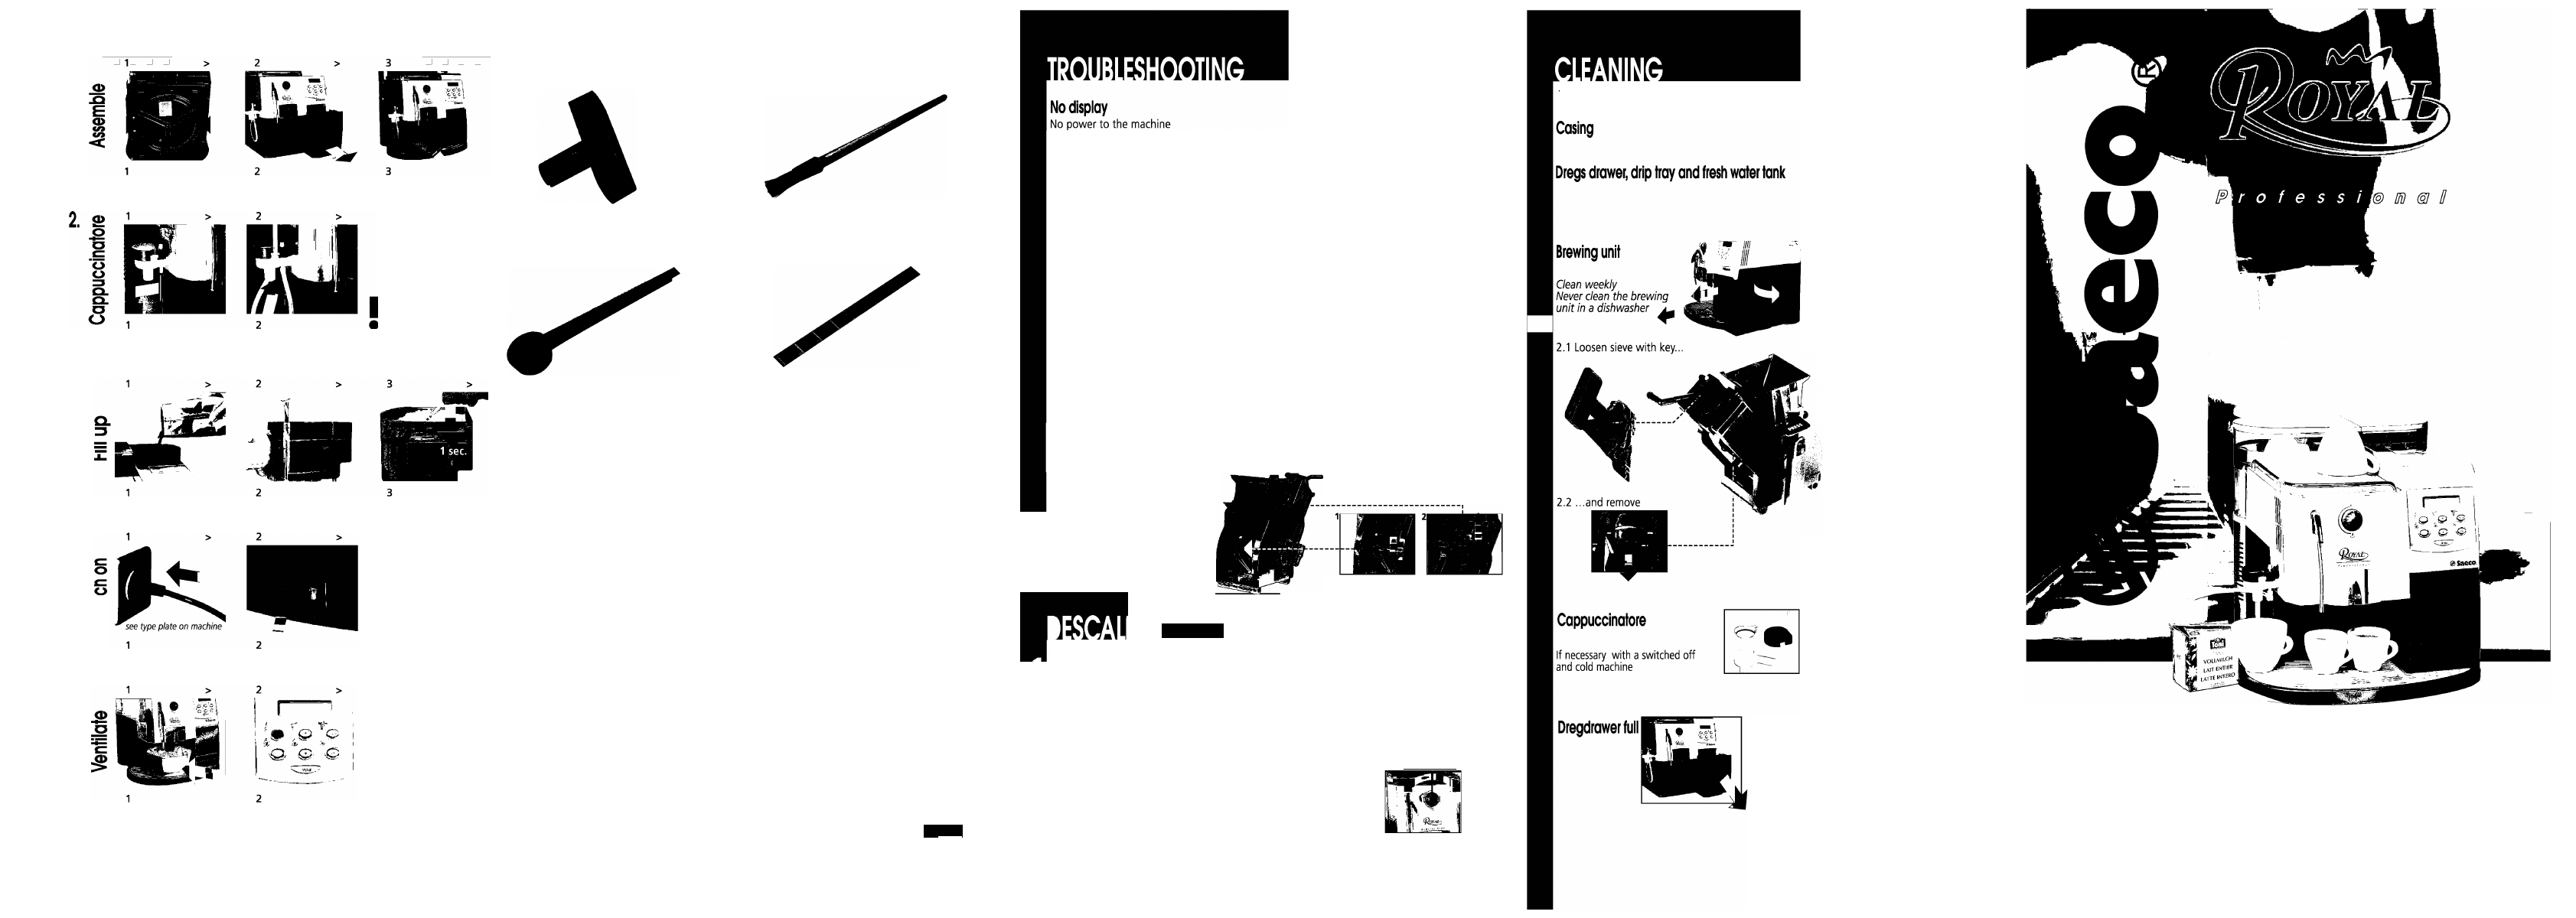
Preparation cycle does not begin .
BREW UNIT MISS.
BREWUNIT BLOCK.
DREG DRAW. MISS.
GRINDER BLOCKED
ENERGY SAVING
-
Switch on main power switch
- Close service door
- Check plug, connection and fuses
► Insert brewing unit
► Clean brewing unit
► Insert dregs drawer
► Clean grinding unit
► Press «ENTER»
Remove mains from power socket before cleaning the machine
- Do not dry parts of the coffee machine in a baking or microwave oven
With «coffee powder» selected, only
water comes instead of coffee ^
Coffee is not hot enough
No hotwater/steam
Hot water/steam nozzle is blocked
Heating time too long, not enough water
Brewing unit cannot be removed
...although the dregs drawer is removed
Brewing unit cannot be inserted
Reset brewing unit
Fill a measuring dipper with ground coffee
Preheat the cups
Modify temperature
If necessary: clean brewing unit
If necessary: descale
Clean hot water / steam nozzle with a thin
needle.
Caution: carry out this
operation only when machine is shut off
and tap closed
-
Descale machine
1. Close service door
2. Attach dregs drawer
3. Switch on machine
4.
The brewing unit is released
_5. Continue with
f
(automatic)
-
NEVER use VINAGER
possible damage to machine
- Follow strictly the manufacturers
TO
______________ _________________________________________ instructions Tor use
Carry out this procedure only when all parts of the machine have cooled down
Prepare descaling
Start descaling
1.
Display :
MACHINE IS DESCALING ^
DESCALING FINISHED
►
FILL WATERTANKi
2
.
Cancel with ESC
1. Place large receptacle under hot water/
steam nozzle
2. Fill descaling solution into the water tank
according to manufacturer's instructions
1. Press programming key
2. Search for DESCALING with
3. Start cycle with ENTER
Open.tur.njna. knp.b
Wait approx. 45 min.
Close turning knob, press ENTER
Rinse -I- fill water tank
Open turning knob
3. Let tank contents run out
4. Close turning knob, press ENTER
RINSING FINISHED
► Press ESC
1. Press programming key
R0s©t d0scal0 display
^
signaldescal
.
with
Cancel with ESC
open \ close
3. Search for YES
with.
'-> ENTER
^-> ENTER
Use only a mild and non-scouring cleaning
agent
Wipe with a soft, damp cloth
Clean under running water
1. Open service door.
Remove drip tray/dregs drawer
2. Press position PRESS and remove brewing
unit. If necessary, unscrew upper sieve
of brewing unit
Clean everything under running warm
water and let dry. Clean service area
3. Assemble brewing unit and slide in. In
doing this, do NOT press position PRESS!
1. Take out lateral
2. Remove cover
3. Remove brewing unit cappuccinatore
4. Wash in water
5. Dry
6. Mount
DREGDRAWERFULL
This message appears on the display when the dregdrawer is full
or every 10-15 cups.
When the digital display reads "dregdrawer full" the machine is
able to dispense only hot water ancTsteam (not coffee).
To clear the message,
make sure machine is on,
remove the
dregdrawer, empty it, wait for 5 seconds and then put back in
place.After this the display reads:
SELECT PRODUCT
READY FOR USE
Now the machine is ready to dispense coffee again.
Operating Instructions
Please read these TSM® operating instructions before initial operation. Follow the instructions
carefully to insure constant optimum quality of your drinks and to avoid damages and injuries.
Keep this instruction manual handy where you can readily refer to it. If you pass on your machine
to others, be sure that the operating and safety instructions go with it. Your machine has been
conscientiously checked for safety and proper functioning and left the factory in fault-free
working order.
FOR HOUSEHOLD USE ONLY
C€
Read safety instructions before starting to use the machine
Document Outline
- co
- co
- o>
- o>
- o
- o
- Select amount of powder Select desired coffee
- Remove cup
- III In coffee powder
- Select powder coffee
- Remove cup
- O
- Place milk receptacle Place cup with coffee
- Draw off milk troth
- Change froth quantity It necessary
- Dip in nozzle completely Start preparation Into cold beverage
- Rotate beverage while End preparation
- Remove cup
- Place glass
- Draw off hot water
- End preparation
- Remove giass
- Ciean nozzle with damp doth
- start programming
- Setting...