Philips BT5275-41 User Manual
Important safety instructions, Danger, Warning
Attention! The text in this document has been recognized automatically. To view the original document, you can use the "Original mode".
ENGLISH
IMPORTANT
SAFETY
INSTRUCTIONS
When using an electrical appliance, basic safety
precautions should always
to
followed, including
the following:
Read all instructions before using this
appliance.
DANGER
To reduce the risk of electric shock:
1. Do not reach for a Trimmer that has fallen
into water. Unplug immediately.
2. Use Trimmer only in dry condition. Do not
use while bathing or in a shower.
3. Do not submerge Trimmer in water.
4. Do not place or store Trimmer where it can
fall or be pulled into a tub or sink. Do not
place in or drop into water or other liquid.
5. Always unplug this Trimmer from the
electrical outlet immediately after using,
except when Trimmer is (re)charging.
6. Unplug and remove power supply cord from
Trimmer before cleaning.
7. When discarding Trimmer, unplug Trimmer
before removing rechargeable battery. See
Rattery Removal instructions.
8. The batteries used in this device may present
a fire or chemical burn hazard if mistreated.
Do not disassemble, heat above 100'’C
(212"F) or incinerate.
WARNING
To reduce the risk of burns, fire, electric
shock or injury to persons:
1. Close supervision is necessary when
this appliance is used by. on. or near children
or invalids.
2. Use this Trimmer for its intended household
use as described in this manual. Do not use
attachments not recommended by Philips
Electronics North America Corporation.
3. Never operate this Trimmer if it has a
damaged cord or plug, if it is not working
property, if it has teen dropped, damagea
or dropped into water while plugged in. For
assistance call 1>800*243>305û.
4. Trimmer can be rinsed under running tap
water. Do not operate Trimmer until fully
dried.
5. Keep the Trimmer, cord and any attachments
away from heated surfaces.
6. Never drop or insert any object into any
opening.
7. Do not operate, charge or plug in Trimmer
outdoors or where aerosol (spray) products
are being used or where oxygen is being
administered.
8. Always check cutters, cutting unit and comb
before using the Trimmer. Do not use the
Trimmer if cutters, cutting unit or comb are
damaged, as injury may occur.
9. Always attach plug to Trimmer first, then
to outlet.To disconnect, turn on/off switch
to “OFF” position, then remove plug from
outlet.
10. To prevent possible damage to the cord, do
not wrap cord around the Trimmer.
11. Never put Trimmer in direct sunlight or store
at a temperature above HO^’F.
12- This Trimmer is for use on human hair
(beard, moustache and sideburns) only. Do
not use this Trimmer for any other
purpose.
13. Always store your Trimmer, attachments and
power plug in a moisture-free area. Make
sure the cord is disconnected from the
Trimmer.
14. Only use the power plug and other
accessories supplied with the appliance.
SAVETHESE
INSTRUCTIONS
Features
IMPORTANT: The power plug contains
a transformer. Do not cut off the power
plug to replace it with another plug as this
will cause a hazardous condition.
Registration
Congratulations on your purchase and welcome
to Philips Norelco!
To fully benefit from the support that Philips
Norelco offers, register your product at
vww.norelco.com/register
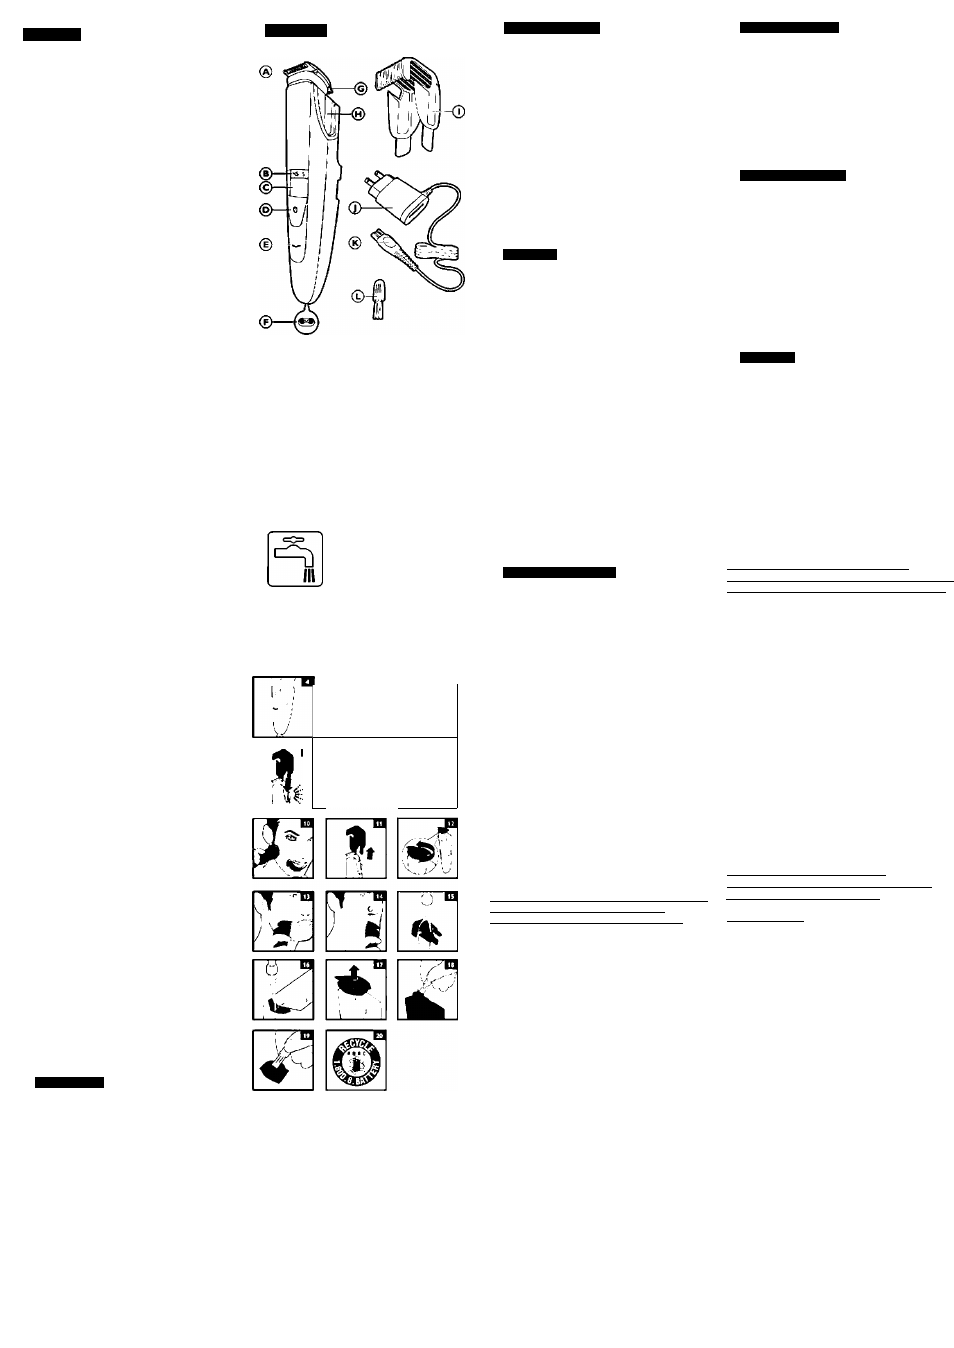
A Dual-Sided Trimmer
B Length Setting
C Zoom Wheel
D On/Off Button
E Battery Light
F Socket for Appliance Plug
G Detail Trimmer
H Trimming Comb Guiding Groove
I Trimming Comb
J Adapter
K Appliance Plug
L Cleanir^ Brush
Full Two-Year Warranty
45-Day Money-Back Guarantee
This symbol indicates that
the Trimmer can be rinsed
under running tap water.
4
_AZ
Ai
-r~r~T
. ^ i
:L¿.
1 /
_5_
h-
0
_i______ i_
Put It To The Test
Like nrany new products, your Philips Norelco
Perfect Pr^isicn Beard Trinnmer may take a little
getting used to If you are using an electric Trimmer
for the first time, or if you’ve been using a different
brand, take the time to acquaint yourself with your
new Trimmer.
Your Trimmer features a unique dual-sided
trimmer for ultmate versatility with a high-
performance trimmer on one end arvj a detail
trimmer on the other so you can create the exact
look you want every time.
Throw your scissors away and put your new
Trimmer to the test We guarantee precise,
professional results or Philips Norelco will refund
you the full purchase price as long as the request
is received within 45 days of purchase.
Charging
Charge the Trimmer fully before you start using it
for tte first time or after a long period of non-use.
Charge Indications
Low Battery
I When che battery is almost empty, the battery
light blinks orange (fig. 1).
t
When you ttrn off the Trimmer, the battery
light continues to blink orange for a few
seconds.
> The battery ¡ght will blink orange more
rapidly if the battery is empty and you press
the ON/OFF button.
Charging
> When you sort charging, the battery light
blinks orange and white alternately (fig. 2).
%
After approx mately 3 minutes the battery light
blinks white only.The battery now has enough
energy for one cordless trimming session
(fig-3).
t
When the battery is folly charged, the battery
light lights up white (fig. 4).
To Charge/Recharge
> Charging, rediarging. or using the Trimmer at
temperatures below 40'F or higher than 9S*F
adversely affects lifespan of the battery.
I If the appliance is subjected to a major change
in temperatu'e. pressure or humidity, let the
Trimmer accimatize for 30 minutes before
using.
I Continuously recharging Trimmer will reduce
lifespan of battery.
n Be certain Trimmer is OFF.
Q Insert the appliance plug directly into the
Trimmer (fig. 5) and plug the adaptor into any
120VAC ojtlet. Use only the cord provided.
t
An adaptor plug may be necessary for
cord usage in some foreign countries. Use
an attachmert plug adaptor of the proper
configuration for power outlet.
Q The Battery Light will blink to indicate the
Trimmer is charging.
i
It will take approximately 1 hour to fully
charge the Trimmer for a cordless trimming
time of up to 60 minutes.
NOTE: After the Trimmer is fully charged a.nd still.
cor^neaed to t'e outlet, the Battery Light will
remain lit for 30 minutes and then turn off.
□ Disconnect the cord and unplug from
electrical outlet.
Optimize the working life of the battery
t
After the Trimmer has teen charged for
the first time, do not recharge the Trimmer
between trimming sessions Continue using it
until the battery is completely empty.
> Do not charge for more than 24 hours.
I Do not keep cord permanently plugged in.
I Discharge/ruf) down the battery completely
twice a year by letting the motor run until it
stops.
I If the Trimmer hasn’t been used for a long
period of time, it must be recharged for one
full hour.
Corded Trimming
I Trimmer does not recharge during corded
trimming.
D
Connect cord provided to Trimmer and plug
Trimmer into electrical outlet.
Q Press the ON/OFF button to begin trimming
(fig-6).
Q Turn Trimmer OFF and unplug.
Cordless Trimming
D
Charge according to directions. Unplug
Trimmer from outlet and remove cord.
Q Press the ON/OFF button to begin trimming.
Q If the charge runs low while trimming, the
Battery Light will blink orange.
□ If the charge runs out while trimming simply
connect cord provided to Trimmer and outlet
to continue trimming.
Q Turn Trimmer OFF and unplug.
Trimming
I Use this Trimmer for its intended household
use as described in this manual.
I
Trimming is easier when skin and hair are dry.
I
Always comb the beard and/or moustache with
a fine comb before you start trimming.
I
If you are trimming for the first time, be
careful. Do not move the Trimmer too fast.
Make smooth and gentle movements.
Trimming with the Comb
I The Comb must be on Trimmer to use the
Zoom Wheel.
n Slide the comb into the guiding grooves on
both sides of the Trimmer. You will hear a
’click’ (fig. 7).
The comb will not frt onto the Trimmer the
Detail Trimmer is po4nting towards the front of the
Trimmer. Turn the trimming head and then slide
the comb goto the appliance (fig.8),
Q Turn the Zoom Wheel to the desired
trimming length setting.The settirtg selected
is shown on the front of the appliance
(fig-9).
I You can select a length from 1/64 in/0.4mm to
13/32 in/IOmm.
I
If you are trimming for the first time, start by
using the comb at the maximum trimming
length setting (13/32 in/IOmm) to prevent
accidentally trimming hairs too short-As you
become familiar with the settings, adjust Zoom
Wheel to desired trimming length. Zoom
Wheel will “click” into position at each setting.
D
Press the ON/OFF button to turn Trimmer
ON (fig. 6).
a
To trim in the most effective way, move the
Trimmer against the direction of hair growth.
Make sure the surface of the comb always
stays in contact with the skin (fig. 10).
NOTE: Since all hairs do rot grow in the
same direction, vou may want to trv different
trimming positfons (i.e.. upwards.
downwards, or across). Practice is t?est for
optimum results.
Q If cut hairs have accumulated In the comb,
turn Trimmer off. remove the comb and
blow and/or shake the hair out of the comb.
The selected trimming length setting will
not change when you do this.
Trimming Without a Comb
Remove comb if you are:
I Defining hair lines
I Trimming nape of neck
I Removing single, unwanted hairs
a
Be certain Trimmer is in the OFF position.
Q Remove the comb by pulling it off the
Trimmer (fig. 11).
Never pull at the flexible top of the comb. Always
pull at the skies.
a
Turn the dual-sided trimming head to the
desired position (fig. 12).
- Use the wider 1.25 iny32mm side for
trimming and contouring (fig 13).
- Use the narrow 0.6 in/ISmm side for more
precise styling and contouring (fig. 14).