Milwaukee Tool 0725-21 User Manual
Page 4
6
7
Grinding Wheel / Sanding Disc Selection
Use sanding discs and grinding wheels that are:
• correct size as written on tool's nameplate.
• correct wheel type and grit for the job.
• rated at or above the RPM listed in the "WARN-
ING" section on the tool's nameplate.
Use backing pads, adapters, and other acces-
sories that are:
• correct size for tool and for sanding disc or grind-
ing wheel.
• rated at or above the RPM listed in the "WARN-
ING" section on the tool's nameplate.
• the proper accessory for the job.
Selecting Wheels
Grinding is the cutting action of thousands of abra-
sive grains on the face of a grinding wheel. When
grinding metals such as steel and iron, choose an
aluminum oxide grinding wheel. Select a silicon
carbide grinding wheel for stone and concrete. Use
cotton reinforced wheels for non-ferrous metals.
Type 27 Reinforced 1/8" thick or less Cut-Off
Wheels are suited for small cut-off and shallow
notching operations only.
Grinding and Cut-off Wheels
Always handle wheels carefully to avoid damage.
Before installing any wheel, always inspect it for
cracks. If wheel is cracked, discard it to prevent
others from using it.
Grinding and cut-off wheels should NOT be:
• dropped
• rolled
• bumped
If any wheel is dropped, rolled, bumped, subjected
to extreme changes in temperature, or has come
into contact with solvents or wetness, discard wheel
immediately.
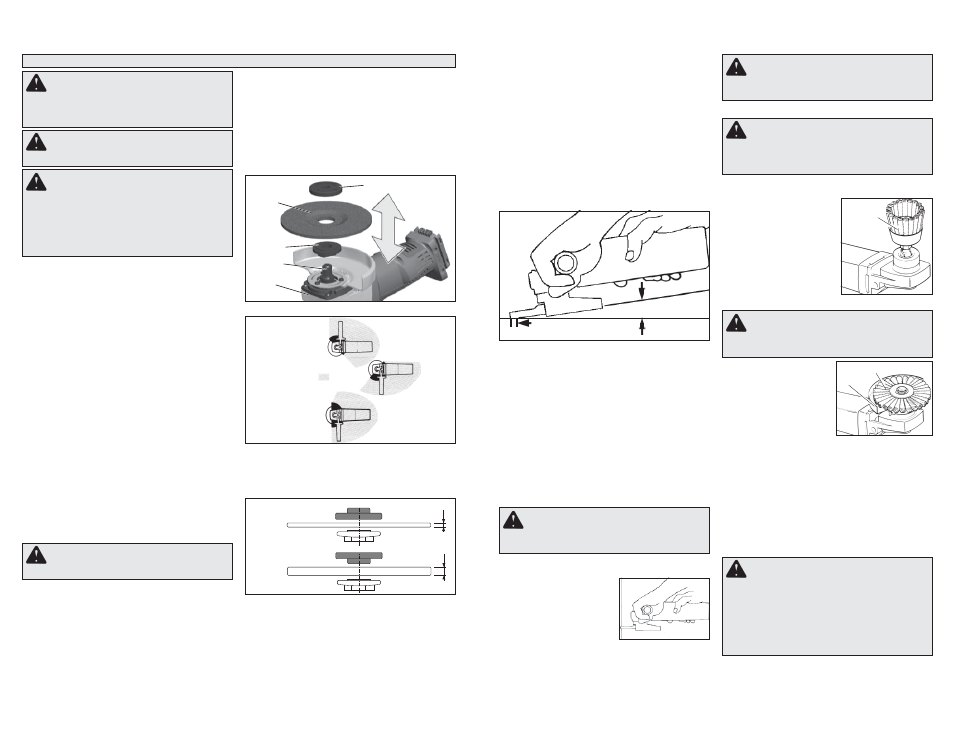
Installing/Removing Grinding Wheels
1. Remove the battery pack.
OPERATION
WARNING
To reduce the risk of injury,
wear safety goggles or glasses with
side shields.
WARNING
Always remove battery
pack before changing or removing
accessories. Only use accessories specifi -
cally recommended for this tool. Others may
be hazardous.
WARNING
Only use accessories with
Maximum Safe Operating Speed rated
at least equal to the maximum speed marked
on the power tool. This speed is based on the
strength of the wheel, allowing for a reasonable
measure of safety. It is not meant to imply a
best or most effi cient operating speed. Do not
exceed the Maximum Safe Operating Speed.
WARNING
To reduce the risk of injury,
the operator should be instructed in
the use, care and protection of grinding wheels.
Fig. 2
Operator's
Zones
Flange nut
position
for 1/8" thick or
less wheels
Flange nut
position
for 1/4" thick or
more wheels
Gear
case
Spindle
Flange
Grinding
wheel
Flange nut
Fig. 3
Fig. 1
1/8"
1/4"
Fig. 4
For best result use
only this portion of disc
Hold at a
Hold at a
5° to 15° angle
5° to 15° angle
1. Unplug tool and place it upside down on a level
surface as shown. Remove any accessories from
spindle.
2. To install, thread wire cup
brush onto spindle. Press
the spindle lock button
while tightening brush with
a 7/8" open end wrench
(not provided with tool).
3. To remove wire cup brush,
unplug tool and reverse
procedure.
Using Wire Wheel Brushes
Installing Wire Cup Brushes
Wire Cup
Brush
Grinding
1. If you have just installed a grinding wheel or are
just beginning a period of work, test wheel by
letting it spin for one minute before applying it to
the workpiece.
NOTE: Out-of-balance wheels can mar work-
piece, damage the tool, and cause stress to
wheel that may cause wheel failure.
2. Use a clamp, vise or other practical means to
hold your work, freeing both hands to control
your tool.
3. When grinding, hold sander/grinder at a 5
o
to
15
o
angle, using constant pressure for a uniform
fi nish. Too great an angle causes concentrated
pressure on small areas which may gouge or
burn work surface.
WARNING
A Type “1” guard must be
installed when using a cut-off wheel
to provide maximum protection for the opera-
tor if the wheel should break.
WARNING
Using the face of a Cut-Off
Wheel (as in grinding) will cause the
Wheel to crack and break, resulting in serious
personal injury.
WARNING
Everyone in the area must
wear protective clothing and safety
goggles or face shields. Fatigued wires and
residue will fl y off the brush with considerable
force, causing potential for serious injury.
4. To start the tool, grasp the handle and side
handle fi rmly and slide the switch to ON.
5. Allow grinding wheel to come to full speed before
beginning work.
6. Control pressure and surface contact between
wheel and workpiece. Too much pressure slows
grinding speed.
7. To stop the tool, release the switch. Make sure
the tool comes to a complete stop before laying
the tool down.
8. To lock-on the switch, slide the switch to ON and
then press down on the front of the switch. To stop
the tool, press and release the switch. Make sure
the tool comes to a complete stop before laying
the tool down.
Using Cut-Off Wheels
2. Properly position the guard (Fig. 2).
WARNING
Because the wires on wire
wheel brushes are directed towards
the operator, a guard must be used to protect
the operator when fatigued wires break.
Wire wheel brushes are
useful for removing rust,
scale, burrs, weld slag, etc.
A wide variety of wire brush-
es are available for many
applications.
Test wire wheel brush for
balance and loose or dam-
aged wires by running tool
at no load speed for at least one minute before
applying it to your work. During this time, no one
should stand in front of or in line with it. When ap-
plying brush to work, avoid using too much pressure.
This causes over-bending of wires and heat build-up
resulting in premature wire breakage, rapid dulling
and reduced brush life. Instead of using more pres-
sure, try a wire wheel brush with more aggressive
cutting action (increased wire size, decreased wire
length or different brush type, i.e. knot type instead
of crimped wire type).
3. Place the fl ange on spindle.
4. Place the selected wheel on the spindle and align
it with the fl ange.
5. Position the fl ange nut over the spindle according
to wheel thickness (Fig. 3).
Type “1” Cut-Off Wheels are suited for small cut-off
and shallow notching operations only.
1. Firmly grasp body of tool
and side handle before
starting and while using
tool. Allow wheel to come to
full speed before starting.
2. When using a cut-off
wheel, hold Sander/Grind-
er as shown, using only the edge of the wheel.
3. Control pressure and surface contact between
disc and workpiece. Too much pressure slows
cutting speed.
Wire Wheel Brush
Guard
Care of Grinding & Cut-Off Wheels
Grinding and cut-off wheels should be protected
from:
• wetness and extreme humidity
• any type of solvent
• extreme changes in temperature
• dropping and bumping
Grinding and cut-off wheels should be stored:
• in an organized way so wheels can be removed
without disturbing or damaging other wheels
• with their safety information
WARNING
Never exceed Maximum
Safe Operating Speed of brush. Do not use a
damaged brush or one which is functioning
improperly (throwing wires, out-of balance,
etc.). these conditions increase the possibility
of further brush failure and possible injury.
Discard and replace damaged brushes im-
mediately.
6. Press in the spindle lock button while turning the
fl ange nut clockwise. Tighten securely using a
spanner wrench.
7. To remove wheel, remove the battery pack and
reverse the procedure.