Danger, Warning, Operation of the chain drive til- ler – Maxim Manufacturing TP50B User Manual
Page 6
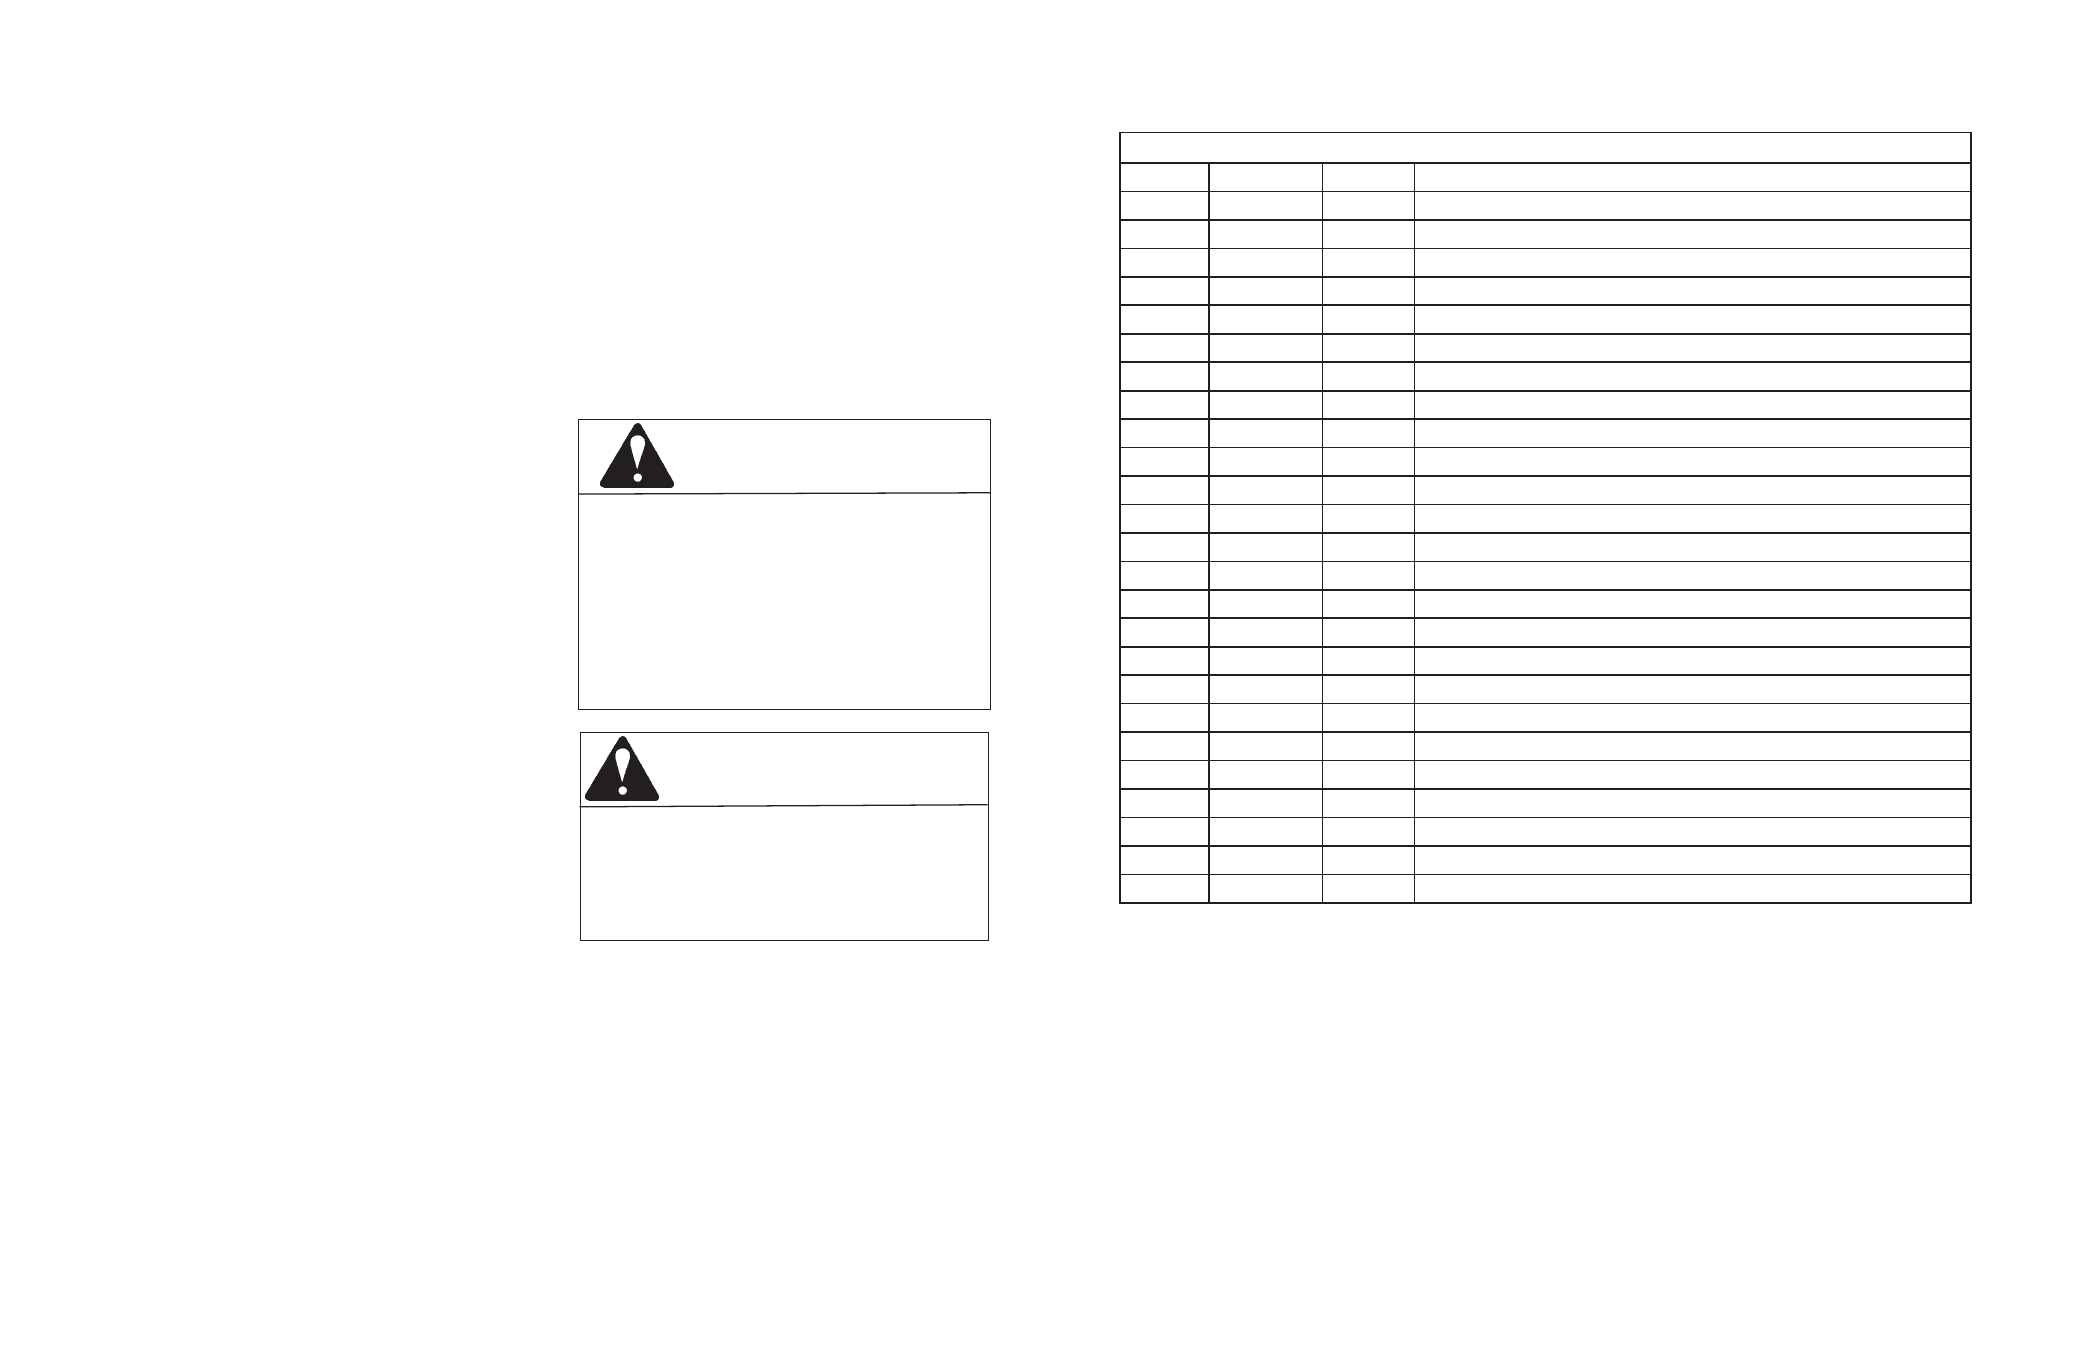
TRANSMISSION 130400
REF #
PART #
QUAN.
DESCRIPTION
1
130693
1
Left hand Case Assembly
2
130692
1
Right Hand Case Assembly
3
359312
1
Oil Fill Plug
4
400201
1
5/16” x 2 3/4” Bolt
5
455041
1
5/16” Washer
6
443106
1
5/16” Nut
7
359306
2
Dust Shield
8
359305
2
Oil Seal
9
359304
2
Bearing, Needle
10
359313
AR
Washer
11
359303
1
Spacer
12
162038
1
Shaft and Sprocket Assembly
13
359302
1
Chain
14
336675
1
Gasket
15
359296
1
Chain
16
162023-A
1
Idler Sprocket Cluster
17
359297
2
Input Bearing
18
359298
1
Bushing, Idler Cluster
20
162037
1
Input Shaft/Sprocket
21
359339
1
Washer Rubber Seal
22
408883
1
1/4” x 1/2” Screw
23
359351
1
Input Shaft Spacer
24
455049
AR
Shim Washer 41/64 x 1 x .0625
455062
AR
Shim Washer 41/64 x 1 x .032
25
359299
2
Transmission Washer
11
4. Repeat steps Number 2 and 3 above until the engine starts. If the engine fails to start after 3 pulls on the
rope, repeat Step 1 above as necessary. Close choke after engine has responded.
5. As the engine warms up, move the throttle lever to desired position. Alllow engine warm-up period be-
fore operating tiller.
NOTE: A warm engine may start without choking. Do not use the choke if engine is hot.
Stopping Engine
1. Move the throttle control to rear position.
2. Push stop switch at spark plug.
3. Disconnect the wire from the spark plug to prevent accidental starting of the machine while it is unat-
tended.
OPERATION OF THE CHAIN DRIVE TIL-
LER
1. When the ground is hard (especially during spring
and fall plowing), place wheels in up position by pulling
spring loading pin and lifting wheels. Release pin. For
weeding or cultivating, wheels may be left down if you
prefer.
2. Adjust the drag stake for comfortable operation.
This is done by depressing pin, and sliding the drag
stake up or down. The drag stake should be set so that
when it is firmly in the ground, and your hands are on
the tiller handle, your arms hand comfortably with the
elbows slightly bent.
3. Move throttle control to center position. Start the
engine and allow it to warm up, then set the throttle at
about half speed. After you have become more familiar
with the tiller, you may want to run the engine a little
faster.
4. Press down firmly on the handles, and then squeeze
the clutch lever. The tines will begin to turn, but the
tiller should not move forward. If it does, don’t pull
backwards - merely press down harder on the handle.
When you find the right amount of downward pressure so that the tines are digging and tiller is not moving
forward, release the pressure slightly. As you release it you’ll notice the tiller beginning to move forward.
The whole tilling operation is controlled by the amount of pressure you put on the drag stake. Do
not fight the tiller. Stand between the handles and press down to go slower and dig deeper, and re-
lease the downward pressure to move forward faster. In normal soil, the actual up and down move-
ment of the handles will be no more than an inch or two.
TRANSPORT
To transport tiller from garden to storage area, lift the handles until the drag stake is above ground level, set
the engine throttle at slow speed and walk the tiller on the tines.
DANGER
To prevent personal injury, the chain drive
must disengage immediately when clutch le-
ver is released. If it does not, stop the tiller,
adjust belt and cable tension as described
in Adjustments section of this manual.
Never leave the tiller unattended with the
engine running. Children are attracted to a
running tiller and could be injured if struck
by the rotating tines.
WARNING
Keep hands clear of belt and tines
while engine is running. Never
attempt to adjust or clean tines
while engine is running, at risk of
severe injury.
6
*AR -- As Required