Philips Radio portátil User Manual
Caution, Attention, Atención
Attention! The text in this document has been recognized automatically. To view the original document, you can use the "Original mode".
English
Français
AE 2160 - Portable radio
English
Français
/XV
Español
Deutsch
Nederlands
Italiano
Portnguês
Dansk
Meet Philips at the Internet
Printed in China
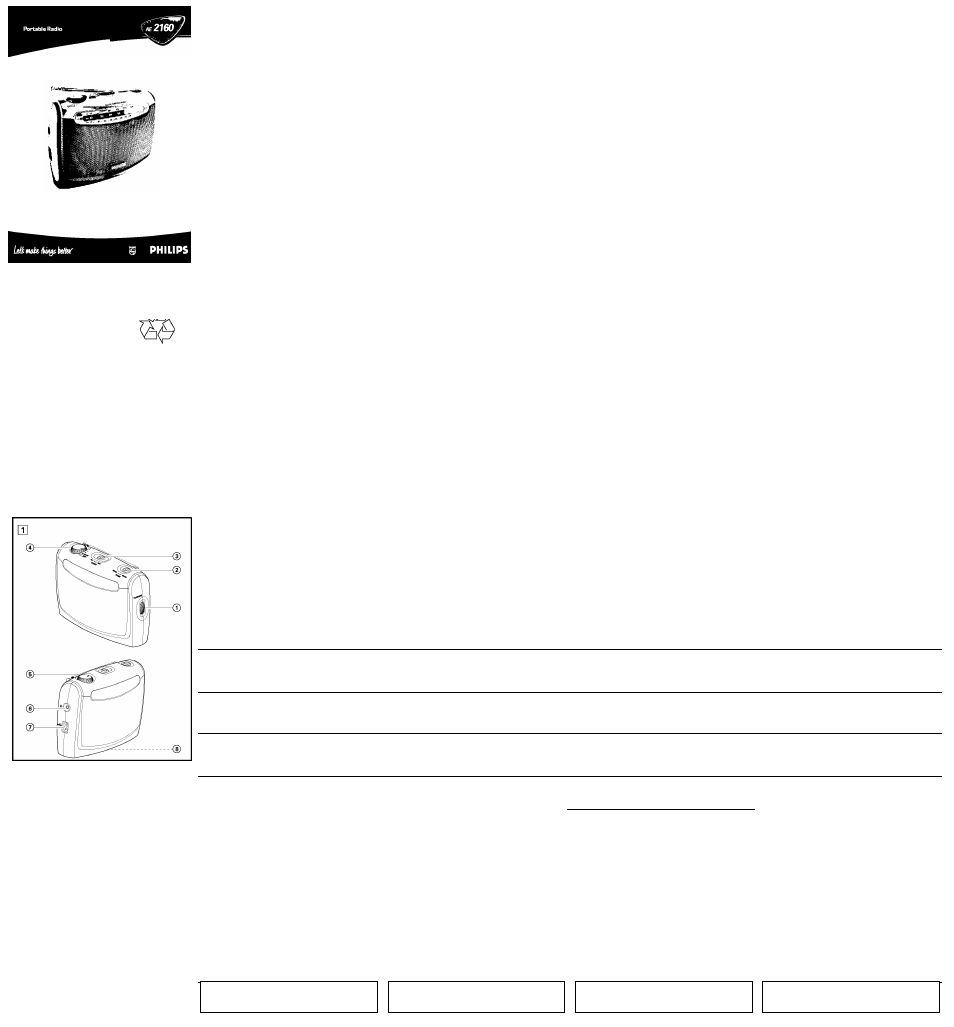
CONTSOLSI see figure Q] )
(i)
TUNING - tune to a radio station
0
TONE - NEWS/MUSIC - adjusts sound
©BAND - selects FM/MW (or LW) waveband
©VOLUME/POWER OFF - switches radio on/off and adjusts volume level
0
Tslsscopic Aerial - improves FM reception
© n - 3.5mm earphone socket
© AC MAINS ~ - socket for mains lead
0
Battery Doer - open and insert 2x R20/UM1/D-cell batteries
POWER SUPPLY
Batteries (Not inciuded)
7 Open the battery compartment and insert two batteries, type UM1.R20 or D-
ceils, with the correct polarity as indicated by tbe "+" andsymbols.
2 Replace the compartment door. The set is new ready to operate.
• The battery supply is switched off when the set is connected to the AC Mains.
• Remove the batteries if the set is not to be used for a long time
Batteries contain chemical substances, so they should be disposed of
properiy.
AC Mains
7 Check if the mains veltage as shewn on the type piate on the bettom of
set, corresponds to your local mains voltage. If it does not, consult your deal
er or service centre.
2 Connect the mains lead to the AC MAINS ~ socket and the wall socket.
The mains supply is now connected and ready fer use.
3 To switch off completely, withdraw the mains lead from the wall socket.
• Disconnect the mains lead frem the wall socket to protect your set during
heavy thunderstorms.
RADiO
Radio reception
7 Turn the VOLUME/POWER OFF knob clockwise to switch on the radio and
adjust the volume.
• You may connect headphones with a 3.5 mm plug to the socket fir
- The built -in speaker will be muted.
2 Select the wave band using the BAND switch.
3 Tune te a radio station using TUNiNG.
• For FM, pull out the telescopic aerial. Incline and rotate the aerial. Reduce its
length if the signal is teo strong (very close te a transmitter).
• For MW (AM or LW) the set is provided with a built-in aerial so the telescopic
aerial is net needed. Direct the aerial by turning the whole set.
4 Adjust the TONE switch by selecting NEWS or MUSIC.
5 To switch off the set, turn the VOLUME/ POWER OFF knob anti-clockwise te
the OFF position and you will hear a small click.
COMMANDES (veir figures [U )
0
TUNING - réglage pour stations de radio.
0
TONE - NEWS/MUSIC ajuste le sen
©BAND - sélectionne la bande de fréquence FM/ MW (eu LW)
©VOLUME/POWER OFF- met en et hors sen/ice la radio et réglage du niveau
de velume.
®
Antenne télescopique - améliore la réception FM
© n - 3,5 mm. pour écouteurs
0 AC MAINS - - entrée pour cordon d'alimentation
® Clapet de compartiment piles - ouvrir pour insérer les 2 piles type R20/ UM1/
cellules D
ALIMENTATION
Piles (non comprises)
7 Devrez le compartiment à piles et insérez deux piles, type UM1, RZO ou
D-cellules, de pelarité correcte, cemme indiqué par les symbeles "+" et
2 Replacez le clapet du compartiment. L'appareil est à présent prêt à fonctionner.
• L'alimentation de la pile est déconnectée lorsque l'appareil est connecté à
secteur l'alimenfatien.
• Enlevez les piles lorsque l'appareil ne sera pas utilisé pendant une période
prolongée.
Les piles contiennent des substances chimiques, donc elles doivent être
jetées selon les nonnes de i'environnemenL
Utilisation de l'alimentation écoutant alternatif
7 Contrôlez si la tension secteur indiquée sur la plaquette signalétique à la
base de l'équipement correspond à la tension secteur locale. Si ce n'est pas
le cas, consultez votre concessionnaire ou le service après-vente.
2 Branchez le cordon secteur é la prise AC MAINS ~ et à la prise secteur
murale.Ce faisant, l'alimentation secteur est un fait et l'appareil prêt à
l'usage.
3 Pour débrancher l'appareil de l'alimentation électrique, retirez le cordon de la
prise murale.
• Déconnectez toujours le cordon secteur de la prise murale pour protéger votre
équipement pendant les orages violents.
RADIO
Réception radio
7 Tournez le bouton VOLUME/POWER OFF (volume/marcbe/arrêt) vers la droite
pour allumer la radio et régler le volume.
il vous est possible de brancher des écouteurs en introduisant une fiche de 3,5
mm dans la prise Ci
- Dans ce cas, le haut-parleur intégré ne fonctionne pas.
Sélectionnez la longueur d'onde à l'aide du sélecteur BAND.
Réglez sur l'émetteur souhaité avec le bouton TUNING.
Si vous optez pour la longueur d'onde FM, sortez l'antenne télescopique.
Inclinez-la et tournez-la pour obtenir le meilleur signal possible. Réduisez la
longueur de l'antenne si le signal obtenu est trop puissant. (Très près d'un
émetteur).
Si vous optez pour l'ondes moyenne, MW (AM ou LW) l'appareil est équipé
d'une antenne incorporée, ce qui ne nécessite pas l'emploi de l'antenne
télescopique. Drientez l'antenne en faisant tourner l'appareil dans tous les
sens.
Réglez TONE (tonalité) en sélectionnant soit NEWS (informations), soit
MUSIC.(musique).
Pour mettre l'appareil hors service, tournez le bouton VOLUME/ POWER OFF
vers la gaucbe en position d'arrêt et vous entendrez un petit déclic.
Español
CONTROLES (Véanse las figuras Q] )
© TUNING - sintoniza estaciones de radio.
0
TONE - NEWS/MUSIC - ajusta sonido
© BAND - selecciona las bandas de FM/MW (o LW).
©VOLUME/POWER OFF - activa/desactiva la radio y ajusta el nivel del
sonido
© Antena telescópica - mejora la recepcién de FM
6 íí- conexién para auriculares de 3.5 mm.
0
AC MAINS ~ - entrada para el cable de alimentacién
® Tapa del compartimenta de las pilas - abrir para insertar 2 pilas de célula D/
R20/UM1.
SUMINISTRO DE ENERGÍA
Pilas (no incluidas)
7 Abra el cempartimento de las pilas e Inserte dos pilas de tipo UM1,R20 o
D-cells, con la polaridad correcta como lo indican los símbolos"+" y
2 Coloque de vuelta la tapa del compartimiento. El aparato está ahora preparado
para funcionar.
• El suministro proveniente de las pilas se apaga cuando se conecta el aparato la
fuente de alimentacién.
• Si no va a utilizar el aparato durante un tiempo considerable, saque las pilas.
Las pilas contienen sustancias químicas peligrosas per lo que deberá
tirerias de acuerdo a la normativa vigente.
Utilización de la energía CA
7 Cempruebe que el voltaje que se indica an la placa tipo situada en la
base del aparato, coincide con el del suministro de la red local. De lo
contrario, consulte con su distribuidor o centro de servicio.
2 Conecte el cable de alimentacién al cenector AC MAINS ~ y al tomacorriente
de pared. Ahora la fuente de alimentación está conectada y lista para
utilizarse.
3 Para desconectar el aparato completamente, desenchufe el cable de
alimentación del tomacorriente de pared.
• Para proteger el aparato durante tormentas eléctricas intensas, desenchufe el
cable de alimentación del tomacerriente de pared.
RADIO
Recepcién de la radio
7 Mueva el selecter VOLUME/POWER OFF en la dirección de las agujas del reloj
para encender la radie y ajustar el volumen.
• Con una clavija de 3.5 mm, se pueden conectar lo auriculares a la entrada П
- El altavoz incorporado deja de emitir sonido.
2 Seleccione la banda de endas cen el interrupter BAND.
3 Para sintonizar una emisora de radio utilice TUNING.
• Para la onda FM, expanda la antena telescópica. Incline y dé vueltas a la
antena. Si la señal es demasiade fuerte, reduzca su largura (está demasiada
cerca de la emisora).
• Para MW (AM o LW) el aparate posee una antena incorporada, de manera que
no se necesita la antena telescópica. Mueva el aparate completo para dirigir
esta antena.
4 Ajuste el interrupter TONE para seleccionar NEWS (noticias) o MUSIC
(música).
5 Para apagar el aparato, gire el selector VOLUME/ POWER OFF en dirección
opuesta al de las agujas del relej hasta la posición de apagade y escuchará un
pequeño clic.
Deutsch
BEDIENELfMENTE (siehe Abbildung Q] )
© TUNING - stellt die Radiostationen ein
0
TONE - NEWS/MUSIC - stellt den Laustärke ein
© BAND - wählt Wellenbereich FM/MW (oder LW)
©VOLUME/POWER OFF - Ein-/ Abschalten des Radios und ändert die
Einstellungen für Lautstärkepegel
© Teleskopantenne - verbessert FM-Empfang
© iF! - Kopfhörerbuchse 3,5 mm
0 AC MAINS ~ - EinlaB für Netzkabel
©
Batlerietür - öffnen, um 2x R20/UM1/D-Zellenbatterien einzusetzen
STROMVERSORGUNG
Batterien (nicht inbegriffen)
7 Das Batteriefach öffnen und zwei Batterien (Typ UM1.R20 oder D-Zellen),
einsetzen, wobei die richtige, von den Symbelen'+' undangegebene
Polarität zu beachten ist.
2 Die Tür des Faches wieder anbringen. Das Gerät ist jetzt einsatzbereit.
• Die Batterieversergung wird abgeschaltet, wenn das Gerät Steckdose
angeschlossen ist
• Die Batterien herausnehmen, falls das Gerät längere Zeit nicht benutzt wird.
Batterien enthalten Chemikalien, weshalb sie vorschriftsmäßig zu
entsorgeu sind.
Benutzung des Wecbselstremnetzes
7 Nachprüfen, ob die auf dem Typenscbild euf der Gsrätsunteraeite
angegebene Netzspannung der örtlichen Netzspannung entspricht. Ist dies
nicht der Fall, sich an Ihren Fländler oder Ihr Kundendienstzentrum wenden.
2 Das Netzkabel an den AC MAINS ~ Eingang und die Steckdese anschließen.
Die Stromversorgung ist jetzt angeschlossen und das Gerät betriebsbereit.
3 Um das Gerät völlig stromlos zu machen, wird der Netzstecker an der
Steckdose gezegen.
• Den Netzstecker an der Steckdose ziehen, um das Gerät bei heftigen
Gewittern zu schützen.
RADIO
Radioempfang
7 Den Knopf VOLUME/POWER OFF im Uhrzeigersinn drehen, um das Radio
einzuschalten und die Lautstärke einzustellen.
• Sie können Kopfhörer mit einem 3,5 mm-Stecker an die Buchse T!
anschließen.
- Der eingebaute Lautsprecher wird stummgeschaltet.
2 Den Wellenbereich mit dem BAND Schalter auswählen.
3 Mit TUNING auf einen Radiesender abstimmen.
• Für FM, die Teleskopantenne ausziehen. Die Antenne neigen und drehen. Sie
einziehen, wenn das Signal zu stark (sehr nahe an einem Sender) ist.
• Für MW (AM oder LW) tverfügt das Gerät über eine eingebaute Antenne,
weshalb die Teleskopantenne nicht benötigt wird. Die Antenne dumb Drehen
des gesamten Gerätes ausrichten.
4 Den TONE Schalter durch Auswahl von NEWS (Nachrichten) oder MUSIC
(Musik) einstellen.
5 Zum Abschalten des Gerätes den Knopf VOLUME/POWER OFF gegen den
Uhrzeiger in die Aus-Stellung drehen, wobei Sie ein leises 'Klicken' hören.
PA232
Important notes for users in the U.K.
Mains plug
This apparatus is fitted with an approved 13 Amp plug. To change a fuse in
this type of plug proceed as follows:
1 Remove fuse cover and fuse.
2 Fix new fuse which should be a BS1362 5 Amp, A.S.T.A. or BSI
approved type.
3 Refit the fuse cover.
If the fitted plug is not suitable for your socket outlets, it should be cut off
and an appropriate plug fitted in its place. If the mains plug contains a
fuse, this should have a value of 5 Amp. If a plug without a fuse is used,
the fuse at the distribution board should not be greater than 5 Amp.
Note: The severed plug must be disposed of to avoid a possible shock
hazard should it be inserted into a 13 Amp socket elsewhere.
How to connect a plug
The wires in the mains lead are coloured with the following code: blue =
neutral (N), brown = live (L). As these colours may not correspond with the
colour markings identifying the terminals in your plug, proceed as follows:
• Connect the blue wire to the terminal marked N or coloured black.
• Connect the brown wire to the terminal marked L or coloured red.
• Do not connect either wire to the earth terminal in the plug, marked E
(or 4^) or coloured green (or green and yellow).
Before replacing the plug cover, make certain that the cord grip is
clamped over the sheath of the lead - not simply over the two wires.
Copyright in the U.K.
Recording and playback of material may require consent. See Copyright
Act 1956 and The Performer's Protection Acts 195B to 1972.
MAINTENANCE
• Do not expose the set to humidity, rain, sand or excessive heat caused by
heating equipment or direct sunlight.
• To clean the set, use a soft dry cloth. Do not use any cleaning agents containing
alcohol, ammonia, benzene or abrasives as these may harm the housing.
TROUBLESHOOTING
If a fault occurs, first check the points listed below before taking the set for repair.
If you are unable to remedy a pmblem by following these hints, consult your dealer or
sen/ice centre.
WARNING: Do not open the set as there is a risk of electric shock! Under no cir
cumstances should you try to repair the set yourself, as this wiil invali
date the guarantee.
No power
ENTRETIEN
• N'exposez pas l'appareil à l'humidité, la pluie, le sable ou une chaleur
excessive provenant d'équipement chauffant ou bien du soleil direct.
• Pour nettoyer l'appareil, utilisez un chamois de cuir doux et légèrement
humide. N'utilisez aucun nettoyant contenant de l'alcohol, de l'ammoniac,
benzine, ou de tels abrasifs, puisque ceux-ci pourraient endommager le boîtier.
DEPISTAGE DES ANOMALIES
Si un défaut se produit, vérifiez premièrement les points suivants avant d'apporter
votre appareil pour réparation.
S'il vous est impossible de remédier au problème en suivant ces suggestions,
consultez votre distributeur ou centre de service.
ATTENTION: Vous ne devriez, en aucune circonstance, tenter de réparer
l'appareil vous-même puisque ceci rendra votre garantie nulle et
sans effet Ne jamais ouvrir vous-même l'équipement au risque de
recevoir des chocs électriques.
Pas d'alimentation
MANTENIMIENTO
• No exponer la unidad a humedad, lluvia, arena o calor excesivo causado por
aparatos de calefacción o luz directa.
• Para limpiar su unidad, use a paño de gamuza ligeramente humedecido. No
use agentes de limpiezas que contengan alcohol, amonfaco, benceno, o
abrasivos que causan daños a la casa.
PROBLEMAS Y SOLUCIONES
En caso de falla, revise primero los puntos enumerados a continuación, antes de
llevarse unidad para reparación.
En caso que usted no pueda remediar el problema siguiendo los pasos
mencionados, consulte a su distribuidor o centro de servicio.
PRECAUCIÓN: No abra el equipo, ya que puede recibir un choque eléctrico! Bajo
ninguna circunstancias trate de arreglar la unidad usted mismo,
esto invalidará la garantía.
No se enciende
PFLEGE
• Das Gerät nicht Feuchtigkeit, Regen, Sand oder übermäßiger Hitze aussetzen,
die von Heizgeräten oder direktem Sonnenlicht erzeugt wird.
• Zum Reinigen des Gerätes ein weiches, leicht angefeuchtetes Fensterleder
benutzen. Ven/venden Sie keine Reinigungsmittel, die Alkohol, Ammonium,
Benzol oder Poliermittel verwenden, die das Gehäuse angreifen könnten.
FEHLERSUCHE
Falls eine Störung auftritt, überprüfen Sie zuerst die unten angeführten Punkte,
bevor Sie das Gerät reparieren lassen.
Wenn Sie trotz Befolgung dieser Hinweise die Störung nicht beheben können,
wenden Sie sich an Ihren Fachhändler oder an den Kundendienst
WARNHINWEIS: Das Gerät nicht öffnen, weil Stromschlaggefahr besteht Unter
keinen Umständen sollten Sie versuchen, das Gerät selbst zu
reparieren, da dies die Garantie ungültig macht
Kein Strom
- Wrong battery polarity
• Insert batteries correctly
- Batteries exhausted
• Replace batteries
No sound (see also No power)
- Polarité incorrecte des piles
• Introduisez correctement les piles
- Piles usées
• Remplacez les piles
Pas de son (voir également Pas d'alimeirtation)
- Las pilas están mal colocadas (polaridad equivocada).
• Inserte las pilas correctamente.
- Las pilas están gastadas
• Cámblelas
No hay sonido (vea también No se enciende)
- Batterien falsch eingesetzt
• Batterien richtig einsetzen
- Batterien erschöpft
• Batterien wechseln
Kein Ton (und auch kein Strom)
- Volume is turned down
• Turn up volume
- Headphones plug is inserted
• Disconnect headphones if you are not using them
Poor headphones sound/ sound from one channel only
- Le volume est faible
• Augmenter le volume
- La fiche écouteurs a été introduite
• Déconnectez les éceuteurs si veus n'en faite pas usage.
Son écouteurs faible/ son en provenance d'un seul canel
- El volumen está demasiado bajo
• Suba el volumen
- La clavija de los auriculares está conectada
• Desconéctela si no los está utilizando.
El sonido de los auricularos es malo/o sólo funciona un lado
- Lautslärke ist heruntergedmht
• Lautstärke hochdrehen
- Kopfhörerstecker angeschlossen
• Kopfhörer ziehen, wenn Sie ihn nicht benutzen
Schlechter Kopfhörerklang/Kleng nur auf einem Kenal
- Headphones plug not fully inserted
• Insert plug fully
- La fiche écouteurs n'est pas bien introduite
• Insérez proprement la fiche
- No se ha insertado la clavija completamente
• Insértela completamente
- Kopfhörerstecker nicht voll eingeschoben
• Stecker ganz einschieben
Severe radio hum/distortion
Grésillements/défermation importants du signal radio
Acusada distorsión/zumbido en la radio
Heftiges Brummen/Reuschen
- FM aerial not fully extended
• Extend FM aerial fully
Continuous crackling/hiss disturhance during MW (AM/LW) hroadcast
- Electrical interference from TV, computer, fluorescent lamp, etc.
• Move set away from other electrical equipment
- L'antenne FM n'est pas entièrement sortie
• Sortez entièrement l'antenne FM
Crépitements/sifflement continus pendant la diffusion MW (AM/LW)
- Interférence électrique d'une télévision, d'un ordinateur, lampe fluorescente,
etc.
• Placez l'appareil à un endroit éloigné d'autre équipement électrique
- La antena de FM no está bien extendida
• Extiéndala
Distorsiones continuas / Sonido de silbido durante la recepción de MW
(AM/LW)
- FM-Antenne nicht ganz ausgezogen
• FM-Antenne ganz ausziehen
Ständige Störungen durch Rauschen/Pfeifen bei MW (AM/LW)- Empfang
- Elektrische Störungen von TV, Computer, Leuchtstofflampen usw.
» Rücken Sie das Gerät weg von anderen Elektrogeräten
- Interferencias eléctricas de TV, computadoras, lámparas fluorescentes, etc.
• Aleje la unidad de otros equipos eléctricos
CAUTION
Use of controls or adjustments or performance of procedures
other than herein may result in hazardous radiation exposure
or other unsafe operation.
ATTENTION:
L'utilisation des commandes ou réglages ou le non respect
des procédures ci-incluses peuvent se traduire par une expo
sition dangereuse à i'irradiation.
ATENCIÓN
Ei uso de mandos o ajustes o la ejecucci ún de m étodos que
no sean los aquí descritos puede ocasionar peligro de exposi
ción a radiación.
ACHTUNG
Die Benutzung von Bedienelementen oder Einstellungen oder
die Durchführung von Verfahren, die nicht hierin enthalten
sind, kann za Exposition an gefährliche Strahiung führen.
Environmental information
Unnecessary packing materials has been omitted to make the pack
ing easy to separate into 2 categories: cardboard and paper pulp.
Our unit consists of materials which can be recycled if disassembled
by a specialized company. Please observe local regulations on the
disposal of packing materials and old equipment.
Informations sur renvironnement
Pour faciliter le triage, nous avons réduit l'emballage à un minimum
en deux matières: papier et carton.
Votre appareil consiste en des matières pouvant être recyclées si
l'appareil est démonté par une compagnie spécialisée. Veuillez s'il-
vous-plait observer les règlements locaux concernant la disposition
de matériels d'emballage et d'équipement usagé.
Información medioambiental
Hemos reducido el embalaje al mínimo para la fácil separación en
dos material: papel y cartón.
Esta unidad contiene material que se pueden reciclar si son
desmontados por compañías especializadas.
Observe las regulaciones locales en lo referente a la disposición de
materiales de embalaje y aparatos usados.
Umweltinformationen
Wir haben das Verpackungsmaterial auf ein Minimum von zwei
Kategorien reduziert: Papier und Pappe.
Ihr Gerät besteht aus Material, das beim Auseinandernehmen durch
eine Expertenfirma wiederverwertet werden kann. Bitte beachten Sie
örtliche Bestimmungen für das Entsorgen von Verpackungsmaterial
und alten Geräten.
This product complies with the radio interference requirements of the
Ce prednit satisfait aux conditions imposées par TUnion Européenne
Este pmducto cumple los requisitos sobie interierencias de radio de la
Dieses Produkt entspricht den Fnnkentstörvorschriften der
European Union.
en matière d'interférences radio.
Unión Europea.
Europäischen Union.
The type plate is located on the bettom of the set
La plaquette de type se trouve à la base de l'équipement
La placa de especificaciones está situada en la paite inferior del equipo.
Das Typenschild befindet sich auf der Geiäteunterseile.