Clarity XL50 User Manual
Page 9
16
17
E
N
G
L
I
S
H
GETTING STARTED
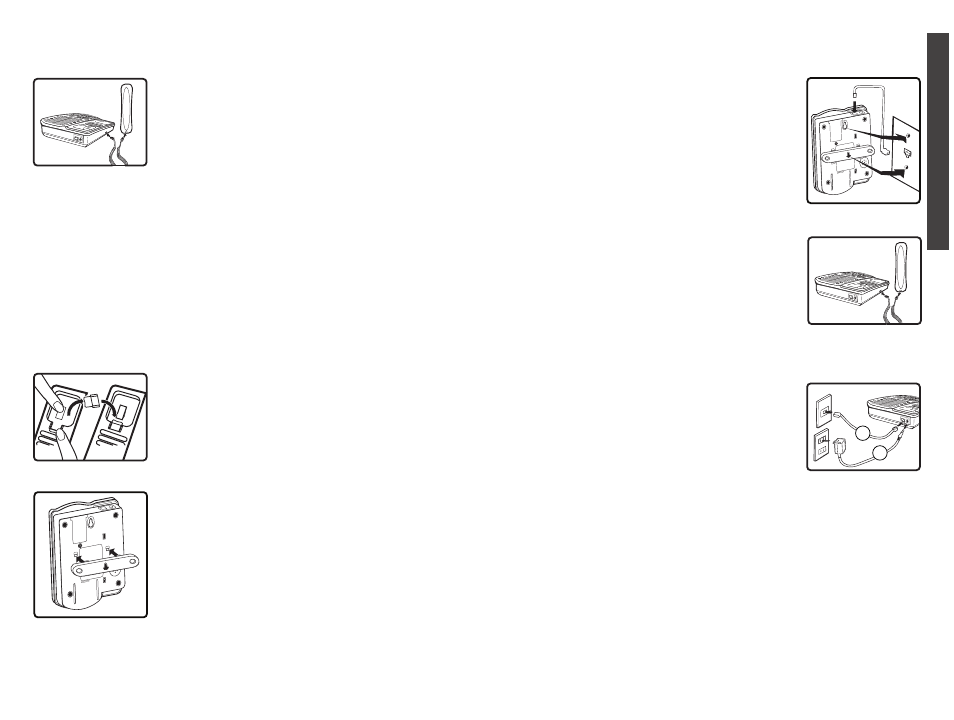
4. Plug the flat telephone line cord into the wall plate
jack, then align the mounting bracket’s keyhole slots
with the wall plate studs and slide the base of the
phone downward to secure it on the wall.
See Figure 6.
5. Plug one end of the coiled handset cord into the
bottom of the handset. Plug the other end of the
handset into the modular jack marked HANDSET
located on the left side of the phone. Place receiver in
the cradle. See Figure 7.
6. Set the TONE/PULSE switch located on the back
of the base to correct dialing mode. Please check with
your local telephone company if uncertain of the type
of service.
7. Insert the plug of the AC adapter into the jack marked
DC 9V located on the back of the base unit. Then plug
the AC adapter into a wall outlet. See Figure 8.
8. Locate the small hook on the handset cradle on the
base. Pull the hook out and turn around so the small
lip faces upward to support the handset.
9. Lift the handset and listen for a dial tone. The phone is
ready to use.
Placing a Call
1. Lift the handset and dial the number you wish to call.
2. Press the BOOST button and turn the Clarity Power
dial to adjust volume. The BOOST button will
illuminate to indicate amplification is on.
M1
M2
M5
M6
M7
M8
M9
M10
M11
M3
M4
Figure 7
M1
M2
M5
M6
M7
M8
M9
M10
M11
M3
M4
1
2
Figure 8
1. Plug one end of the long
flat telephone line cord
into the jack marked
LINE located on the
back of the telephone.
2. Insert the plug of the
AC adapter into the jack
marked DC 9V located
on the back of the
base unit.
GETTING STARTED
MANUA
L
AUTO
Figure 6
3. Plug one end of the modular coiled handset cord into
the handset. Plug the other end into the jack located
on the left side of the telephone. Place the handset in
the cradle. See Figure 3.
4. Set the TONE/PULSE switch located on the back
of the base to correct dialing mode. Please check with
your local telephone company if uncertain of the type
of service.
5. Lift the handset and listen for a dial tone. The phone is
ready to use.
Warning:
Use only the power adapter provided with
this telephone. Use of any other adapter may damage the
product and result in injury.
Wall Mounting Instructions
The phone unit may be mounted on a standard wall plate.
The mounting bracket will mount on the telephone with
the larger tabs towards the bottom of the phone.
1. Pull the handset hook out of the base and reverse its
position so that the hook points up and will hold the
handset when you hang up. See Figure 4.
2. Plug one end of the short flat telephone line cord into
the jack marked LINE located on the back of the
telephone. Then run the cord through the groove on
the back of the phone.
3. Insert the tabs of the mounting bracket into the slots
in the back of the phone. Push the mounting bracket in
and down firmly until it snaps into place. See Figure 5.
MANUA
L
AUTO
Figure 5
Figure 4
M1
M2
M5
M6
M7
M8
M9
M10
M11
M3
M4
Figure 3