1~r1j#e – Craftsman 917.28746 User Manual
Page 13
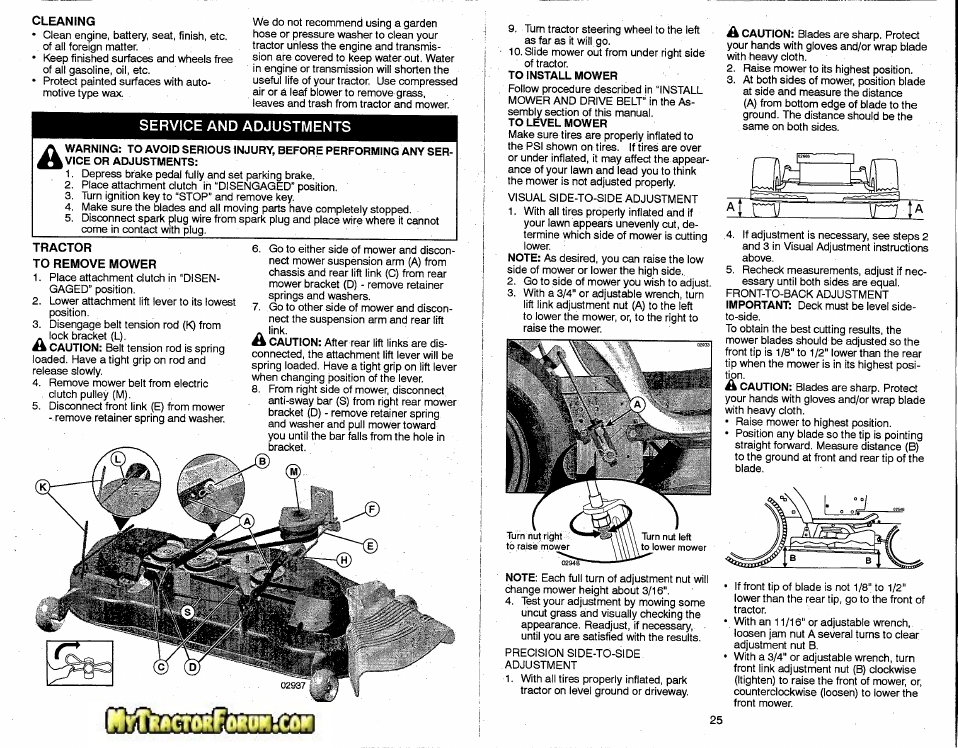
A
CAUTION: Blades are sharp. Protect
your hands with gloves and/or wrap blade
with heavy cloth.
2. Raise mower to its highest position.
3. At both sides of mower, position blade
at side and measure the distance
(A) from bottom edge of blade to the
ground. The distance should be the
same on both sides.
~1~r1J#E
• If front tip of blade is not 1/8" to 1/2"
lower than the rear tip, go to the front of
tractor.
• With an 11/16" or adjustable wrench,
loosen jam nut A several tums to clear
adjustment nut B.
With a 3/4" or adjustable wrench, turn
front link adjustment nut (B) clockwise
(Itighten) to raise the front of mower, or,
counterclockwise
(loosen) to lower the
front mower.
.4. If adjustment is necessary, see steps 2
and 3 in Visual Adjustment instructions
above.
5. Recheck measurements,
adjust if nec-
essary until both sides are equal.
FRONT-TO-BACK
ADJUSTMENT
IMPORTANT:
Deck must be level side-
to-side.
To obtain the best cutting results, the
mower blades should be adjusted so the
front tip is 1/8" to 1/2" lower than the rear
tip when the mower is in its highest posi-
tion.
A
CAUTION:. Blades are sharp. Protect
your hands with gloves and/or wrap blade
with heavy cloth.
• Raise mower to highest position.
Position any blade so the tip is pointing
straight forward. Measure distance (8)
to the ground at front and rear tip of the
blade.
25
9 .. Tum tractor steering wheel to the left
as far as it will go.
10. Slide mower out from under right side
of tractor.
TO INSTALL MOWER
Follow procedure described in "INSTALL
MOWER AND DRIVE BELT" in the As-
sembly section of this manual.
TO LEVEL MOWER
Make sure tires are properly inflated to
the PSI shown on tires.
Iftires are over
or under inflated, it may affect the appear-
ance of your lawn and lead you to think
the mower is not adjusted properly.
VISUAL SIDE-TO-SIDEADJUSTMENT
1. With all tires properly inflated and if
your lawn appears unevenly cut, de-
termine which side of mower is cutting
lower ..
NOTE: As desired, you can raise the low
side of mower or lower the high side.
2. Go to side of mower you wish to adjust.
3. With a 3/4" or adjustable wrench, turn
lift link adjustment
nut (A) to the left
to lower the mower, or, to the right to
raise the mower.
NOTE: Each full turn of adjustment nut will
change mower height about 3/16".
4. Test your adjustment
by mowing some
uncut grass and visually checking the
appearance.
Readjust, if necessary,
until you are satisfied with the results.
PRECISION SIDE-TO-SIDE
ADJUSTMENT
1. With all tires properly inflated, park
tractor on level ground or driveway.
We do not recommend using a garden
hose or pressure washer to clean your
tractor unless the engine and transmis-
sion are covered to keep water out. Water
in engine or transmission will shorten the
useful life of your tractor.
Use compressed
air or
a
leaf blower to remove grass,
leaves and trash from tractor and mower.
6. Go to either side of mower and discon-
nect mower suspension arm (A) from
chassis and rear lift link (C) from rear
mower bracket (D) - remove retainer
springs and washers.
7. Go to other side of mower and discon-
nect the suspension
arm and rear lift
link.
A
CAUTION: Aftenear
lift links are dis-
connected, the attachment lift lever will be
spring loaded. Have a tight grip on lift lever
when changing position of the lever.
8.
From right side of mower, disconnect
anti-sway bar (S) from right rear mower
bracket (D) - remove retainer spring
and washer and pull mower toward
you until the bar falls from the hole in
bracket.
~
B
24
TRACTOR
TO REMOVE MOWER
1. Place attachment clutch in "DISEN-
GAGED" position.
2.
Lower attachment
lift lever to its lowest
position.
.
3. Disengage belt tension rod (K) from
lock bracket (L).
A
CAUTION: Belt tension rod is spring
loaded. Have a tight grip on rod and
release slowly.
4.
Remove mower belt from electric
clutch pulley (M).
5. Disconnect front link (E) from mower
- remove retainer spring and washer.
L).
WARNING:
TO AVOID SERIOUS ..
INJURV, BEFORE PERFORMING
ANY SER-
a
VICE OR ADJUSTMENTS:
1. Depress brake pedal fully and set parking brake.
.
2.
Place attachment clutch
in "DISENGAGED"
position.
3. Turn ignition key to "STOP" and remove key.
4.
Make sure the blades and all moving parts have completely stopped.
5.
Disconnect spark plug wire from spark plug and place wire where it cannot
come in contact with plug.
.
~
CLEANING
• Clean engine, battery, seat, finish, etc.
of all foreign matter.
Keep finished surfaces and wheels free
of all gasoline, oil, etc.
• Protect painted surfaces with auto-
motive type wax.