11 block diagram, 11 section details, Mike-e – Empirical Labs EL-9 User Manual
Page 11: Example settings pt 3, Wiring the mike-e, Cable facts… and fiction, Options/upgrades, Example settings pt 2, Percussion, Elec. guitar
EXAMPLE SETTINGS PT 3
Synthesizers – First, don’t forget to use the direct Instrument input if the level of the synth is low,
although many modern synths can usually go right into the rear input jacks and not have trouble
driving the transformer input. Great for stage setups as a DI box. Synths often have plucky top
ends. One can smooth them out with saturation and emphasis previously described, or with a fast
compressor/limiter. Compression can help get rid of the pointy peaks also, but often more EQ is
necessary. Rolling off top end can help get rid of the buzz and peaks of a synth part. Remember it’s
how the whole mix fits together, and not an incredible tone of a single incidental part. Cutting freqs
on one track, gives room for them to come through on other tracks.
Percussion -
Drums and percussion have a huge dynamic range, and often need lots of “help”
in digital recordings. Perhaps the most common issue is spiky transients that can fatigue the ear
quite quickly. Drums can have peaks 20dB above the beef or tonal part of the sound, and analog
tape used to smash these down a bit so your poor ear drums didn’t have to respond to them and
clamp down so hard on them. Because the Mic Pre part of the Mike-E is clean and accurate, the
discussion below is about using the CompSat circuits to add musicality and warmth to percussives.
Snare – After setting the Mic Gain, perhaps the safest and most musical thing to do while tracking is
to use the Saturation of the Mike-E’s CompSat. Compressing drums during tracking can be
dangerous because bleed is brought up, and also, gating becomes a problem because the signal is
leveled and the decay or even another drums bleed will keep the gate ON (open). However, Mike-
E’s compressor does sound incredible on snare drums! More on this after trying the Saturation first.
Analog tape was always a big help in getting a fat, punchy, natural snare. If the snare has a
plastic edge to the front end, try 1:1 with the Emphasis circuits to saturate the HF peaks sooner,
especially after Eqing in some top end. Try turning up the Drive while in 1:1 till the BAD! LED lights
then backing down a touch, and listen to what full Saturation sounds like on the snare. This can
really help bring up snare “ghost” strokes, without compressing (one engineers favorite use!).
Compressing the Snare is a blast. So many options, especially when you start using the Mix
Control. Lets go over the top with NUKE ratio first. Turn the Mix 100% (full CW on 10) and put the
attack on .9mS, release .1 and turn Drive up till all the GR LEDS light up. Notice how smooth the
compressor is even at 20 – 30 dB of compression. Now for a sec, turn the mix control CCW to blend
in the DRY signal. You may want to adjust the output volume to compare different Mix amounts.
Now the dynamics have returned with the body and tone of the snare appearing quickly underneath
as the compressor brings them up. This is a wonderful mixdown tool, but can again be dangerous if
you track with it, unless you have another uncompressed snare track.
A more gentler compressor setting would be to return the Mix to 100% (10) and turn the ratio to 8:1,
attack on 20 or 100mS, much slower now to give some THWACK! A slow compressor attack lets
the transient front edge overshoot and seem ‘harder”, while the fast release will recover the body of
the snare after. You will see the Warm or even the TOASTY LED light up on the front edge
indicating some tape-like saturation. Experiment with the the Drive and Release and notice how the
tail of the snare is affected. Always try to have a good drum submix when adjusting compressors
and eqs, since the interaction of mics is what you will be dealing with when its all done.
Toms – Generally you can use all the techniques of the snare, described above. Toms are
especially susceptible to cymbal bleed, especially when compressing. The ride and crash cymbals
are extremely close to the toms so positioning of the mics to minimize the cymbals is very key when
tracking. If the toms are clacky, you can help with the compressor during mixdown by using a higher
ratio (8:1?) and a fast .9mS attack, and a fast release. This will demolish the attack (producing the
clackyness), and emphasize the tone that follows.
Kick Drum – Setting levels should be relatively easy using the CLIP TEST method, having the
drummer hit the Kick and snare as hard as he can at the same time. Using the 1:1 CompSat in 1:1
to softly clip peaks can make the Kick, especially if the drummer hits hard and has lots of attack. If
the Kick needs attack, use the slower 20mS or 100mS attack setting on the Compressor to allow
overshoot. Again this should be done on mixdown, since tracking the kick with compression can
cause problems previously mentioned on other drums.
Overhead cymbals – Analog tape used to soft clip and self erase the sometimes annoying transient
pings on the front edge of cymbals. The Mike-E’s saturation can really help with this, especially if
the Emphasis is used. Set MIX to 10 (full CW) CompSat on 1:1 and adjust drive to get desired
saturation. Sometimes a fast compressor (.9mS attack) can be a tool to soften these edges,
although it can also cause a splashy sounding mix if the drummer plays a lot of cymbals. Lighter
ratios will keep the cymbals from pumping too much, but don’t be afraid to bypass compressing and
just use some saturation for treatment of the overheads, especially while tracking.
5
Wiring the Mike-E
All Empirical Labs products have hookup directions located on the rear panel of unit, near
the connectors.
Connect AC line cord to 3 prong IEC jack, plug in XLR or phone plug ins and outs, and you're
wired. The rear panel phone and XLR input jacks are both differential. At the output, only the XLRs
are differential (balanced). The output phone jack tip is wired to pin 2 of the XLR out, and therefore is
in phase with that pin. The Instrument Input on the front has gain and is single ended. If you have
an instrument like a bass, guitar, or synth that needs pre-amping, use this input. You CANNOT use
two inputs at the same time, but its ok to use the Inst “In jack” and leave the rear inputs connected.
Preferably, only one input jack will have a “hot” signal at any given time.
The only real problems you may have are at the outputs.
Don’t short any of the Active XLR
output pins 2 or 3 to ground. Let the unused pin “float” (stay unconnected). Separate
amplifier drives each of these pins, so grounding one of them will short the associated amplifier out.
Therefore, if you only use pin 2 on your output cable, leave pin 3 unconnected and vice-versa.
The reverse is true with the Class A Transformer Output. Always connect pins 2 and 3 to
something, either an input or to ground. Pin 1 is shipped un-grounded on the Transformer Output
XLR, but a jumper inside on the rear of the “Power Supply” board can connect this pin to ground.
When going to a single ended patch bay or other device, using quarter inch phone plugs
(guitar cables) will work just fine, and take some guesswork out of wiring. To use the
Transformer Output single ended, short pin 3 to ground on the XLR at the patch bay, or other
device. Patch bays seem to be the cause of many phase, buzz, or fidelity-loss problems.
Cable Facts… and Fiction
CABLES GENERALLY DO NOT MAKE A BIG DIFFERENCE IN SOUND. As long as a cable is
wired properly, shielded properly, and not damaged, no one will be able to hear the difference in a
length of decent cable 40 feet or shorter... regardless of what Munster Cable or anyone tells you!
To our knowledge, no AB/X listening tests have ever found any difference between a short, properly
wired low cost cable, and a premium “audiophile” cable in low impedance situations. But even
though there are cable companies who have made millions propagating misconceptions, some
cables are indeed lower impedance, better shielded, and break-free than others. Mogami is a great
price/value in our opinion. The big “gotcha” is that between patch bays and remote wiring, the
accumulative lengths can exceed 60 ft or more for a professional studio “patch”. These longer
lengths can start to show shortcomings of cables, since the capacitance vs. inductance begins to
mount and causes slight phase shift and high frequency loss, especially in high impedance sources
such as “passive” guitars, basses, and certain microphones. Low impedance wiring is less prone.
Speaker cables are even sensitive as long as they are heavy gauge. For monitors, 10 –
14 gauge zip cord should handle most anything (for some reason the lower the gauge, the thicker
the wire). Huge PA systems with long runs to amplifiers require a little more care.
The same applies to the AC power cables. We have seen $150 power cables, claiming
added definition, musicality, and even “sincerity”! As long as a $1 six foot AC cable isn’t worn, and is
less than 16 gauge, signal processors such as the Mike-E will perform just as superbly as with any
$150 cable. Almost all musical gear has a regulated DC power supply that does an incredible job at
completely isolating whatever flaky AC comes in.
OPTIONS/UPGRADES
Lundahl XL Input Transformer – Handles hotter Low Frequency inputs.
Insert Point – Sends the Mic Preamp to TRS rear connector, which can
be used as insert point for EQ or other processing. Also allows
outputting compressed and uncompressed audio, simultaneously.
Jenson Output Transformer – Available in future.
Class A Output Transformer – Available in future.
XFRM Output Ground Lift Switch – Useful for live situations.
Alternate Compression Ratios
These options will be available from Empirical Labs directly.
See www.EmpiricalLabs.com for pricing and details.
10
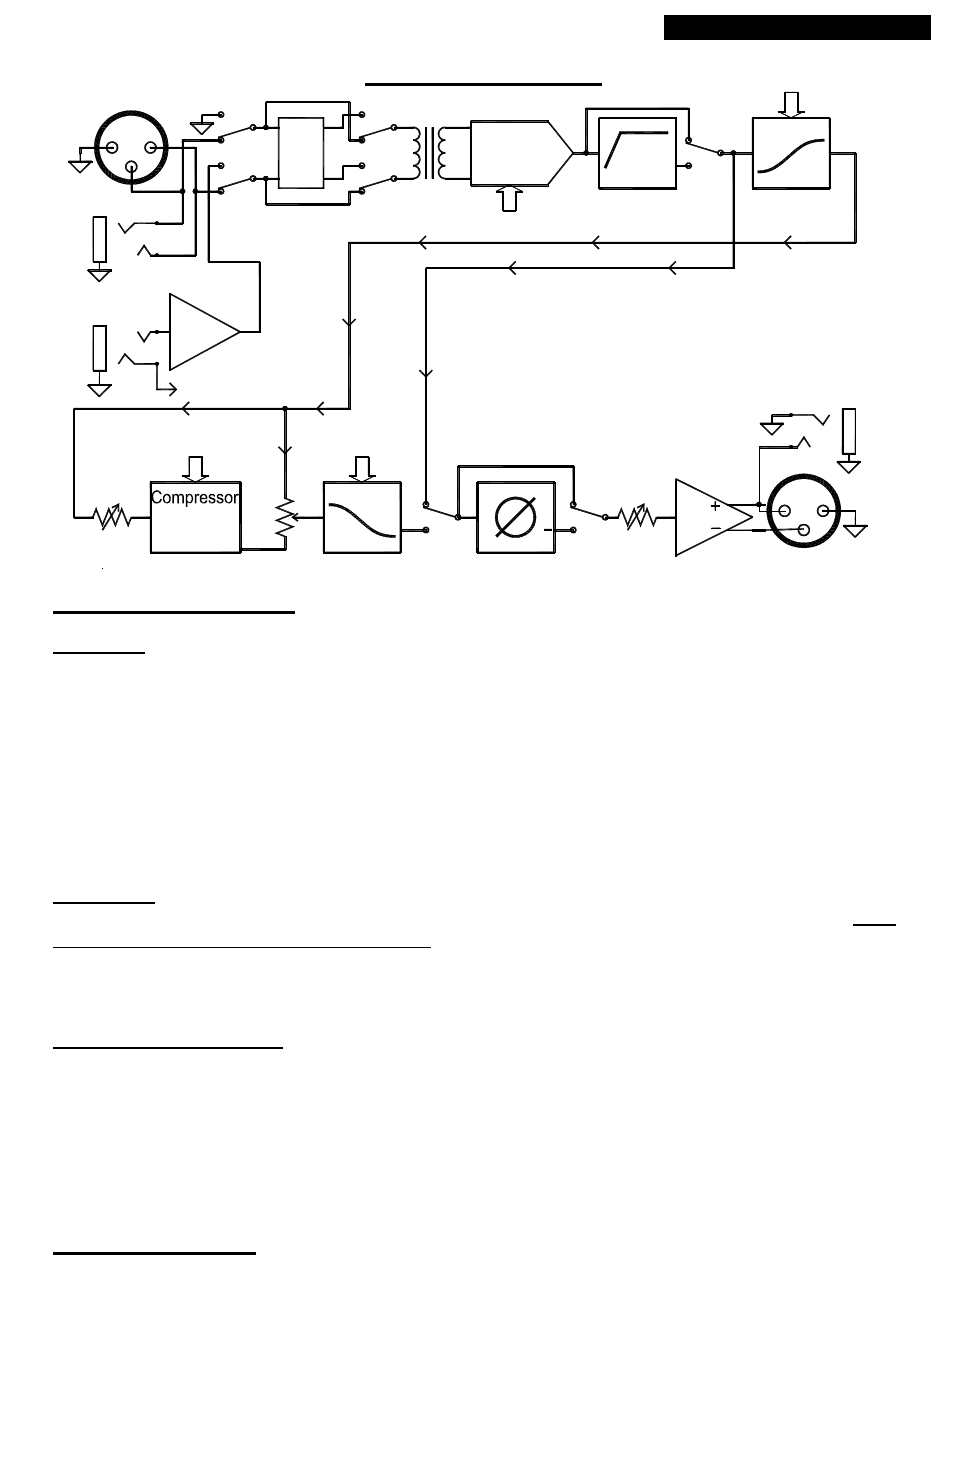
Block Diagram
Section Details
The Input The “Input” section is a transformer balanced low impedance circuit. It is relatively
insensitive to all kinds of wiring, be it balanced or unbalanced. The Input phone jack on the back is
also balanced but will terminate (“short out” in a GOOD way) one leg of the balanced input when a
non-stereo guitar type cable is inserted. The input impedance of the main inputs is quite low at 600
ohms. Do not let this input section clip, causing the BAD! LED to light.
The Instrument Input on the front panel is an unbalanced, high impedance input (340Kohms),
designed for lower level, and higher impedance signal such as electric guitar, electric bass, and
other sources that may be sensitive to input loading. It will sense when something is plugged in and
automatically switch off the rear inputs. It uses circuitry that was designed for a DI box, and goes to
the input transformer for some “iron” in the sound, and gain adjustment. If your instrument is low
impedance and has a good output level, plug into the rear phone jack.
The Output – The basic Mike-E has an active output section going to two jacks in parallel, with the
¼” phone jack output being unbalanced. The output driver has 14dB of clean gain available. All of
the output jacks can be used the same time. Pin 2 of the active output XLR is directly connected to
the tip of the phone jack output. See Wiring on page 10 for more details.
The output driver has tremendous headroom, so don’t be afraid to run the output knob between
8 – 10 (all the way up) if necessary. As long as the BAD! doesn’t light, there is no degradation.
Mic Preamp Section
– This is a super low noise transformer input amplifier section, with the
gain digitally controlled. This section comes standard with a shielded Lundahl transformer, but
provides for a Jenson transformer also. The signal to noise far exceeds any microphone in
existence, typically over 130 dB with the input shorted and 40dB of gain. Having used many mic
preamps over the years, we have implemented a unique stepped gain control that should be
impervious to the normal flakiness that age causes to pots and detented switches. Counting the
output gain of 14 dB, a total of 74 dB of gain is available to the user, with the CompSat section
bypassed. A 48 Volt Phantom power is provided for condensor mikes. The Phantom power will reset
to OFF whenever unit is turned on to protect a different mic, such as a ribbon microphone.
Highpass Section
This is a specially shaped, digitally controlled 3rd order high pass filter. The shape has been
selected to prevent thinning out frequencies just above the corner frequency. The slope of the roll
off is 18dB per octave, and because of this steepness, the HP must be used with caution, especially
during tracking. No compromise was used in this filter, with a single active stage design, 5% caps,
1% resistors used throughout. This filter is capable of .0005% THD and over 124dB dynamic range.
11
EXAMPLE SETTINGS PT 2
With a soft instrument like an acoustic guitar, start with Mic Gain set at 50dB, and do the CLIP
TEST by having the player hit a really hard chord. If the mic doesn’t have a nice HP filter, you can
engage the 80Hz HP on the Mike-E to cut sub-frequencies.
Smoothing out the dynamic range of plucked instruments with a fast compressor is extremely
common., using a LN1176 or our own Distressor is sometimes all you will need when tracking or
mixing. BUT… The Mike-E has an amazing compressor, as good as any, in our highly respected
opinions… so lets use it!
Start setting up the compressor by turning the mix to 10 (full CW or 100%). If you want a
smooth glassy sound, we should keep the attack really fast (LN1176 speed) and set it to .9mS. The
release too can be fast which smoothes out the pumping. Lets start with Release on .1, and ratio
4:1. This can keep the compressor working most of the time with peak Gain Reduction around 10
dB. This should sound natural even while tracking. If the instrument or part is overly dynamic, even
more compression can be applied by turning up the DRIVE control. If the instrument starts to sound
squashed, you can back off the compression or use the MIX control to add back in some
uncompressed signal. This will bring up the low level stuff while keeping the loud emotional
passages more intact. If there are shrill or brittle parts, engaging the Emphasis can saturate the
higher frequencies sooner and soften them.
Saturation Only - If you are recording a solo instrument and wish to keep all the dynamic range,
but fatten up and soften the brittle edges ala analog tape, you can put the CompSat on 1:1 and
simply round out the pointy peaks and make them easier on the ear, and with the Emphasis
engaged, get a very warm tape like sound. Again, turn the Mix to 100%, and adjust Drive so the
WARM LED is on most of the time the musician is playing, letting the Toasty light come on frequently
on peaks. The unique dual clip Germanium circuits will softly and subtly clip the peaks of the
waveforms, rounding them out. If desired, the MIX control can be used to mitigate over -saturation in
a wonderfully musical way. This saturation with emphasis may be worth the price of the Mike-E
alone, bringing back a familiar smooth sound to those familiar with analog tape.
Elec. guitar
– Digital recorders do not enhance Electric guitar sounds in any way. Mike-E’s
CompSat is a wonderful tool to bring back some smoother, monstrous electric guitar sounds, while
tracking, or while mixing. The CompSat section is incredibly deep, and offers many options to color
the sound. Don’t forget the high quality HP filter, which will not affect any useful guitar frequencies.
Using Saturation - After adjusting the Mic Gain using the CLIP TEST, engage the CompSat and
start with 1:1, simply soft clipping the grittiness, and subs. The Emphasis will again further soften
the high frequencies by clipping them earlier. Very analog tape-like.
Using the Compression – If compression is to be used, one should be careful on heavy,
distorted guitars, since they are already “compressed” from the Distortion, and the main outcome will
be just bringing up hiss and noise, especially during pauses. A low ratio would probably be a first
choice on heavy guitars, using only 1 – 4 dB of compression. On clean electrics, one can use liberal
amounts of compression usually. 6 – 20dB or more may not be unusual, but unless you’re a master,
prudence is called for when tracking since it cannot be undone. Use the fastest attack to get sustain
and smooth attacks, probably with a very fast release also. Try 8:1 attack .9, release .1S. Usually
you would keep the mix 100% (10). On the other hand, if you want to get a nice “Poppy” attack and
front edge to each note, but still have lots of “hang time” sustain, try 20 or 100mS attack, release
.1S. OR, try over compressing and then blending in the DRY Signal with the Mix Control.
Also, for clean guitar, you must try “INSTRUMENT IN” DI input. Great with CompSat.
Keyboards
– In this sampled age, this covers a lot of sounds. Acoustic Pianos are a whole
subject unto themselves, so let’s start there. Their sound begins with a great, well tuned piano and
good mics. Treatment also depends on the final setting, I.E. Solo piano, or as part of a larger
ensemble. Getting a big full sound is usually the goal of solo pianos pieces, whereas with a piano
that is part of an ensemble or rock mix is often brightened and compressed somewhat, and high
passed, especially if there are potential conflicts in the low end between the piano and bass parts.
So one can use the CompSat with just subtle Saturation, or for pop recordings, lots of compression.
Engineers use all kinds of approaches, fast attacks or slow, fast to medium release. Often however,
when a piano is part of an ensemble, you may want to use a fast attack to keep the attacks low in
relation to the main decay of the piano. One can also employ the MIX control to keep the attack and
dynamics, while bringing up the sustain as the compressed signal appears under the fading dry
unprocessed signal, eventually dominating the blend.
4
1
3
2
2
3
1
Balanced In
Digitally
Controlled
Preamp
10dB
Atten
Comp/Sat
Gain
HP
Filter
Main Output
Unit shown with all processing "Out"
Unbal
Dig Ctrls
HP Relay
Dig Control
Pre-Emphasis
Atten
Relay
Circuit
Dig Ctrls
Saturation Mix
Output
Gain
Inst
Preamp
Balanced Out
Mike-E
De-Emphasis
Inst Sense
Phase Invert
Input
XFRM
Comp/Sat
Comp
Bypass
(Tip)
Dig Ctrls