Kawasaki engines – EDCO GS-42 User Manual
Page 6
b. Charge the battery or provide an absolute
source of 12 volt DC power capable of 50
amperes total output. (A pair of good
jumper cables from your car or truck battery
will suffice.) Equip yourself with an
inexpensive 12 volt test light.
c. If the trouble seems to be in the electrical
control equipment, you may wish to
disconnect the starter from the system so
as to check the system without spinning
the engine.
d. Battery rundown. A common problem
is letting the battery run down. What
usually happens is that it takes the crew a
few jobs to get used to the whole system,
so the machine is stopped and started
quite often. Key left in on position, when
engine is turned off, will result in battery
running down – dying.
D. Belt Inspection & Replacement
Inspection
• Fold T-Handle to forward position
• Tilt machine back on rear of body & handle
• If belt is worn, cracked or shredding, belt
needs to be replaced.
Replacement
• Place 3/4" wrench on end of the shaft on the
top of the buffer body.
• Turn pad driver counter-clockwise to
remove.
• Take belt off by turning 3/4" wrench on shaft
and removing belt from pad driver pulley
and engine crank pulley.
• Check pad driver pulley & engine crank
pulley for correct alignment.
• Install new belt on engine crank pulley &
pad driver pulley, using 3/4" wrench.
• Install belt on tension pulley
• Install pad drive onto shaft, and return
buffer to operating position.
E. Adjusting Pad Pressure
The pad pressure may be adjusted by moving
the wheels:
• Forward to reduce weight on the buffer pad
or
• Backward to increase the weight
This adjustment may be required to adjust to
different floor finishes or to the weight variance
of aluminum or steel propane tanks.
KAWASAKI ENGINES
Tune-up Specifications
ITEM
SPECIFICATIONS
Ignition Timing
Unadjustable
Spark Plugs:
NGK - BPR4ES
Gap
0.75 mm (0.30 in)
Low Idle Speed
1500 RPM
High Idle Speed
3400 RPM
Valve Clearance
IN: 0.10-0.15 mm
(0.004-0.006 in)
EX: 0.10-0.15 mm
(0.004-0.006 in)
Other
No other adjustment
Specifications
needed
NOTE: High and low idle speeds may vary
depending on the equipment on which the engine
is used. Refer to the equipment specifications.
Engine Oil
Check the engine oil daily before starting the
engine otherwise shortage of the engine oil may
cause serious damage to the engine such as
seizure.
• Place the engine on a level surface. Clean the
area around the oil gauge before removing it.
• Remove the oil gauge and wipe it with a
clean cloth.
• Pour the oil slowly to “FULL” mark on the oil
gauge.
• Insert the oil gauge into the tube WITHOUT
SCREWING IT IN.
• Remove the oil gauge to check the oil level.
The oil level should be between “ADD” and
“FULL” marks. Do not overfill.
• Install and tighten the oil gauge.
The following engine oils are recommended:
API Service Classification: SF, SG, SH, or SJ.
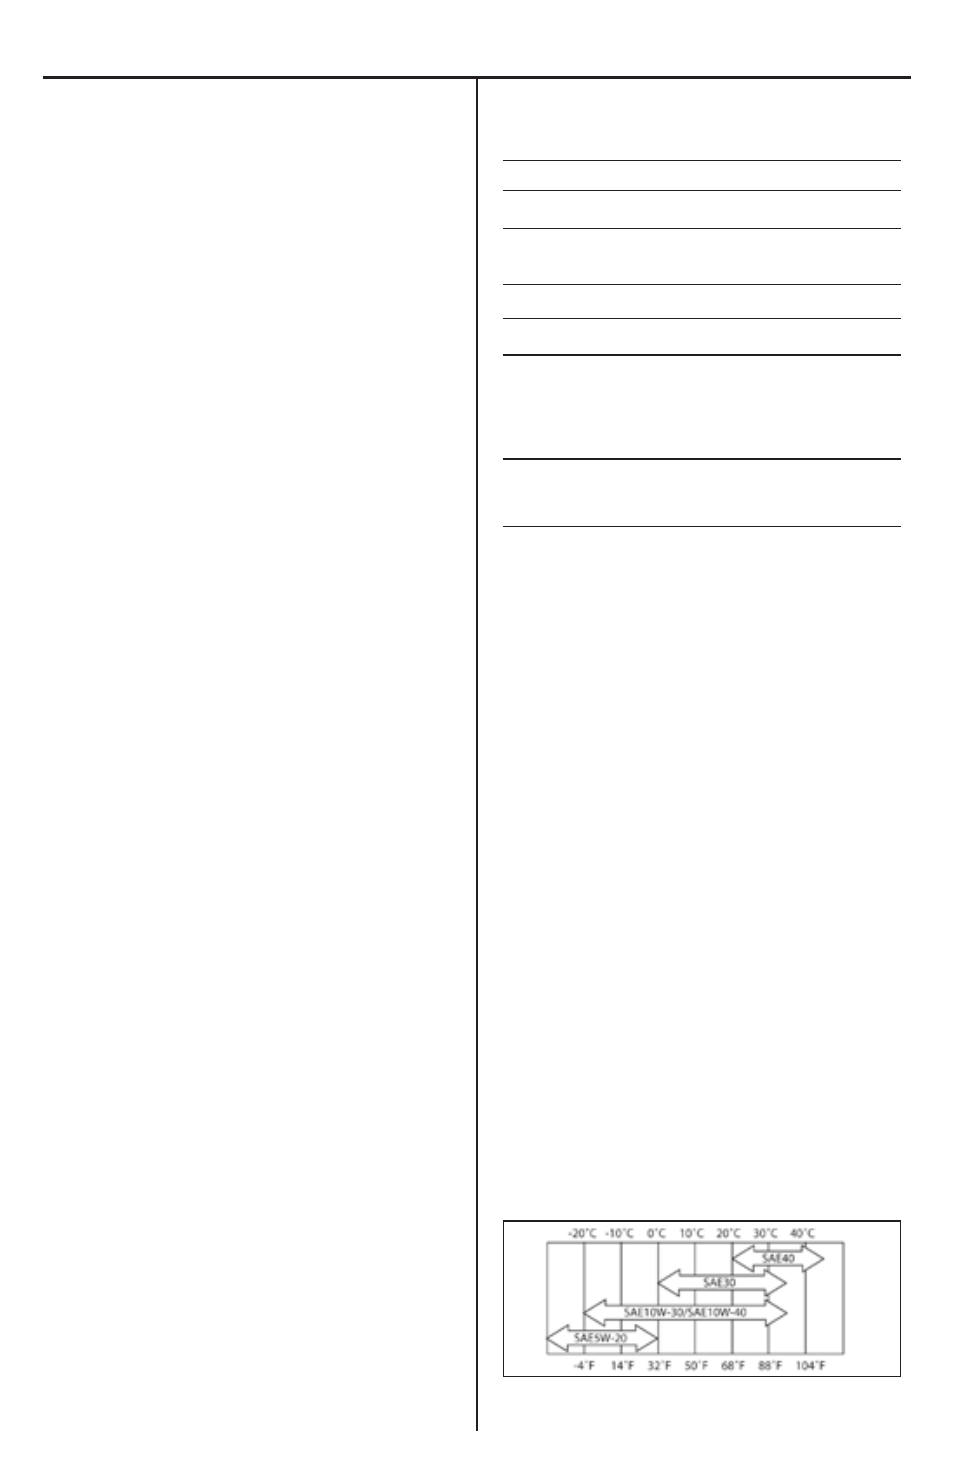
Oil Viscosity
Choose the viscosity according to the
temperature as follows:
NOTE: Using multi grade oils (5W-20, 10W-30, and 10W-40)
will increase oil consumption. Check oil level more frequently.
PG. 6