Water disposing options, Bbbi – Kenmore 251.90701 User Manual
Page 4
Attention! The text in this document has been recognized automatically. To view the original document, you can use the "Original mode".
CONTROL PANEL
WATER DISPOSING OPTIONS
(
2
) @
(19) ¡a
BBBI
(D
(z)
®
Power On/Off (1)
Pressing Power button once turns the
dehumidifier “ON” and pressing it again
turns the dehumidifier “OFF.”
Setting (2)
By pressing this button, unit will cycle through
each setting with every press. The order of
settings are Auto - Humidity - Delay Start
- Cycle Timer - Auto ...
Auto (3)
When the unit is turned on, the unitwill default
in Auto mode. AUTO (3) will be lit and “Auto”
will be displayed in window (7/8) for 10 seconds
before returning to the ambient temperature
and humidity. In this setting, humidity level is
automatically set for 50% RH. Because lower
temperatures usually correlate with lower
humidity levels, the unit will not run frequently.
At higher temperatures higher humidity is normal
so the unit will run more often.
Humidity
In this setting. Humidity allows you to manually
set the desired humidity level by using the
humidity arrows (9). Humidity values are changed
in 5% increments ranging from 35% to 70%.
When in this mode, there will not be a setting
LED lit. When pressing v arrow key when the
value is 35%, the unit will operate continuously.
In this continuous operation, “Cont” will be
displayed in the window (7/8) for 10 seconds
before returning to the ambient temperature and
humidity. To leave continuous operation, press
the arrows or change the setting.
Delay Start (5)
Unit can be programmed to turn on at a desired
delay time by pushing the timer arrows (6).
Time can be adjusted in 1 hour increments
ranging from 1 to 12 hours. Delay time will be
shown in window (8) and will count down to
start time in 1 hour increments.
Cycle Timer Setting (4)
In this setting, the unit will run for either 3, 6, or
12 hours, then shut off for 3. 6. or 12 hours. Cycle
time can be adjusted by pushing the timer arrow
up or down (6) repeatedly to set operating time
for 3, 6, or 12 hours. The cycle timer function will
continue until you change the setting or turn the
unit off.
Fan Speed (10)
Press Fan Speed to toggle between Auto, Low,
and High fan speeds. Speed will be shown in
fan speed indicator (11). When AUTO is selected,
the unit will adjust the fan speed accordingly
depending on the humidity level.
Bucket Full Indicator (12).
When the collection bucket is full, BUCKET FULL
indicator (12) will come on. The dehumidifier will
not run until the bucket is empty.
Pump On/Off
Pump On is an optional setting when using the
supplied
Vi
drain hose to remove the collected
water in the bucket. To turn the pump on/off, press
the Pump Button (14). When the pump is on. Pump
Display (13) will light on. The Pump Display (13)
will be off when the pump is off. The pump should
only be turned on when there is a
Vt
drain hose
properly connected to the machine and the pump
is intended to be used. If the pump button is pressed
when using other water disposal options, E3 (Error
Message) will show on display panel. Pump will run
automatically whenever the bucket gets full. The
bucket may not empty completely to protect the
pump, but once the bucket fills up again, the pump
will turn on.
OPTION 1, EMPTYING MANUALLY
1. Pull out the bucket, grasping upper and
lower handles.
2. Carry the bucket by grasping the inside
handle of the bucket.
3. After emptying the bucket, replace the
bucket in the dehumidifier.
NOTE: Dehumidifier will not work when the
BUCKET FULL light is on or without the
bucket properly placed in the unit.
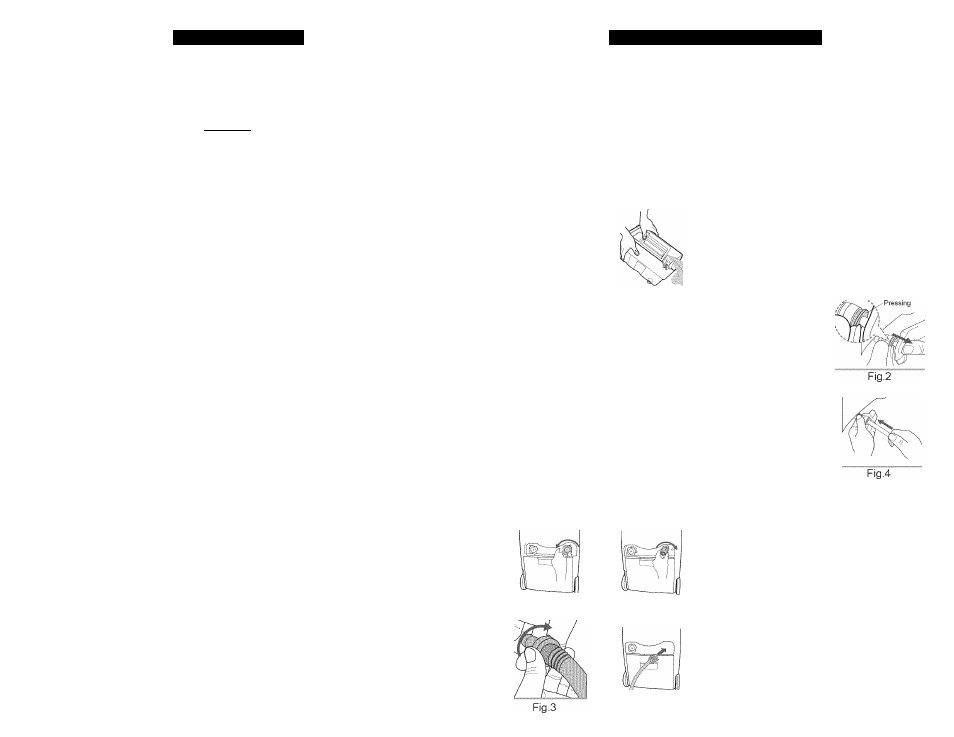
OPTION 2, GRAVITY DRAIN HOSE
(Hose Not Provided)
1. Take off GRAVITY DRAIN CAP by turning
the cap counterclockwise. (Fig.1)
2. Remove DRAIN CONNECTOR from the
bucket. (Fig.2)
3. Next, screw the DRAIN CONNECTOR
to a standard garden hose by turning
clockwise. (Fig.3)
4. Reattach the DRAIN CONNECTOR end
of garden hose to the dehumidifier (Fig.4)
then check hose for kinks or obstructions.
The position of the hose at the floor drain
must be lower than DRAIN CONNECTOR.
5. Keep the DRAIN CAP for future use when
emptying bucket manually.
Fig.1
Fig.2
OPTION 3, PUMP DRAIN
1. Remove the PUMP DRAIN CAP by turn
ing clockwise (Reverse thread). (Fig.1)
2. Remove the drain-hole PLUG by pulling out
while pressing in on the coupler. (Fig.2)
Keep the DRAIN CAP and PLUG for future use.
3. Feed the 1/4-inch hose provided through
the hole in the DRAIN CAP. (Fig.3)
4. Insert the end of hose into the drain hole
(Fig.4), then screw DRAIN CAP back
onto the unit. Place the other end of the
hose in the location you want the water to
go: to a floor drain, a water container, or
through a basement window to the
outdoors. (Pump can lift water up to 15
feet above the unit.) Check hose for kinks
or other obstruction.
Fig.1
Fig.3
5. In the unlikely event the hose comes
loose during pump operation due to
vibration, re-attach hose to continue
automatic pump removal of water.
A
Fig.4
I CAUTION: Do not remove the
bucket while the pump is operating. This
will cause the dehumidifier to stop operat
ing and result in an “E3” error message.
ALSO: The pump drain hose should not
be both under water AND at a height
that is above the dehumidifier. This can
cause a “back flow” to the dehumidifier
and cause the dehumidifier to stop work
ing resulting in an “E3” error message.
Following an “E3” error, the unit must be
unplugged and reset to operate. (See
Error Code section of this manual.)