Т³гж 9, Dvd + rewritable, Identification of controls – Curtis DVDR5000 User Manual
Page 9: Recording options
MUTE
PLAY STOP
PAUSE/STEP
ADD/CLEAR NAVIGATION
SELECT
OPEN/CLOSE
STANDBY/ON
SCAN
SETUP
TITLE
TIMER
REC/OTR
EDIT
AV
TV
DV
DISC OPER
MENU
CH+
REV PREV
FWD NEXT
CH-
VOL+
VOL-
AUDIO SUBTITLE ANGLE RETURN
REPEAT
SLOW
ZOOM
GOTO
PS/IS
PROG
DISPLAY
RANDOM
0
//
1
2
3
4
5
6
7
8
9
DVD + ReWritable
Identification of Controls
7
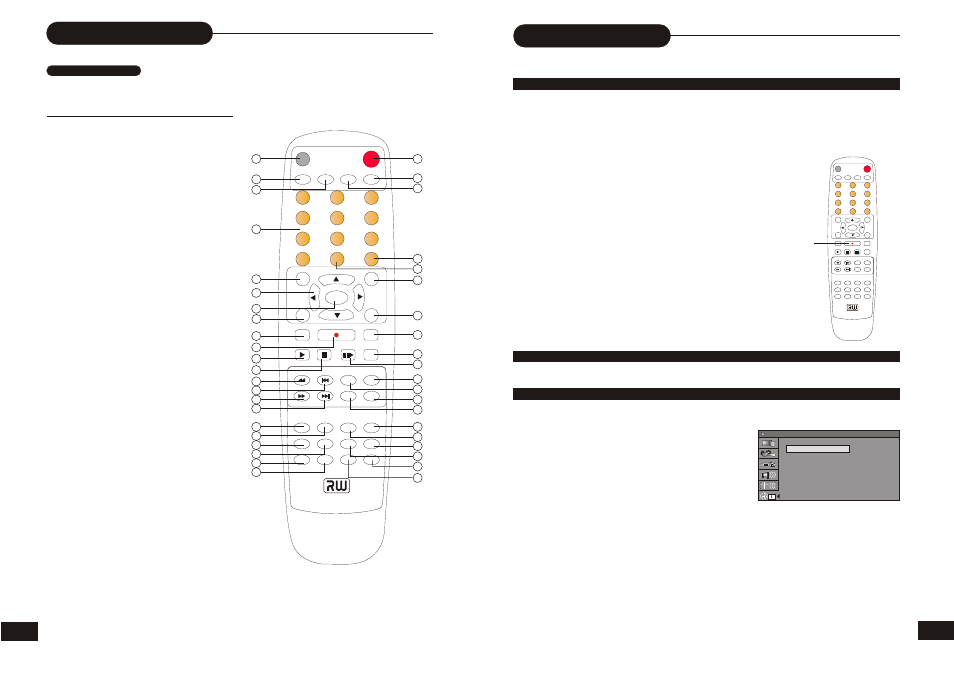
REMOTE CONTROL
THE INSTRUCTIONS BELOW DESCRIBE THE
FUNCTIONS OF THE REMOTE CONTROL
1. OPEN/CLOSE
2. DV
3. TV
4. NUMBERS
5. SETUP
6. DIRECTION
(UP/DOWN/LEFT/RIGHT)
7. SELECT
8. MENU
9. TIMER
10.REC/OTR
(RECORD/ONE-TOUCH RECORD)
11.PLAY
12.STOP
13.REVERSE
14.PREVIOUS
15.FWD
16.NEXT
17.AUDIO
18.SUBTITLE
19.REPEAT
20.SLOW
21.PROG
22.RANDOM
23.STANDBY/ON
24.SCAN
25.AV(SOURCE)
26.NAVIGATION
27.ADD/CLEAR
28.TITLE
29.DISC OPER
30.EDIT
31. MUTE
32.PAUSE/STEP
33.VOLUME+
34.CHANNEL+
35.VOLUME-
36.CHANNEL-
37.RETURN
38.ANGLE
39.DISPLAY
40.ZOOM
41.GOTO
42.PS/IS(PROGRESSIVE / INTERLACE SCAN)
MUTE
PLAY STOP
PAUSE/STEP
ADD/CLEAR NAVIGATION
SELECT
OPEN/CLOSE
STANDBY/ON
SCAN
SETUP
TITLE
TIMER
REC/OTR
EDIT
AV
TV
DV
DISC OPER
MENU
CH+
REV PREV
FWD NEXT
CH-
VOL+
VOL-
AUDIO SUBTITLE ANGLE RETURN
REPEAT
SLOW
ZOOM
GOTO
PS/IS
PROG
DISPLAY
RANDOM
0
//
1
2
3
4
5
6
7
8
9
DVD + ReWritable
1
2
23
24
26
28
29
30
31
33
37
39
35
32
34
38
40
41
42
36
27
25
3
4
5
6
7
8
9
11
13
15
17
19
21
14
16
18
20
22
12
10
28
Recording Options
ONE-TOUCH RECORD
1. During normal recording, press RECORD, the recorder will automatically stop in 30 minutes.
2. The recording time will extend for another 30 minutes with each press.
The length of recording time is determined by disc capacity and record quality.
With your setting, if it will exceed the capacity of the disc, OTR will be cancelled, and switched to
normal record.
3. If you want to stop recording, press STOP.
HOW TO SWITCH TO PLAYBACK MODE
When the recording is suspended, you can press PLAY to switch to normal playback mode.
CLOCK SETUP
1. During stop status, press SETUP to access the Setup Menu.
2. Use RIGHT/LEFT to highlight the CLOCK icon as the
right figure.
3. With “Date (mm/dd/yy)” highlighted, press SELECT,
and input the local date by numbers, press SELECT
again.
4. With “Time (hh:mm:ss)” highlighted, press SELECT,
and input the local time by numbers, press SELECT again.
Note:
If you want to cancel input, press RETURN.
Date(mm/dd/yy)
0 1 / 0 1 / 0 0
1 4 / 2 9 / 5 2
Time(hh:mm:ss)
SYSTEM SETUP - CLOCK
REC/OTR