Valve installation continued – Audio Note Ginrei User Manual
Page 9
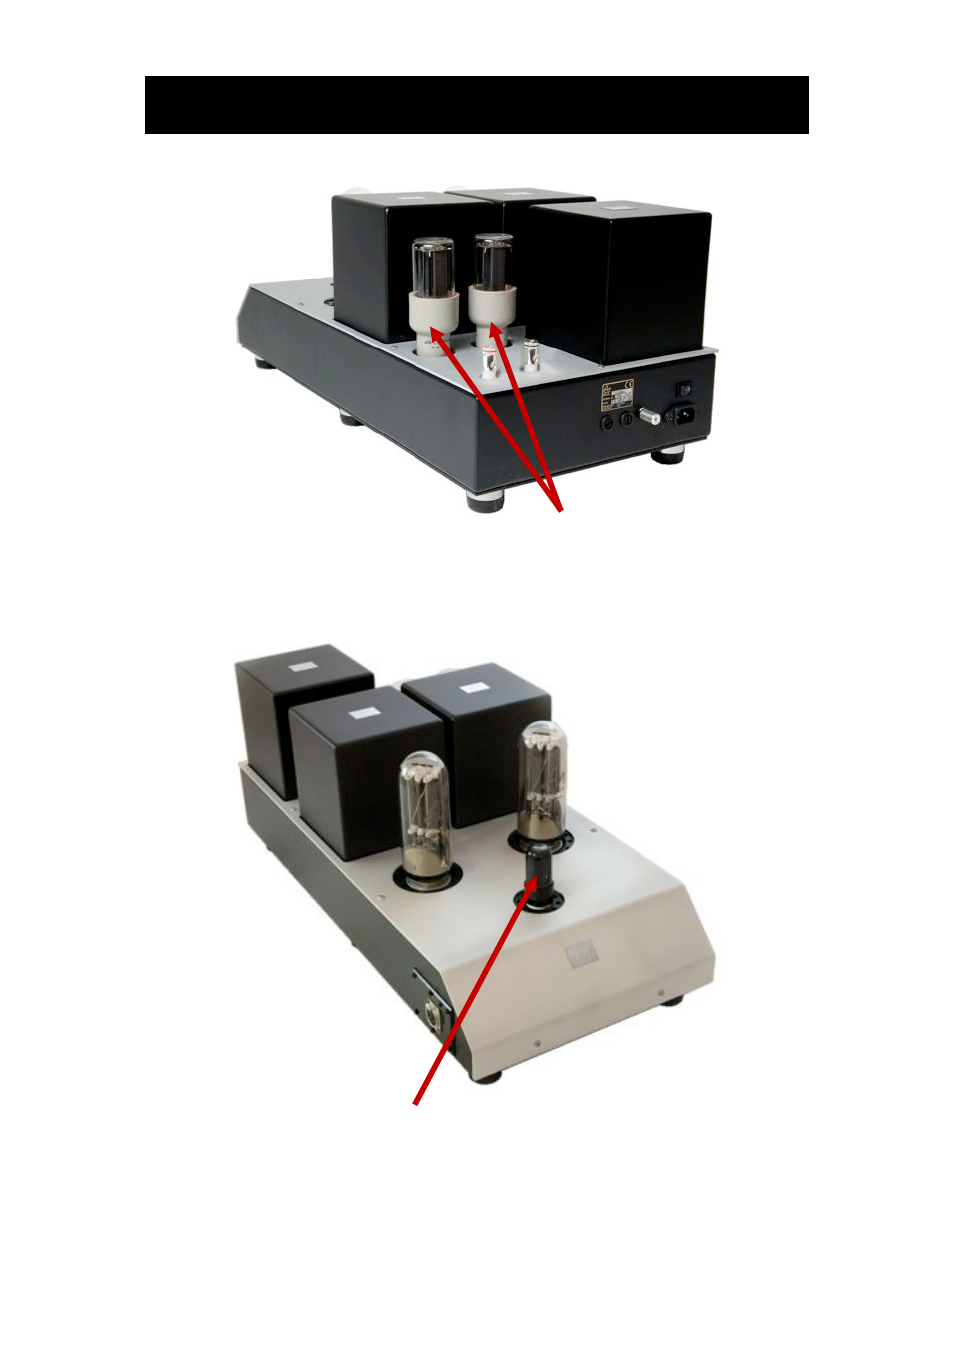
Looking from the back of the amplifier, insert the
5R4WGB
valves into the two empty
sockets located on the left, situated between the black rectangular transformer
covers and the loudspeaker connection binding posts. Locate the rib on the central
pin of the valve and align with the valve base (it can only be inserted one way due to
this locating rib) and with gentle but firm pressure insert the valve.
Finally, insert the
small signal valve
into the front socket. The valve can only be
inserted one way.
Check one more time that all of the 5 valves are correctly fitted, and
repeat the process for the second amplifier.
VALVE INSTALLATION continued…
See also other documents in the category Audio Note Receivers and Amplifiers:
- M Zero (7 pages)
- M Zero Remote (8 pages)
- M-One (7 pages)
- M-One Remote (8 pages)
- M1 Line (12 pages)
- M1 Phono (12 pages)
- M1 RIAA (12 pages)
- M2 Line (13 pages)
- M2 Line Balanced (15 pages)
- M2 Phono (13 pages)
- M2 Phono Balanced (15 pages)
- M2 RIAA (12 pages)
- M3 Line (15 pages)
- M3 Line Balanced CD Input (15 pages)
- M3 Phono (15 pages)
- M3 RIAA (14 pages)
- M5 Line (15 pages)
- M5 Line Balanced CD Input (15 pages)
- M5 Phono (15 pages)
- M5 Phono Signature (15 pages)
- M5 RIAA (14 pages)
- M6 Line (15 pages)
- M6 Line Balanced CD Input (15 pages)
- M6 Phono (15 pages)
- M6 RIAA (14 pages)
- M8 Line (15 pages)
- M8 Line Balanced CD Input (16 pages)
- M8 Line Signature (20 pages)
- M8 Phono (15 pages)
- M8 Phonosig (9 pages)
- M8 RIAA (14 pages)
- M9 Phono (20 pages)
- M10 Line (20 pages)
- M10 Signature (23 pages)
- I-Zero (6 pages)
- Jinro (14 pages)
- Meishu Line (13 pages)
- Meishu Line Silver (13 pages)
- Meishu Line Silver Signature (13 pages)
- Meishu Phono (13 pages)
- Meishu Phono Silver (13 pages)
- Meishu Phono Silver Signature (13 pages)
- Ongaku (15 pages)
- Oto Line (11 pages)
- Oto Line PP (11 pages)