Installation – natural gas – Fire By Design AWEIS User Manual
Page 5
5
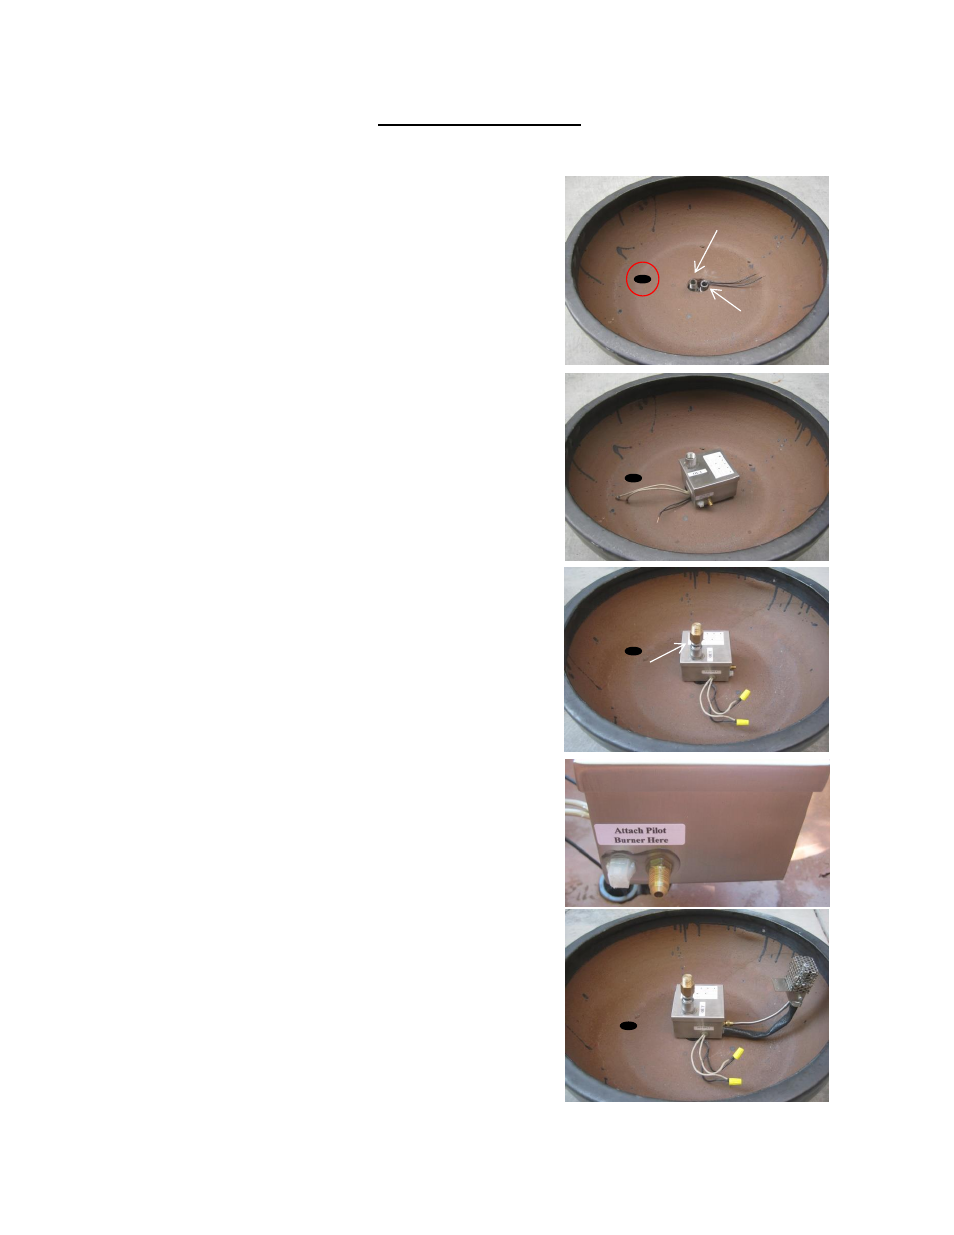
1. In the photo at right there is a bowl with both a gas
riser and an electrical conduit stubbed up inside the
bowl. In this photo the gas riser is centered whereas the
electrical is off center. It is preferred to stub the gas
riser centered in order to ensure the fire ring is centered
in the bowl once installation is complete.
NOTE: Drainage MUST be provided in the bottom of
the bowl. Drainage can be obtained by making a simple
hole as shown at right or providing a drain line next to
the gas and electrical conduit.
2. Apply pipe dope to the gas stub and thread the
AWEIS onto the gas riser as shown in the photo at right.
NOTE: Leak Test – it is highly recommended to
perform a gas leak test at this point in the install. Turn
on the gas supply and then, using a soapy water solution
spray the bottom of the AWEIS where it is connected to
the gas line to ensure no leaks exist.
3. Electrical Connections / Orifice Install. In the photo
at right the wires protruding from the AWEIS have been
connected to the two wires from the electrical conduit
using appropriate sized wire nuts.
In addition a short pipe nipple and the Natural Gas
Orifice (supplied) are installed using either Teflon tape
or gas plumbing pipe dope.
4. On the side of the AWEIS there are two connections
for the Pilot Burner Assembly as shown in the photo at
right. The white ‘quick connect’ is the electrical
connection and the brass plumbing fitting is the gas
connection. There is a label next to these connections,
“Attach Pilot Burner Here”.
5. The photo at right shows the AWEIS after the Pilot
Burner Assembly has been connected.
NOTE: The electrical connection for the Pilot Burner
Assembly is a shaped connection thereby ensuring it can
only be connected the correct way. On the Pilot Burner
Assembly side of the connection there is a locking clip
on the quick connect that will ‘lock’ the connection in
place. Therefore after making the connection lightly tug
on the connection to ensure it is in fact ‘locked’ in place.
1” Drain
Hole
Gas Stub
Electrical
Conduit
Installation – Natural Gas
Note: Installation should be done by a qualified service technician that is locally licensed.
Natural Gas
Orifice