Cub Cadet 997 User Manual
Page 32
32
A. Fasteners
B. Recoil Starter
C. Air Cleaner Case
D. Air Cleaner body
E. Latches
Remove the paper element (A) and the foam element
(B) from the air cleaner body (C).
Figure 15
A. Paper Element
B. Foam Element
C. Air Cleaner body
Foam Element
Clean the foam element every 25 hours.
Wash the element in detergent and water, and dry it
thoroughly.
CAUTION: Do not oil foam element.
Paper Element
•
Clean the paper element every 100 hours.
•
Clean the element by tapping gently to remove
dust. If very dirty, replace the element.
•
Replace paper-element yearly or every 300 hours.
CAUTION: Do not wash paper-element. Do not use
pressurized air to clean or dry paper element.
NOTE: Operating in a dusty condition may require
more frequent maintenance than above.
•
Reinstall the foam element and then the paper
element on the air cleaner body.
•
Reinstall the air cleaner case on the air cleaner
body by first fitting the projection (B) on the edge of
the air cleaner case into the slit (A) in the air cleaner
body. Then, sliding the fasteners (C) toward the air
cleaner case, securely fasten the air cleaner case
with the air cleaner body.
Figure 16
A. Slit in the air cleaner body
B. Projection on the air cleaner case
C. Fasteners
CAUTION: After servicing the air cleaner, be sure
all the removed parts are reinstalled properly in
place. Failure to secure fastening of the air cleaner
case with the air cleaner body may cause dirt or
other foreign materials to enter the engine, while it
is running, through the air cleaner, resulting in
engine troubles or failures.
•
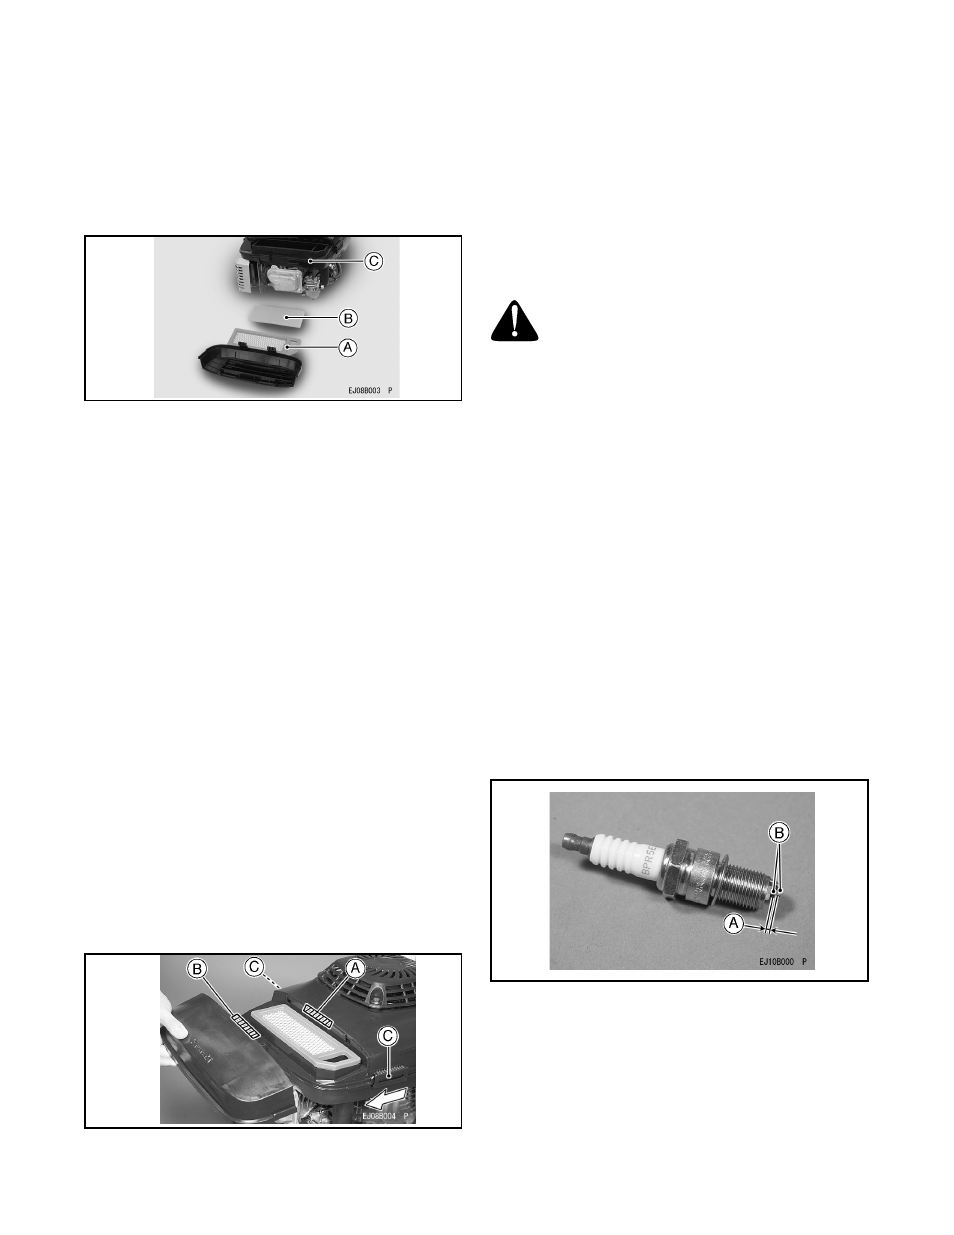
Clean or replace the spark plug and reset gap (A)
every 100 hours of operation.
•
Disconnect the spark plug cap from spark plug and
remove the spark plug.
•
Clean the electrodes (B) by scraping or with a wire
brush to remove carbon deposits.
•
Inspect for cracked porcelain or other wear and
damage. Replace the spark plug with a new one if
necessary.
•
Check the spark plug gap and reset it if necessary.
The gap must be between 0.7 and 0.8 mm (0.028
and 0.032").
To change the gap, bend only the side-electrode, using
a spark plug tool.
-Install and tighten the spark plug to 23 N-m (2.3kgf-m,
17fMb).
-Fit the spark plug cap on the spark plug securely.
-Pull up the spark plug cap lightly to make sure of the
installation of the spark plug cap.
Recommended Spark Plug
NGK... BPR5ES
Figure 17
A.
Spark Plug Gap
B.
Electrodes
CAUTION: Be sure to use the same type of spark
plug for change. Resistor spark plug is required in
some areas by local law.
WARNING:
Hot engine components can
cause severe burns. Stop engine and allow it to
cool before checking spark plug.