Measuring, Preparation – Checkline ESL-200 User Manual
Page 4
page 5
page 4
MEMORY
(FPM and Hz units each have nine separate memory locations)
Saving Flash Rates in Memory
Turn on the strobe and synchronize the
flash rate with the moving object. Press and
hold
MODE
, then press
MEMORY
, a memory
location number appears briefly and the
flash rate is saved to that memory location.
When nine locations have been saved FUL appears on the display.
Memory Recall
Turn on the strobe. Press
MEMORY
to enter
memory mode and memory location ‘1’
appears at the top of the display. Press
MEMORY
again to select another location. If no flash
rates are stored, numbers do not appear.
Changing Memory Values
Select a memory location (see Memory Recall above). The memory icon
indicates the stored flash rate matches the current flash rate. Use the
arrow keys to change the flash rate (the memory icon disappears). To
save the new flash rate, press and hold
MODE
, then press
MEMORY
. The
memory icon reappears and shows that the current flash rate is stored.
Clearing All Memory
Turn off the strobe. Press and hold the
MODE
key, and then press the power switch . SEL
is displayed. Press and hold
MODE
, then press
MEMORY
to display CLr. Press
MEMORY
again
and stored memory is cleared (CLr disappears
in three seconds). After memory is cleared
the strobe returns to default measuring mode
(3,000 FPM).
MEASURING
1. Visually note a unique feature on the
object to be measured or physically
mark it with reflective tape or chalk.
2. Press
to turn on the strobe. The
LED indicator blinks and the strobe
flashes at 3,000 FPM factory default
or previous power down value.
3. Set flash rate to maximum and aim
at the object. Press the
▼ arrow until
the object appears frozen. To find true
rpm, press the
÷2 button, ▲ or ▼
arrows, to adjust the flash rate until
the first time a single mark appears.
The flash rate changes more rapidly the longer the
▲ or ▼ arrow key is
held, then resets 1.5 seconds after it is released.
Advanced users: After releasing the
▲ or ▼ arrow, the numeric place of
the flashing digit indicates the rate of change. While the digit is flashing,
press the
or
arrows to move the numeric place of the flashing digit
higher or lower. Then press the
▲ or ▼ arrow to change the flash rate
using that increment.
4. Press
to turn off the strobe (the display remains for two more
minutes). The strobe shuts off automatically after 10 minutes.
▲
▲
–FUL–
FPM
F0
3000.0
FPM
1
MEMORY
ICON
1-2-3 ...9
–CL6–
FPM
F0
PREPARATION
Changing Units
(FPM is the factory default)
Turn off the strobe (the strobe light goes off
and the display stays on for two more minutes).
Press and hold
MODE
, then press the power
switch
and SEL is displayed. Press the
or
arrows to select FPM or Hz. The selected
unit becomes the default when the strobe is
powered on. Press the power switch
to exit.
▲
▲
–SEL–
FPM
F0
–SEL–
FPM
F0
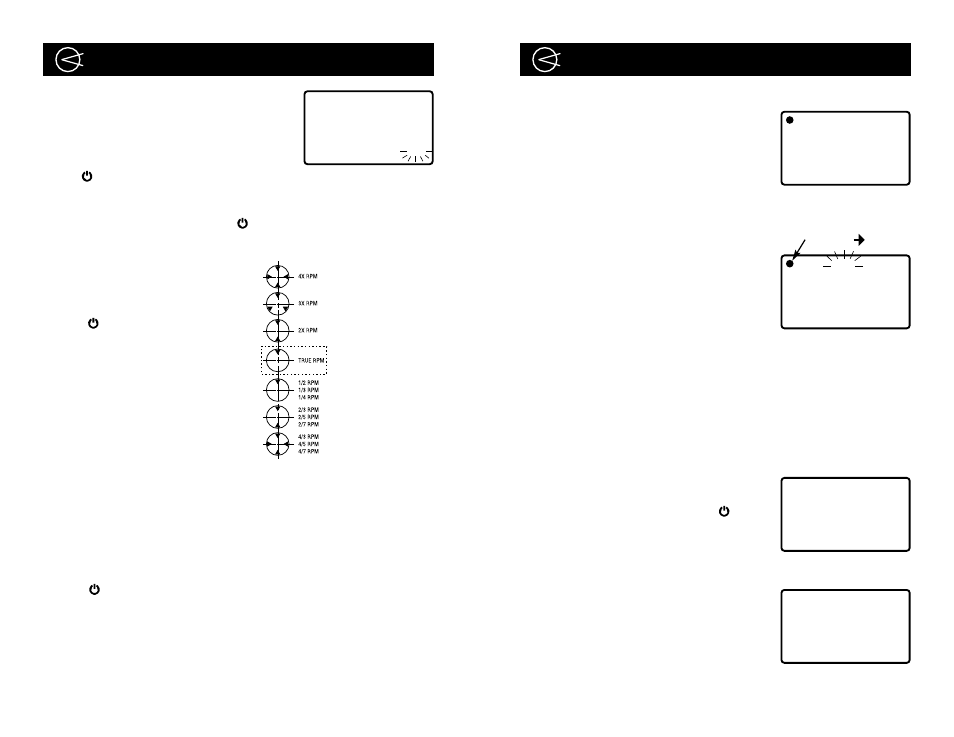
NOTE: IF THE FLASH RATE
IS 1/2 OF TRUE RPM, 1/3,
1/4, ETC., A SINGLE MARK
ALSO APPEARS.
IF THE FLASH RATE IS 2X
TRUE RPM, TWO MARKS
APPEAR, 3X TRUE RPM,
THREE MARKS, 4X, FOUR
MARKS, ETC.
IF THE FLASH RATE IS 2/3
OF TRUE RPM, 2/5, 2/7
ETC., TWO MARKS
APPEAR. AND 4/3, 4/5
AND 4/7 FOUR MARKS
APPEAR, ETC.
PRESS MEMORY TO CHANGE LOCATION
PRESS MEMORY TO CLEAR
PRESS AND HOLD MODE, THEN
PRESS MEMORY TO DISPLAY CLR
FPM, FLASHES PER MINUTE IS BEST
FOR MOST APPLICATIONS. HZ IS
FLASHES PER SECOND. SELECT
WITH LEFT/RIGHT ARROWS
Digital Phase Shift
(image rotation)
After synchronizing the flash rate with the moving object, press
–
or
+
to adjust the angle. When the strobe is turned off, the phase shift resets
to zero.