CITIZEN ANA-DIGI 30-7XXX User Manual
Page 2
4. SETTING AND USING THE ALARM
• The setting procedure of the ALARM time is the
same as that of the TIME display. Setting order is
as follows: ALARM•HOURS
→MINUTES
• The HOURS display will synchronise with the
selection of 12 or 24 HOURS in the TIME
adjustment.
• If the watch is left in the adjustment mode for more
than 1 minute without operating any button, AUTO
RETURN will activate to return to the normal
ALARM display.
• INSTANT MANUAL RETURN to the normal
ALARM display can be made at any stage of
adjustment by pressing
ࠗ
M
button.
• Press
ࠗ
R
button in the normal ALARM mode to set
“ON” or “OFF” the alarm. The ALARM set mark
will be indicated.
• ALARM sounds for 20 seconds at the ALARM set
time. Alarm buzzer can be ceased by pressing any
button.
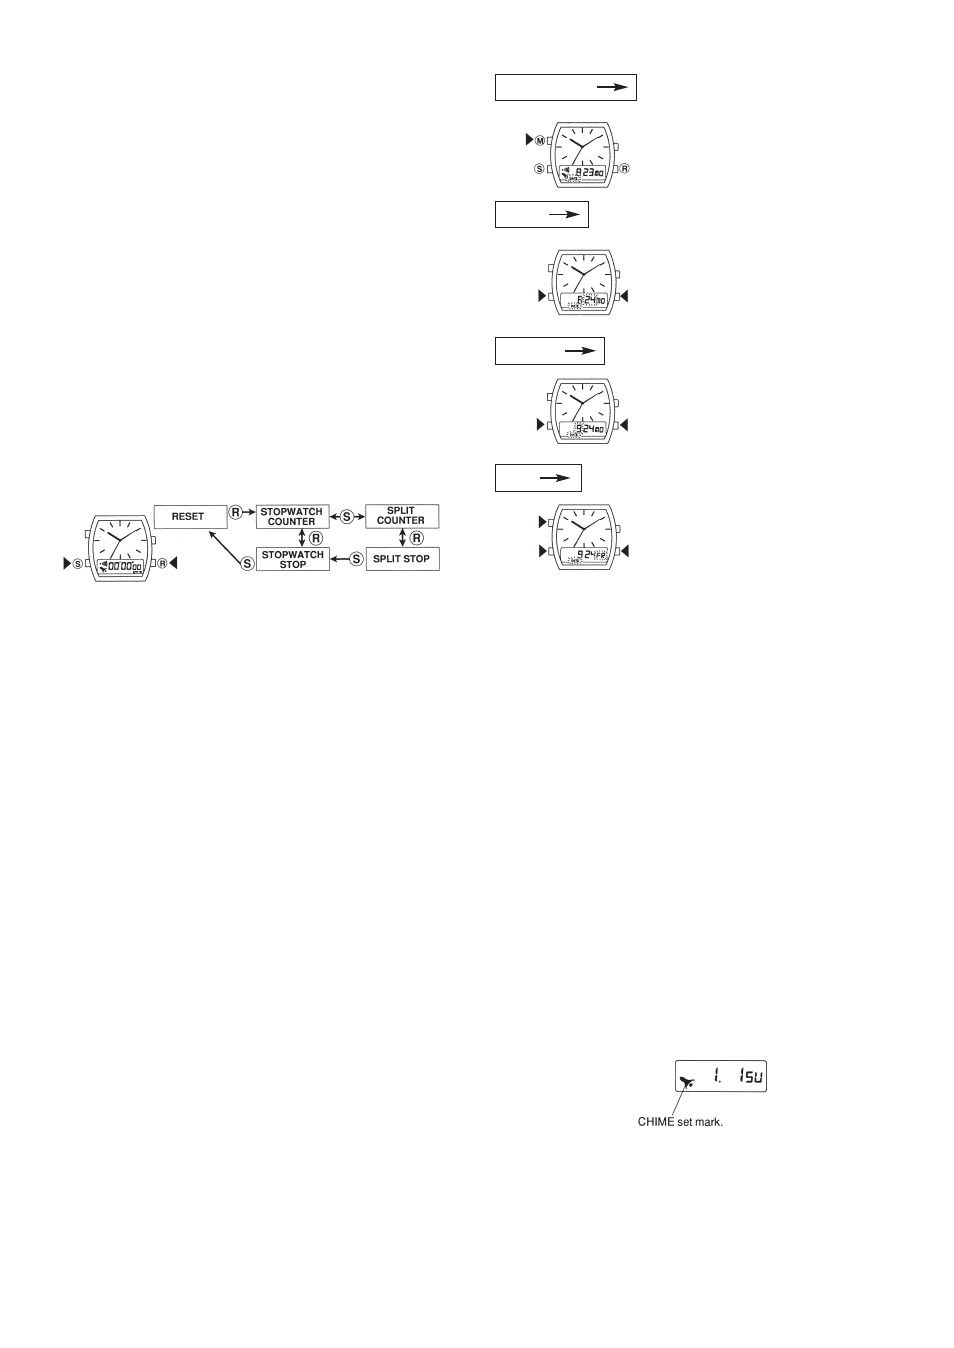
5. USING THE STOPWATCH
Stopwatch operation diagram
• Confirmation sound will be made each time
ࠗ
S
or
ࠗ
R
button is pressed in the STOPWATCH mode.
• The SPLIT COUNTER mode will turn into the
STOPWATCH COUNTER mode when it is
changed to the other mode while it is in operation.
• The TIMEKEEPING of the stopwatch will be turned
off, if the ALARM buzzer is stopped by pressing
ࠗ
S
or
ࠗ
R
button when the watch is in the STOPWATCH
COUNTER or SPLIT COUNTER mode.
While the split display is in use the SPLIT mark or
S mark is displayed.
★ SPLIT TIME measures the time elapsed after
starting the split time function.
• The stopwatch measurement capacity is 60 minutes,
from 0 to 59' 59.99".
6. ADJUSTING THE CALENDAR
1. Press
ࠗ
M
button to set to
the normal CALENDAR
display.
2. Press
ࠗ
S
until DATE starts
flashing.
3. Press
ࠗ
R
and adjust the
date.
4. Press
ࠗ
S
for MONTH
adjustment. MONTH starts
flashing.
5. Press
ࠗ
R
and adjust the
month.
6. Press
ࠗ
S
for DAY
adjustment. DAY starts
flashing.
7. Press
ࠗ
R
and adjust the
day.
8. Press
ࠗ
S
or
ࠗ
M
to finalise
adjustment. The watch
returns to the normal
CALENDAR display.
• INSTANT MANUAL RETURN and AUTO RETURN
system will activate in the same manner as
described in the TIME adjustment.
• If non-existent date is set, the CALENDAR display
will show the 1st day of the next month when
returned to the normal display.
(ex: February
➝31 March 1)
• The CALENDAR function includes automatic
month-end adjustment, but in the leap year
changeover for February to March must be made
manually.
(The Cal C20 doesn’t display the CALENDAR
mode mark.)
7. SETTING THE CHIME AND SOUND MONITOR
• Press
ࠗ
S
and
ࠗ
R
button simultaneously in the
normal TIME or normal CALENDAR mode, the
CHIME can be set “ON” or “OFF” each time the
buttons are pressed and the CHIME set mark will
be indicated. The SOUND MONITOR is conducted
at the same time when the buttons are pressed.
CALENDAR
DATE
MONTH
DAY