Windy Nation SOL-AJBR-01 Adjustable Tilt Solar Mount User Manual
Page 2
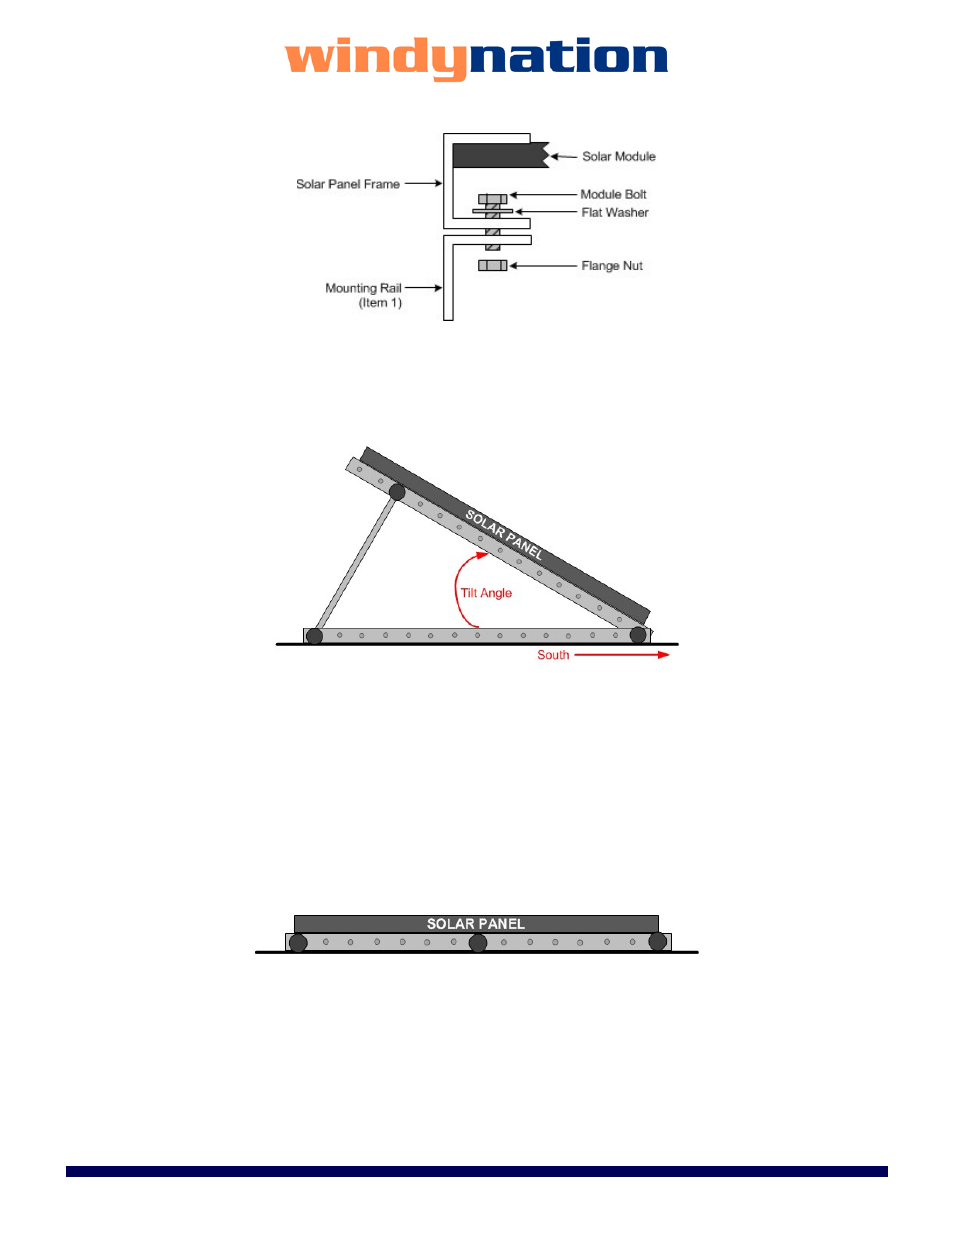
1. Secure the solar panel to two of the Mounting Rails (Item 1) using the provided hardware (Items 5, 6, and 7).
2. Attach the two remaining Mounting Rails (Item 1) to the first pair of mounting rails at one end using the Knob
Bolt (Item 3) and Wing Nut (Item 4), so that the assembly pivots at one end.
3. Secure the Mounting Rails from Step 2 to the roof or permanent mounting surface. Note: The bolts to secure
the rails to the mounting surface are not included in this kit. This is because the bolt type (lag bolt, carriage
bolt, etc) and bolt length will depend on the mounting surface type (metal, wood, and fiberglass) and thickness.
4. Set the tilt angle by securing the Tilt Angle Brackets (Item 2) to the free ends of the mounting rail pairs using
the remaining Knob Bolts (Item 3) and Wing Nuts (Item 4).
For Northern Hemisphere installations, the solar panels should be mounted at angle facing true south (true north for
Southern Hemisphere installations). The recommended mounting angle should be equal to the latitude location of
where you are installing the solar panels. For example, the latitude of Miami, Florida, USA is 25 degrees. Therefore,
solar panels installed in this area should ideally be facing true south at a tilt angle of 25 degrees.
Due to design constraints in many installations, you will not be able to mount the solar panel facing true south at the
ideal tilt angle. In these cases, try to come as close as possible to the ideal mounting configuration as this will
maximize the power output from the solar panels. Different Tilt-angles are possible by using different hole
combinations.
STORAGE /TRAVEL POSITION
The Solar Panels must be mounted in the tilted position only when stationary. For RV or boat applications, when in
motion, the mounting hardware should be in the flat mount position as shown below.
1. Remove the two Knob Bolts (Item 3) and Wing Nuts (Item 4) that secure the Tilt Angle Bracket (Item 2).
2. Lower the Mounting Rails and the Tilt Angle Brackets so that the square holes of each set of the mounting rails
and brackets align with each other and the solar panel is flat.
3. Reconnect the two Knob Bolts (Item 3) and Wing Nuts (Item 4) to secure the structure in the flat position.
WARRANTY
Windy Nation warrants the item to be free of manufacturing flaws for a period of one (1) year.
Windy Nation is not responsible for any injuries and/or damages caused as a result of not complying with the specifications stated.
Page 2 of 2
windy
nation
Adjustable Bracket Manual Rev 1.0