Part two: mount, align, and record mount – Contour VholdR J61250712V1100 User Manual
Page 7
Mounting, Aligning, and Recording great action video out of the box is
an important part of the VholdR experience. The following explains how
to record video from your point of view successfully on the first try.
Mount
Your standing position and riding positions are different. When going down hill your
head is lower than you think and when traveling uphill your camera can be filming
the sky. Therefore, first get into a true riding position.
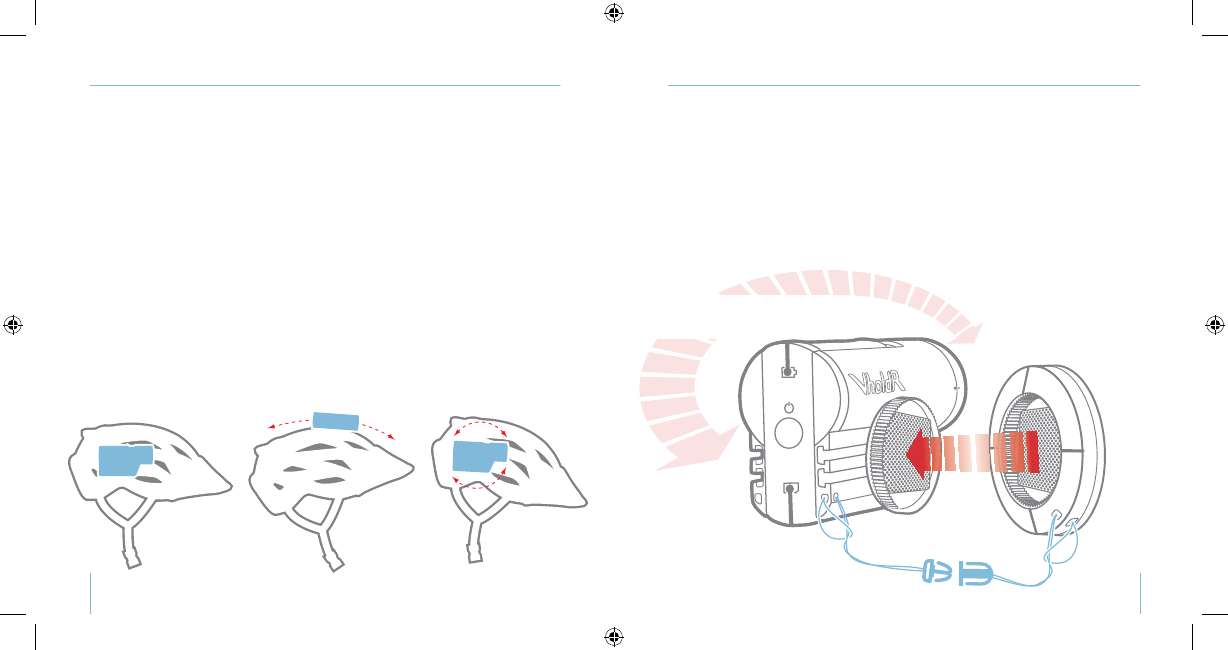
Select your preferred mounting location on your helmet.
Note: The top of the helmet provides the most centered view.
Find a flat or slightly curved surface. Clean off the surface with alcohol or a damp
cloth and let dry. Remove the cover on the adhesive pad and then adhere the base
to your surface.
Note: Press firmly and for best results let sit overnight to cure.
Loop the leash through either of the two holes on the back of VholdR before attaching
the VholdR to the mount.
Slide your camera onto the rails of the mount with the two notches on the mount facing
towards the back of the camera.
To adjust the vertical position of your mount you can detach the rails from the base of
the mount. Simply hold down the base and pull the VholdR away from the mount until
the Velcro detaches. For best results and longevity it is best to not pull straight but to
apply pressure out from the rear half.
S/
NO 120
700 0 0 3 3
S/
NO 120
700 0 0 3 3
S/
NO 120
700 0 0 3 3
rear door
record
stop
record switch
192º rotating lens
dual alignment lasers
TRail™ mounting system
power indicator
serial number
charging indicator
battery slot
microSD
card slot
USB
power button
memory indicator
charging indicator
USB connection
record
stop
rear
press and hold
until lights
come on
front
push until
lights
come on
a, f
c
b
b
press and hold
for (1) second
attach leash
before using
after detaching, rotate
vertically to align and then
reattach firmly into mount
attach and adjust camera according to your riding position
(it’s no fun watching videos of the ground)
press and hold
for (1) second
rotate lens to align
lasers horizontally
Battery Status
Green light
Yellow light
Red light
No lights
Memory card status
Green light
Yellow light
Red light
Flashing Red
Power off
More than 66% full
Between 33% and 66% full
Less than 33% - time to recharge
Recharge your VholdR or power up again
More than 66% free recording space
Between 33% and 66% free recording space
Less than 33% - time to swap out cards or download
Your memory card is full, you are missing a card, or
your card has an error and needs to be formatted
(see Tips & Troubleshooting to format your MicroSD Card)
Press and hold rear button for 3 seconds or until all
lights turn off
aim lasers
record
stop
hold base of
mount firmly
against
surface as
you pull
camera
away
from
velcro
S/
NO 120
700 0 0 3 3
S/
NO 120
700 0 0 3 3
S/
NO 120
700 0 0 3 3
rear door
record
stop
record switch
192º rotating lens
dual alignment lasers
TRail™ mounting system
power indicator
serial number
charging indicator
battery slot
microSD
card slot
USB
power button
memory indicator
charging indicator
USB connection
record
stop
rear
press and hold
until lights
come on
front
push until
lights
come on
a, f
c
b
b
press and hold
for (1) second
attach leash
before using
after detaching, rotate
vertically to align and then
reattach firmly into mount
attach and adjust camera according to your riding position
(it’s no fun watching videos of the ground)
press and hold
for (1) second
rotate lens to align
lasers horizontally
Battery Status
Green light
Yellow light
Red light
No lights
Memory card status
Green light
Yellow light
Red light
Flashing Red
Power off
More than 66% full
Between 33% and 66% full
Less than 33% - time to recharge
Recharge your VholdR or power up again
More than 66% free recording space
Between 33% and 66% free recording space
Less than 33% - time to swap out cards or download
Your memory card is full, you are missing a card, or
your card has an error and needs to be formatted
(see Tips & Troubleshooting to format your MicroSD Card)
Press and hold rear button for 3 seconds or until all
lights turn off
aim lasers
record
stop
hold base of
mount firmly
against
surface as
you pull
camera
away
from
velcro
1
4
5
6
2
3
12
13
Mount, Align, and Record
Mount
Part Two: Mount, Align, and Record
Mount