Hell Bent Steel Steering Stabilizer Bar for Dodge Ram User Manual
Hell bent steel, inc - installation instructions
170-000-001
05/2011
HELL BENT STEEL, INC - INSTALLATION INSTRUCTIONS
STEERING STABILIZER BAR FOR DODGE RAM
YOU CAN ALSO VIEW THE INSTRUCTIONS ON LINE AT www.hellbentsteel.com
IMPORTANT NOTES:
Please read before beginning installation.
OEM Manual should be used as a reference.
IT IS HIGHLY RECOMMENDED THAT A CERTIFIED
MECHANIC PERFORM
THIS INSTALLATION.
Read and understand all the instructions before beginning
installation.
Before installing the Hell Bent Steel Steering Stabilizer bar,
inspect all steering components for signs of wear or damage.
Replace worn or damaged parts as necessary. This product is
NOT designed to be a replacement for a new steering box
and/or ball joints and will not fix or replace worn-out steering
components.
The HBS Steering Stabilizer bar is designed to reduce the
stress on the steering box and extend the life of the steering
components.
Use Loctite® on all bolts associated with this installation.
It is the responsibility of the mechanic and customer to wear safety
glasses at all times during installation, especially when working
with air tools.
Before installation begins, drive the vehicle and inspect it to make
sure that there are not any uncommon sounds or frame damage.
IMPORTANT CUSTOMER INFORMATION:
It is the customer’s responsibility to make sure a re-torque is
performed on all hardware associated with this suspension
system after the first 100 miles and every 1000 miles there-
after and after every off road use.
Required Tools:
• 15mm & 17mm Socket/Wrench
• 3/4”, 1-1/4” & 1-15/16” Deep Socket/Wrench
• 1/8” Allen Wrench
• Torque Wrench (40-180 ft-lb)
Torque Settings:
Anti-sway bar to frame bolts – 45 ft-lb
Sector shaft nut – 180 ft-lb
End-link to frame nut – 40 to 60 ft-lb
View instructions in full color on the HBS website
www.hellbentsteel.com
Join us on Facebook at
Installation:
1. To begin installation block the rear tires of the vehicle so
that the vehicle is stable and can not roll.
2. With a 15mm socket or
end wrench, remove the
four (4) 10mm mount the
anti-sway bar mounting
bolts. (Two bolts per
bracket)
NOTE: The anti-sway bar will swing free when the bolts are
removed. Allow the bar to rest on the steering linkage, but be
sure to support the bar to avoid excessive load on the end
links.
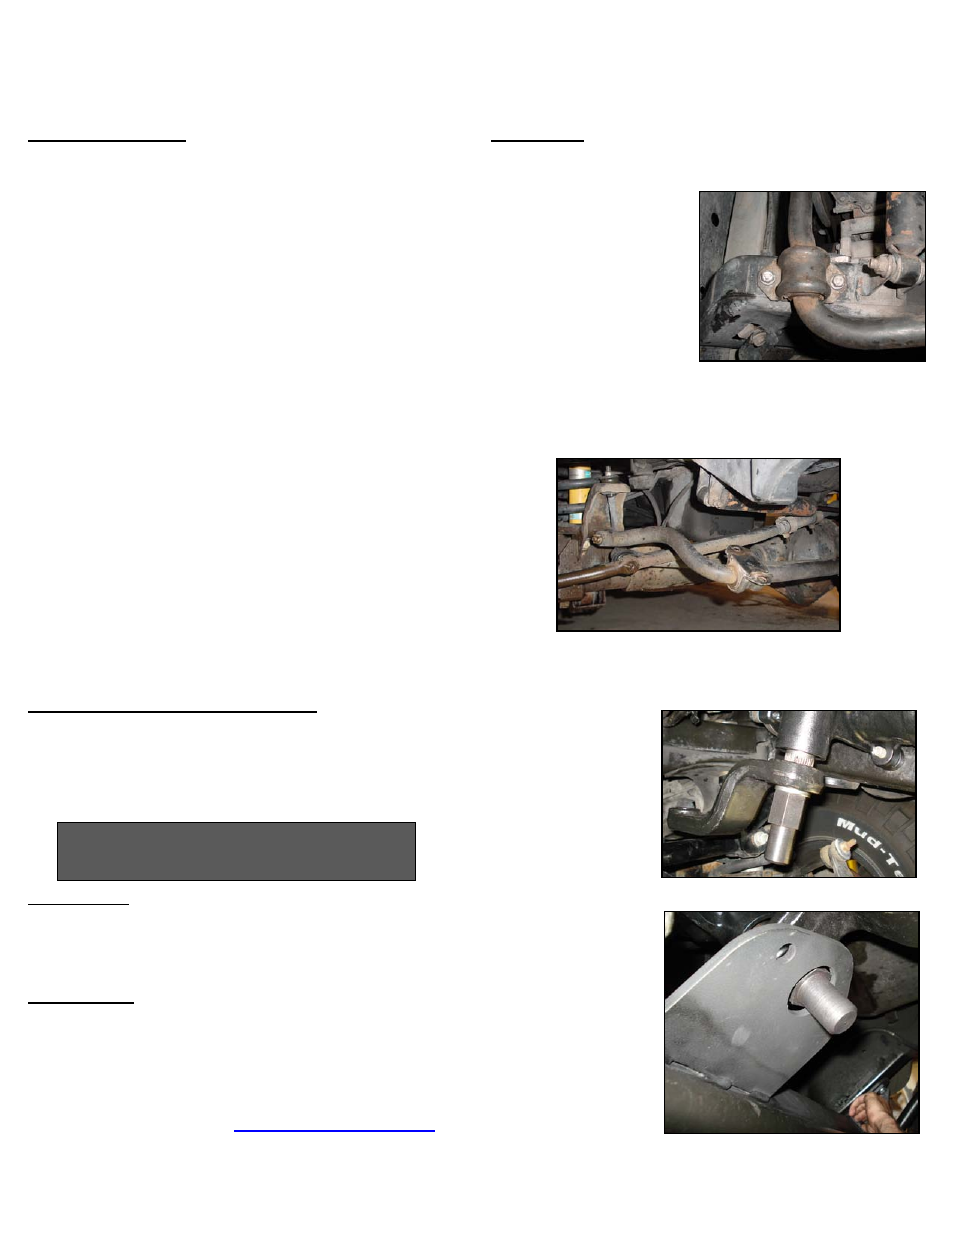
3. Remove the sector shaft nut and lock washer using a
1-5/16” socket. Retain the lock washer for re-installation.
Take care to ensure no thread damage occurs with the
removal of the nut.
4. Apply Loctite and
attach the provided
sector shaft nut with a
1-1/4” wrench re-
using the lock washer.
Hand-start the nut to
ensure no cross-
threading occurs. Torque sector shaft nut to spec.
5. Slide the stabilizer
bar into place, so the
feet are between the
frame and sway bar
mounts. Ensure that
the large diameter
hole on the bearing
plate is approximately
centered on the
sector shaft nut.
DO NOT USE THIS PRODUCT AS A
TOWING ATTACHMENT POINT.