Product overview (front), Introduction – Chauvet DMX-40B User Manual
Page 5
Introduction
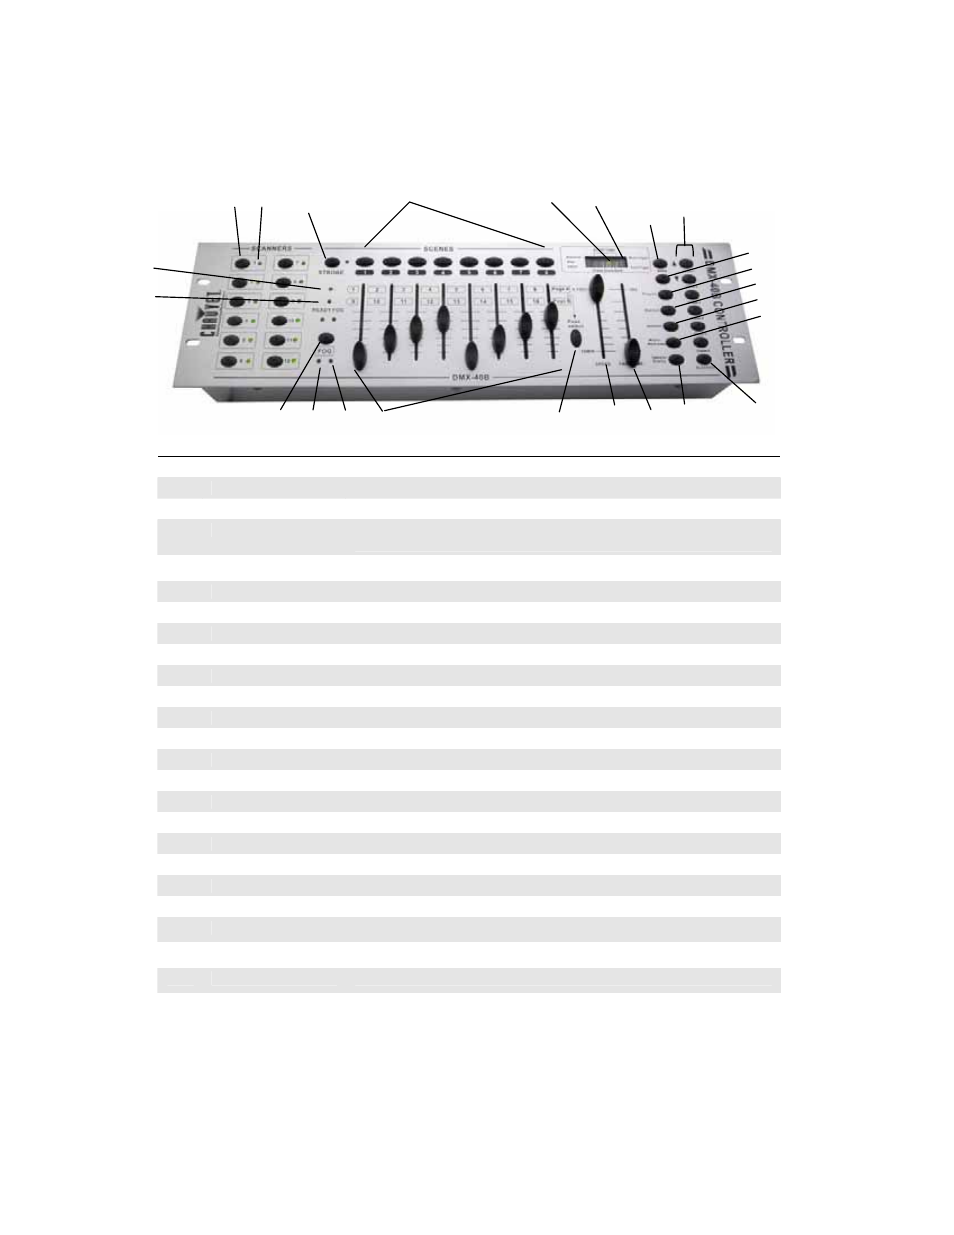
Product Overview (front)
Item
Button or Fader
Function
1
Scanner select buttons
Fixture selection
2
Scanner indicator LED's
Indicates the fixtures currently selected
3
Scene select buttons
Universal bump buttons representing scene location for storage and selection
4
Channel faders
For adjusting DMX values, Ch 1~8 can be adjusted immediately after pressing the
respective scanner select button, Ch 9~16 after pressing the Page select button
5
Page A Indicator LED
Represents Ch 1~8 range selected
6
Page B Indicator LED
Represents Ch 9~16 range selected
7
Page select button
Press to toggle between pages of control.
8
Program button
Used to enter programming mode
9
Music/Bank Copy button
Used to activate Music mode and as the copy command during programming
10
LED display window
Status window displays pertinent operational data
11
Mode Indicator LED’S
Provides operating mode status, (manual, music or auto)
12
Bank Up button
Function button to scroll through banks in ascending order.
13
Bank Down button
Function button to scroll through banks in descending order.
14
Tapsync/Display button
Sets the chase speed by tapping, and toggles between values and percentages.
15
Blackout button
Reduces all DMX values to zero.
16
Midi/Add button
Activates MIDI external control and also used to confirm the record/save process
17
Auto/Del button
Used to activate Auto mode and as the delete function key during programming
18
Chase buttons
Chase memory 1 ~ 6
19
Speed fader
This will adjust the hold time of a scene or a step within a chase
20
Fade Time fader
Also considered a cross-fade, sets the interval time between two scenes in a chase
21
Strobe button
Used for Chauvet strobes.
22
Fog button
Strobe button
23
Reverse Channel LED
Indicates reverse channel programming mode
24
Fade LED
Indicates fade programming mode
1
2
5
3
8
9
10
16
12
11
17
18
13
7
4
19
20
15
14
6
22
21
23 24
DMX-40B User Manual
5
Revised: 2006-12-06 09:36:47