Voltage Valet SS2 User Manual
Travel steam iron, Important safeguards, Save these
Voltage Valet
Dual Voltage (120/240 VAC)
Travel Steam Iron
Model SS2
IMPORTANT
SAFEGUARDS
When using irons, especially when children are present, basic safe-
ty precautions should always be followed, including the following:
READ ALL INSTRUCTIONS BEFORE USING.
DANGER – To reduce the risk of electrocution:
1. Always unplug this appliance immediately after using.
2. Do not use while bathing.
3. Do not immerse in water or liquid, and do not place or store
appliance where it can fall or be dropped into a sink or tub.
4. Do not reach for an appliance that has fallen into water.
Unplug immediately.
V
OLTAGE
V
ALET
™
Travel Steam Iron
Dual Voltage Steam Iron With Spray Feature
Model SS2
Instruction Manual
Read instructions before using this appliance
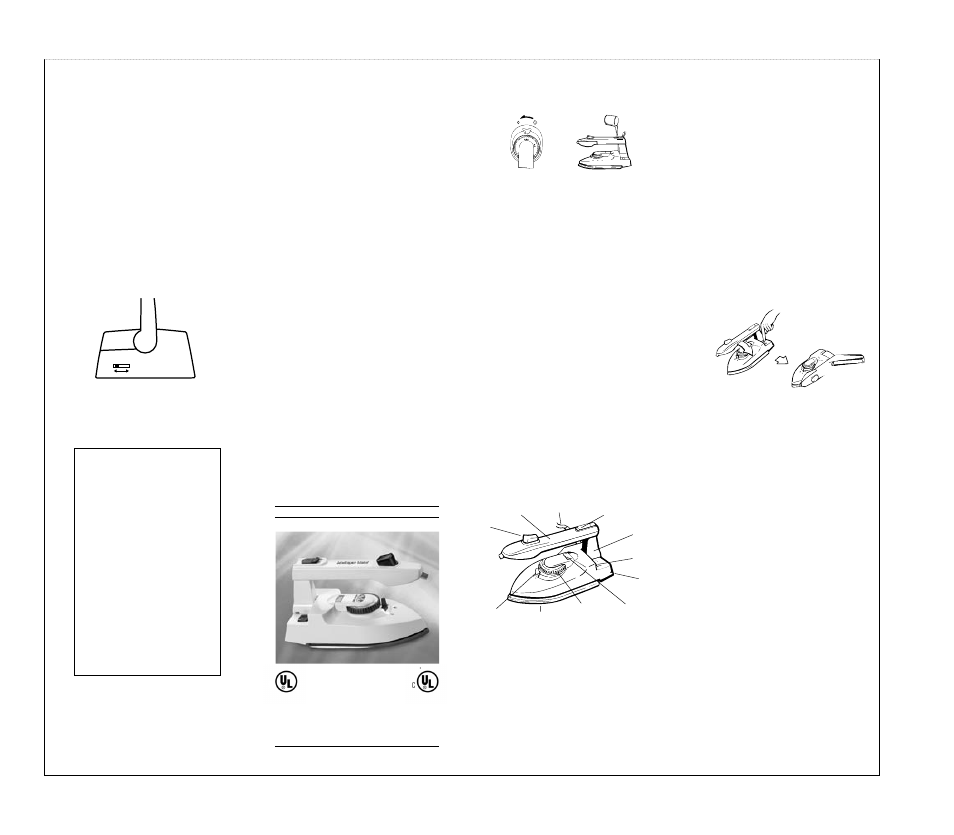
Cord Guard
Water Tank
Spray Button
Steam “ON-OFF”
Switch
Temperature
Control Knob/
Fabric Dial
Filling Mouth Cap
Foldable Handle
Sole Plate
Indicator Light
Release Button
Voltage Selector
WARNING – To reduce the risk of burns, electrocution, fire,
or injury to persons:
1. Do not leave iron unattended while connected or on an
ironing board.
2. Close supervision is necessary for any appliance being used
by or near children, invalids or house pets.
3. Use iron for its intended use only as described in this manual.
Do not use attachments not recommended by the manufacturer.
4. Do not operate iron with a damaged cord or if the iron has
been dropped or damaged. Return iron to manufacturer for
examination or repair.
5. Do not allow cord to touch hot surfaces. Let iron cool com-
pletely before storing. Loop cord loosely around iron when
storing.
6. Always disconnect iron from electrical outlet when filling with
water or emptying, or when not in use.
7. The temperature control knob should always be turned to OFF
120V~
240V~
before plugging or unplugging from electrical outlet. Never
yank cord to disconnect it from the outlet. Instead, grasp plug
and pull to disconnect.
8. Burns can occur from touching hot metal parts. Exercise cau-
tion when iron is in use.
9. If, during use, you change the temperature control knob from a
high temperature setting to a lower one, wait for the soleplate
temperature to fall, then be sure to test the iron before apply-
ing it to the fabric.
10. Do not plug iron into electrical outlet when iron handle is in the
folded position.
11. This appliance has a polarized plug (one blade is wider than
the other). As a safety feature, this plug will fit in a polarized
outlet only one way. If the plug does not fit fully in the outlet,
reverse the plug. If it still does not fit, contact a qualified elec-
trician. Do not attempt to defeat this safety feature.
12. To avoid a circuit overload, do not operate another high
wattage appliance on the same circuit.
13. If an extension cord is absolutely necessary, a 10-ampere cord
should be used. Cords rated for less amperage may overheat.
Care should be taken to arrange the cord so that it cannot be
pulled or tripped over.
SAVE THESE
Voltage Valet Division, Hybrinetics, Inc.
225 Sutton Place, Santa Rosa, CA 95407
©1996 Hybrinetics,Inc.
One Year Warranty
We guarantee each new Travel Steam
Iron to be free from defects in material or
workmanship and to perform under normal
use and service. This guarantee shall run
for a period of one year from the date of
purchase, and obligations under this guar-
antee are limited to remedying any defect
or replacing any defective part and shall be
effective only if the defective unit is returned
to us within 12 months after purchase.
Damage due to abuse, misuse, or overload-
ing is not covered by this guarantee. We
shall not be responsible for any other loss
or damage that may arise through the use
by a purchaser or others of this device, and
the purchaser assumes such responsibility
and will hold Hybrinetics, Inc. harmless in
respect to all such loss or damage.
Important: This is a factory direct war-
ranty. Do not return defectives to your
retailer. All defectives must be returned
to the factory accompanied by a sales
receipt with the original date of pur-
chase. For more information please call
our toll free number: (800) 247-6900.
INSTRUCTIONS
OPERATING INSTRUCTIONS
READ ALL INSTRUCTIONS BEFORE USING
1. Some parts inside the iron have been lightly greased and as a
result the iron might smoke a little when switched on for the
first time. Shortly thereafter, the smoking will cease.
2. Before using for the first time, remove any stickers or protec-
tive foil from the soleplate. Clean the soleplate with a soft cloth.
3. Keep the soleplate smooth. Do not bring it in contact with
metal objects, as scratching may occur (e.g. buttons, zippers,
pins, ironing board rack).
SET VOLTAGE BEFORE USING
1. Be sure iron is unplugged.
2. To set dual voltage selector switch, insert a small pointed
object, like a ball-point pen, into the voltage selector slot. Slide
the selector to the desired voltage position. For use in Canada
or North America, the voltage selector switch should be placed
in the 120 volt position. For use in most foreign countries, the
selector switch must be placed in the 240 position. CONFIRM
the voltage available at each location before using the iron.
NOTE: For connection to a 240 volt supply an adaptor plug
may be needed.
SETTING THE TEMPERATURE
1. Review any ironing instructions attached to the article to be
ironed. Refer to the table below for temperature settings for
different fiber contents.
2. The table is valid for the actual fiber contents of the fabric and
does not apply to any special finishes or treatments to the fabric.
3. Fabrics that have an applied finish (gloss, wrinkle relief, etc.)
can best be ironed at a somewhat lower temperature than
indi-
cated for the fabric’s fiber con-
tent. If the fabric consists of vari-
ous kinds
of fibers, you must always select the coolest ironing
temperature associated with the fibers. For example, an article
consisting of 60% nylon and 40% wool should be ironed at the
temperature indicated for nylon, and without steam. Fabrics
containing 100% wool fibers may be pressed with the iron set
to a steam position.
4. For batch ironing, begin by sorting the articles according to
ironing temperature: wool settings in one group, cotton in
another, etc. Since the iron heats up faster than it cools down,
begin ironing the articles requiring the lowest temperature,
such as those made of synthetic fibers. Then proceed to the
articles that require a higher temperature.
5. To adjust the setting, turn the temperature control knob
around until the desired setting is opposite the setting
pointer.
Set temperature control for:
•
Nylon, Acetate
Set temerature control for:
• •
Wool, Silks or Blends
Set temperature control for:
• • •
Cotton or Linen (Steam)
HOW TO FILL WITH WATER
1. Set the steam switch in “OFF” position before filling the iron
with water. (Figure 1)
2. Remove the plug from the electrical outlet.
3. Open the filling mouth cap and fill the water through the filling
mouth into the water tank. (Figure 2)
• If the water is very hard, it is advisable to use distilled
water or demineralized water.
• The harder the water, the more frequently the iron should be
self-cleaned (see Maintenance).
4. Pour out the remaining water after use.
STEAM IRONING
1. Slide the steam switch to “OFF”
position.
2. Fill the iron as described in “How to Fill with Water”.
3. Plug iron into electrical outlet.
4. Set the temperature control knob to the maximum temperature
setting indicated with • • •. Lower settings may result in water
leakage from the soleplate.
5. Wait for the indicator light to shut off, indicating the required
temperature has been reached.
6. Set the steam switch to the steam position.
SPRAY
When the spray button is depressed, the water sprays out of the
spray nozzle. For best results, operate the spray button quickly:
Slow operation may result in little or no spray.
NOTE: Repeat pumping is required to start this function.
MAINTENANCE
Self-cleaning the Water Reservoir
IMPORTANT: Your iron will give the best ironing results
and last the longest if you apply “self-cleaning” periodically to
remove any scale.
1. Set the steam switch in “OFF” position and fill the water reser-
voir half-full with water.
2. Insert the plug into an electrical outlet.
3. Slide the temperature control knob to “MAX”.
4. Allow the iron to heat until the indicator light shuts off.
5. Remove the plug from the electrical outlet.
6. Hold the iron over the sink, keeping it in the horizontal position.
7. Switch the steam button to “ON”.
8. Boiling water and steam will now emit from the holes in the
soleplate. Impurities and scale (if any) are washed away with
the steam. During this process, take care to protect your skin
from the hot steam.
9. Move the iron forwards and backwards during the steam
process, allowing the steam and water to escape until the
water reservoir is virtually empty.
10. Insert the plug into an electrical outlet.
11. Leave the temperature control knob in the “MAX” position and
let the iron heat up again. The remainder of the water inside
the steam chamber will now vaporize and exit the iron through
the soleplate.
12. During this process of dry-steaming, it is advisable to move
the iron over an old piece of cloth to absorb the moisture.
Cleaning the Soleplate
To remove starch or other materials from the soleplate, apply a
small amount of mild cleaner to a damp cloth forming a paste on
the cloth. Gently rub soleplate with the moist cloth. Never use
abrasive pads.
CAUTION: Never use scouring pads, abrasive or harsh clean
-
ers, as they may scratch the surface.
STORAGE
Let the iron cool down sufficiently, press down the release button
and fold the handle down against the body of the iron. Wrap the
cord around the iron loosely and store the unit.
Steam
“OFF”
Steam
“ON”
Figure 1
Figure 2