Unpacking, Assembling the corded pole saw (fig. 1 - fig. 4) – Snow Joe SWJ800E-RM Saw Joe 8-Inch 6.5-Amp Electric Pole Chain Saw User Manual
Page 5
Unpacking
Carton Contents:
• Corded pole saw body
• Bar & chain
• 7/32-inch Hex key wrench/ blade screwdriver
• Bar cover
• Safety and operating instructions
Unpacking:
1. Carefully remove the contents from the shipping carton.
Make sure that all items listed in the carton contents are
included.
2. Inspect the product carefully to make sure no breakage or
damage occurred during shipping. If you find damaged or
missing parts, DO NOT return to store, please call
1-866-766-9563.
NOTE: Do not discard the shipping carton and packaging
material until you are ready to use your new Corded Pole Saw.
Assembling the Corded
Pole Saw (Fig. 1 - Fig. 4)
Tools and Supplies Required:
• 7/32-inch Hex key wrench/ blade screwdriver (supplied)
• Gloves
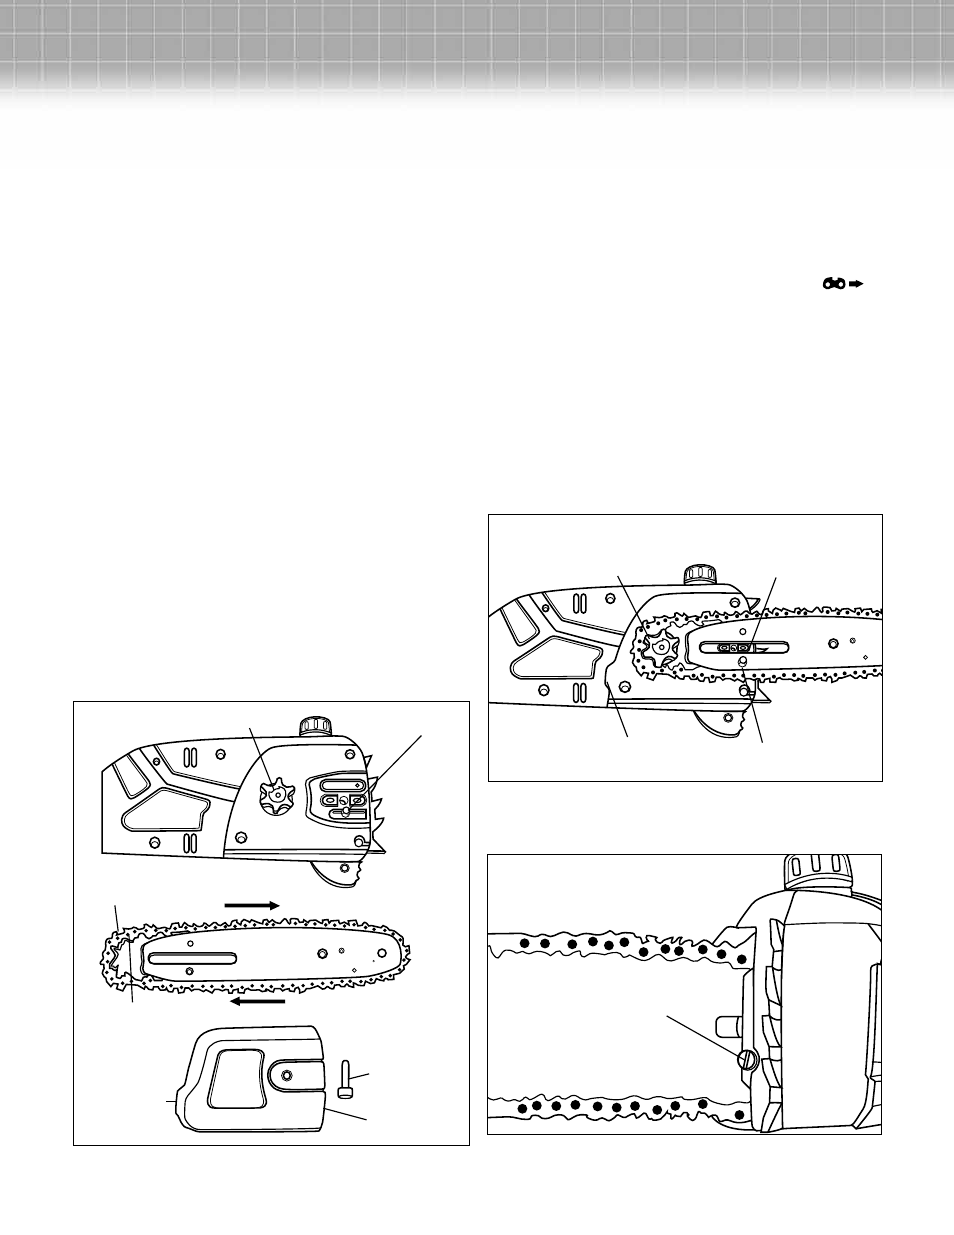
1. Using a 7/32-inch hex key wrench, unscrew the sprocket
cover bolt (E) and remove the cover (F) (Fig. 1).
2. Lay out the saw chain in a loop and straighten any kinks.
THE SHARP SIDE OF THE TEETH SHOULD FACE IN THE
DIRECTION OF THE CHAIN ROTATION (Fig. 1). If they face
backwards, turn the loop (C) over.
3. Place the chain drive links (D) into the bar groove (Fig. 1).
NOTE: Make certain of the direction of the chain.
4. Position the chain so there is a loop (C) at the back of the
bar (Fig. 1). Hold the chain in position on the bar and place
the loop around the sprocket (Fig. 2).
5. Fit the bar flush against the mounting surface so that the
bar slot mounts onto the slot flange in the head and hold
firmly in place.
NOTE: When placing the bar on the flange, ensure that the
tensioner pin is in the chain tensioner pin hole in the bar
(Fig. 2). Adjust the chain tension as needed by adjusting
the chain tensioner screw with a flat tip screwdriver, so it
lines up with the pin hole (Fig. 3).
6. Tighten the chain tensioner screw only enough to hold the
bar and chain in place (Fig. 3) ensuring the chain is still in
place over the sprocket (Fig. 2).
Fig. 1
(A) Sprocket
(C) Loop
(D) Chain Drive Link
(G) Read Tab
(E) Sprocket
Cover Bolt
(F) Sprocket Cover
(B) Tensioner Pin
Chain Rotation
Chain over Sprocket
Bar Slot over
Slot Flange
Chain Tensioner
Pin in Hole
Rear Tab Slot
Fig. 2
Chain Tensioner Screw
Fig. 3
5