Fotodiox Pro Standard Softbox User Manual
Page 3
4
3
4x Elastic Bands
Inner Diffuser
Rectangle/
Square Softbox
Stripbox
Octagon Box
Small
Large
2
4
3
1
Small Tip
2
6
3
7
4
8
1
5
4
5
Insert rod into
closed pocket.
Using both hands,
grab the Rod
with one and
push toward the
speedring.
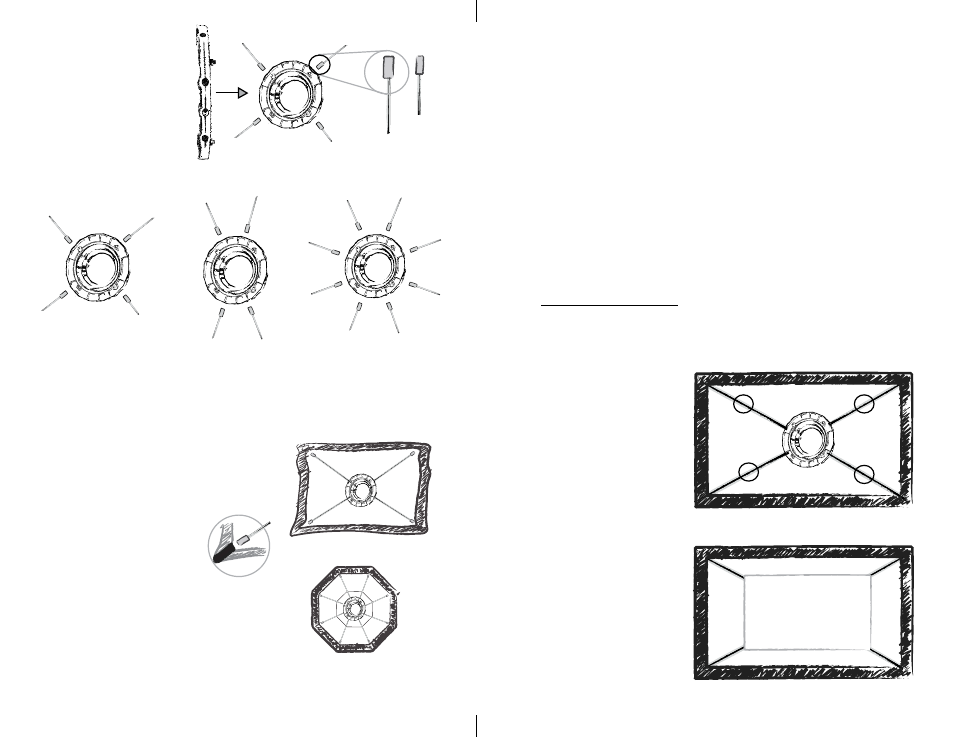
Rectangular Softboxes: You may insert the
rods in any order.
Octagon Softboxes: Insert rods into holes
2 and 3 (see diagram in step 3) into the
closed pockets first. Then insert rods into
holes 6 and 7 (see diagram in step 3) on
the speedring. Then insert remaining 4
rods in any order desired. This procedure
allows for easy installation. Otherwise, the
rods will be difficult to insert.
Locate the 4 elastic
bands inside the
Softbox at mid-
perimeter on each
corner.
Locate 8 elastic
bands if your model is
an Octagon Softbox.
a
ssembling
t
he
s
oftbox
Attaching the inner diffusers
6
Connect all 4 corners
of the Inner Diffuser to
the 4 elastic bands.
Connect 8 corners of
the Inner Diffuser to
the 8 elastic bands
if your model is an
Octagon Softbox.
3
Place Speedring in the
center of the Softbox
Shell as illustrated here.
Insert the large tip
of the Rods in four
opposite holes on
the speedring to
form a perfect “X”
Insert the large tip
of the Rods in four
opposite holes on
the speedring to
form a “Tall X”
Insert the large tip
of the Rods in eight
of the holes on the
speedring that form
an Octagon
2
Study the different
holes of the
Speedring. Insert the
large tip of the Rods
in the holes that
correspond to your
softbox model.
(Examples Below)
Start inserting the small
tip of the rods into the
corresponding closed
pockets in the sequence
that corresponds to your
Softbox model.
WARNING: DO NOT insert the rods underneath the pockets,
Be sure to insert them inside the pockets, NOT under.