Follower needle dial, Electric signal dial, Setting electric contact arm on dual scale model – CDI Torque DIAL TORQUE WRENCH DUAL SCALE User Manual
Page 3
Before using all models of dial torque wrenches, it is
strongly suggested to cycle/operate them 3 times at
full scale in the torque direction in which they will be
used. Dial torque wrenches must always be
zeroed
before use. To set orange pusher & blue follower
needle for right-hand (CW) torquing:
1. Turn bezel in left-hand (CCW) direction until, blue
memory follower needle contacts orange pusher
needle.
2. Continue to turn bezel left-hand (CCW) until blue
memory follower needle is lined up with
zero (0) of
outer graduation on portion of dial for IN.LB., FT.LB.,
METRIC readings.
3. Apply force on the wrench handle until blue follower
needle reaches desired torque. When force is released
orange pusher needle will return to
zero and blue
memory follower needle will remain at torque applied.
4. For repetitive torque operations (once the
zero
has been set as instructed above), the blue memory
follower needle can be returned to
zero by use of the
follower needle knob. It is ready for the next operation.
5.
IMPORTANT - When using the memory feature
always make sure that the blue follower memory
needle is on
zero before torquing.
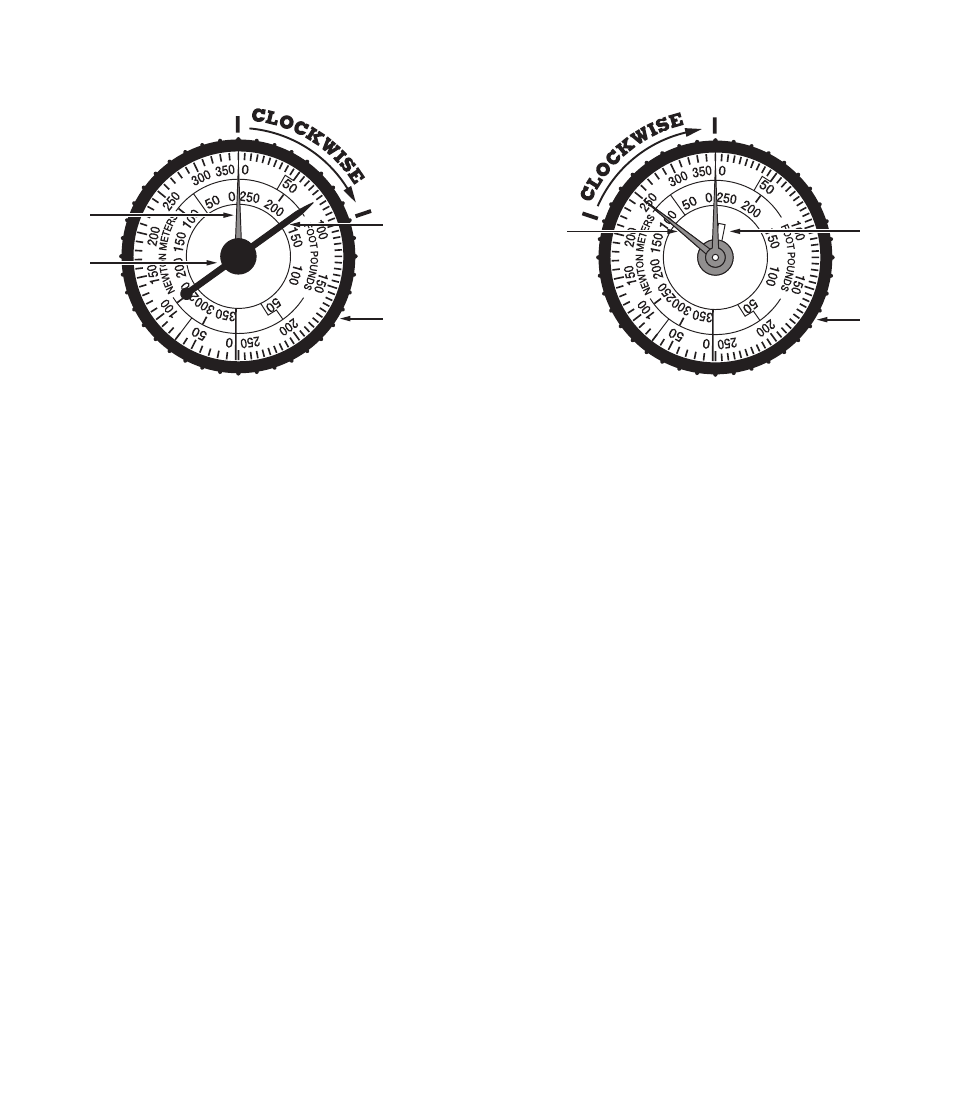
BEZEL
MEMORY
FOLLOWER
NEEDLE
(BLUE)
PUSHER
NEEDLE
(ORANGE)
FOLLOWER NEEdLE dIAL
MEMORY
FOLLOWER
NEEDLE
KNOB
SETTING MEMORY
FOLLOWER NEEdLE
ON dUAL SCALE MOdEL
BEZEL
ELECTRIC
CONTACT
ARM
PUSHER
NEEDLE
(ORANGE)
ELECTRIC SIGNAL dIAL
Setting electric arm at
zero with all torque readings
made from inner circle of numbers on the scale for
right-hand (CW) torquing, and the outer circle of
numbers on the scale for left-hand (CCW) torquing:
1. Turn bezel (CCW) until light and buzzer goes on.
2. Continue to turn bezel (CCW) until inner
zero of
desired scale (English or Metric) is lined up with
orange pusher needle.
3. Now turn bezel (CW) until light goes off and
orange pusher needle is aligned with desired torque
graduation in inner portion of scale orange pusher
needle is now preset to desired torque value.
4. Apply force to handle in the (CW) direction. When
the preset torque value is reached the light and
buzzer will go on. When force on the handle is
released orange pusher needle will return to the
preset torque value.
5. To change the preset torque value to another,
turn the bezel as required to the new torque value
within the same dial graduation and proceed as in
step 4 above.
6.
IMPORTANT - Always make sure that the electric
contact arm is
zeroed.
SETTING ELECTRIC
CONTACT ARM
ON dUAL SCALE MOdEL