Attwood Pontoon Bimini Tops User Manual
Pontoon bimini top, Assembly and installation instructions
Pad Eye
Jaw Slide
Deck Hinge
Inside Eye
This Attwood Bimini Top requires some assembly before installation.
Please read these instructions carefully.
REQUIRED FOR INSTALLATION
• Drill and 9/64" bit
• Phillips screwdriver
Check contents of your carton against the parts lists below.
Quantity
Description
2
Long Outside Bow Sections
2
Medium Outside Bow Sections
4
Short Outside Bow Sections
4
Center Bow Sections
2
Tie-Down Straps
4
Pad Eyes
16
#12 Sheet Metal Screws
12
#10 x 3/4" Screws
2
Frame Deck Hinges (with straight slot screw)
2
Support Pole Deck Hinges (with clevis pin)
2
Top Support Poles
ASSEMBLE BOWS
1. Assemble all bows from two equal-length end sections and one
center section.
Insert sleeves of the center sections into the end sections. Align
predrilled holes at both ends and attach with 4 #12 sheet metal
screws, 2 on each side. (See Figure 1)
2. Spread fabric top upside down on a flat surface so the label sewn
into the fabric is visible. This label identifies the rear of the cover.
3
®
Pontoon Bimini Top
Assembly and Installation Instructions
Attwood marine hardware, navigational lighting, bilge pumps, and other
marine accessories are specified more than any other brand by America’s
best-known boat manufacturers as original equipment. Look to Attwood
for quality replacement parts and marine accessories.
SAVE THESE INSTRUCTIONS
Form Number 19385R Rev. B
04-07
Figure 1
#12 Sheet Metal Screws
Outside Bow Section
Sleeve
Center Bow Section
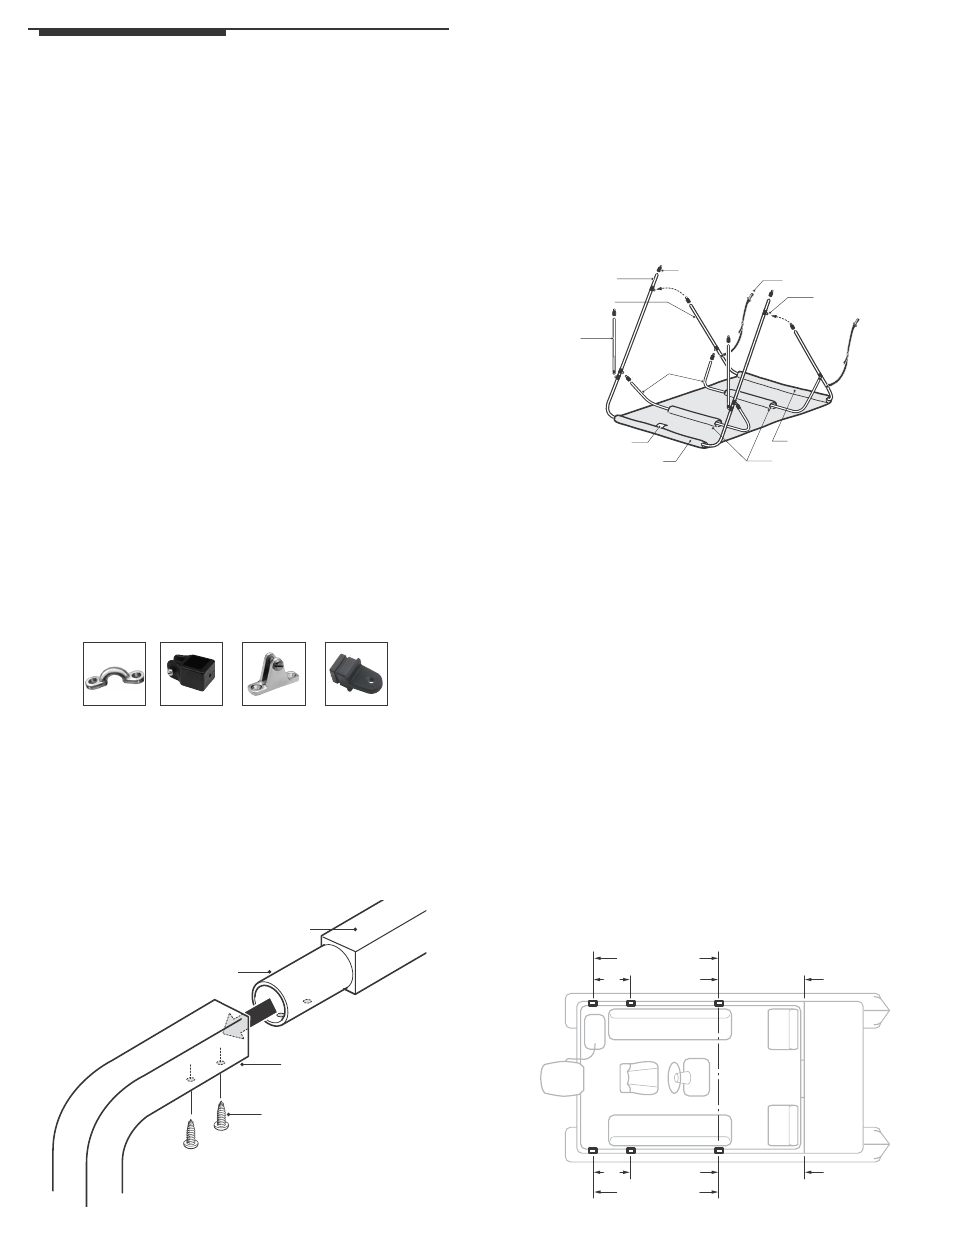
INSTALL FABRIC ON FRAME
1. Hold the assembled longest bow over the rear fabric loop (where
the label is sewn) with ends up. Screws on jaw slides must be
toward the inside of the bimini top. Thread the bow through the
rear fabric loop. (See Figure 2)
2. Thread the medium bow through the front fabric loop.
3. Slide the remaining short bows through the middle fabric loops.
4. To complete the frame assembly, remove screws from all jaw
slides. Insert eye ends of the middle and front bows into the jaw
slides, reinsert screws, and tighten.
INSTALL FRAME ON BOAT
NOTE: To choose the installation site for the assembled bimini frame:
• Open the top and place it over the area you want to cover.
• When folded flat, the frame should be as far aft as possible so it
does not interfere with movement in the cockpit.
1. Hold the assembled frame with the fabric label toward the rear of
the boat. Spread it out over the area you wish to cover (this will
be easier with the help of another person).
2. Mark the location of the deck hinge.
IMPORTANT: It is critical to mount both deck hinges parallel to
each other and at the same location on both sides of the boat.
Measure reference points on boat side to be sure both deck
hinges are at the same front-to-rear position. (See Figure 3)
3. Place deck hinge on the rail at the marked position. Mark the
screw holes. (See Figure 4)
4. Drill 9/64" holes. If installing into gel coat, use a countersink to
help prevent chipping. Bed all holes with silicone caulk to help
prevent water from seeping around screws. Use provided
#10 x 3/4" screws to install deck hinges.
5. Loosen screws in deck hinges. Install the bimini frame eye ends
into deck hinges and replace the screws.
6. Fold the frame flat toward the bow.
Equal Distance
Equal Distance
Equal Distance
36"
Equal Distance
36"
Figure 3
Rear Fabric Loop
Middle Fabric Loops
Front Fabric Loop
Tie-Down Strap
Jaw Slide
Label
Eye Ends
Medium Bow
Short Bow
Support
Poles
Long Bow
Figure 2