Your receiver is now ready 7, Features, Advanced setup – AItech Wireless Cable TV User Manual
Page 2: Multiple applications, Remote control, Advanced set-up illustration, Transmitter, Turning synchronization off, Operation, Receiver
8
4. After pressing the RF button on the remote to select the cleanest channel,
press SCAN on the remote. The system will now scan all of the available
channels. After scanning is complete, you are ready to watch TV using
your AITech Wireless Cable TVs system.
Receiver
4
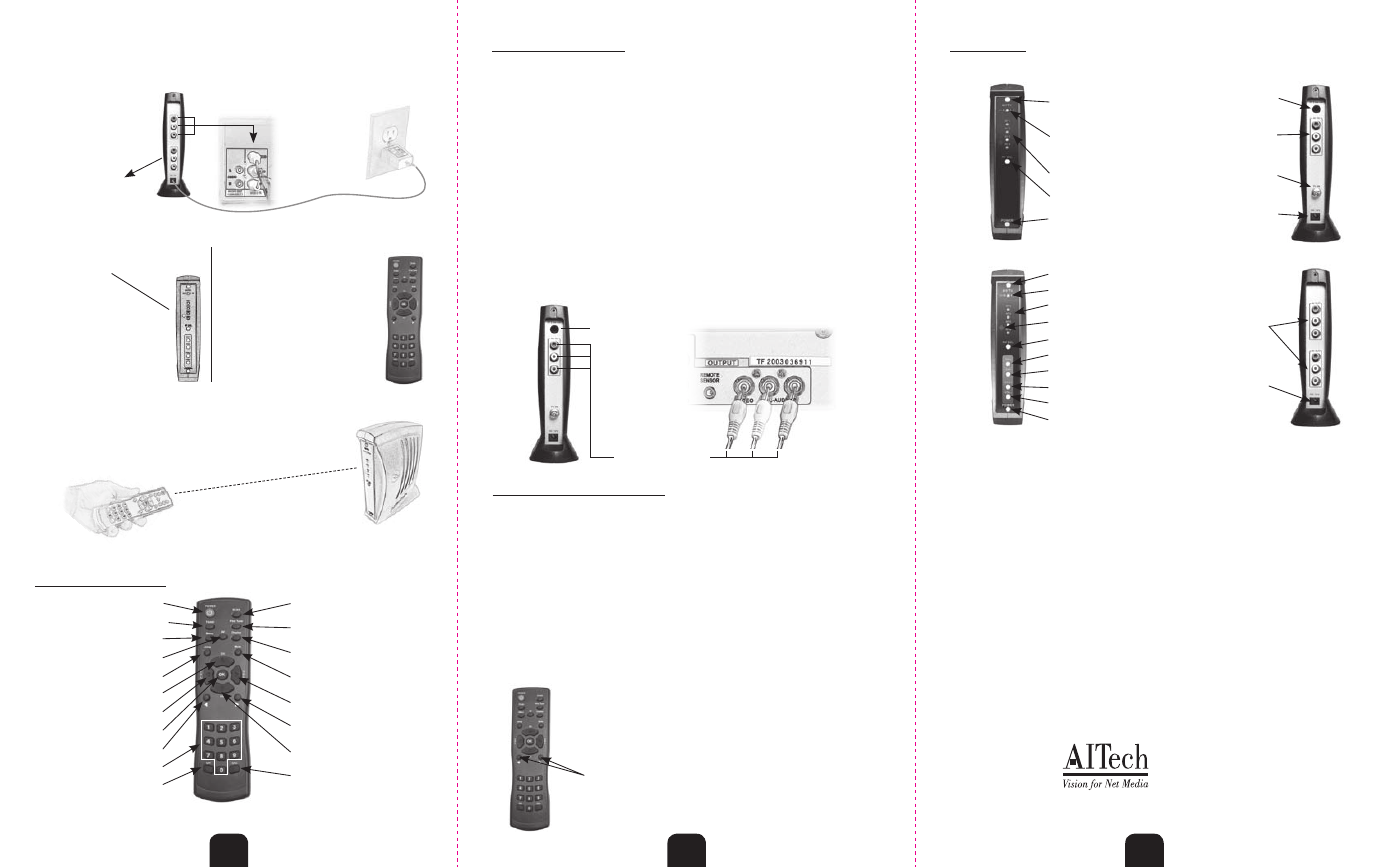
Connect IR Remote
Extender Cable
RCA Cable Connection
Digital Cable TV Box
Advanced Set-Up Illustration
TV/AV Selector Button
IR remote Extender Connector
Composite Input
(Digital Box)
Incoming Cable
from Cable Previder
TV/AV Indicator Light
(When Lit, you are in
“TV” mode)
RF Channel Indicator Light
RF Channel Selector Button
Power Button
Power Button
Features
Transmitter
Advanced Setup
1
Follow the instructions from title 1 to title 4. After completing the set-up on
title 7 through 11, you are ready for advanced set-up. Advanced set-up is for
those customers that want the added value of being able to watch their digital
channels and controlling the digital box from the remote location.
Note: When
watching the digital channels, they will not be independent.
1. Connect a set of RCA cables from the output of the digital box (from your cable
provider) to the RCA input on the back of the transmitter.
2. Connect the IR extender cable to the rear of the transmitter. Locate the opposite end of
the cable in front of the IR receptor of your digital box.
3. Select the TV/AV button on your remote control. This will switch the coaxial input to
the RCA input. You are now seeing the digital channel.
4. To change the digital channels (all functions of your digital box) use the remote that
came with your digital box. Simply point your digital box remote at the receiver.
SET-UP 3
Multiple Applications
The Wireless Cable TVs Systems are designed to be used in applications where more
than one system is needed. There are two different applications and a solution for each.
1. If you have two or more locations where a wireless TV solution is needed and those
locations are not used simultaneously, then all you need is one complete system and
multiple receivers. All receivers will display the same channel.
2. If you have two or more locations where a wireless TV solution is needed and those
locations are used simultaneously, then you will need complete systems to keep all wireless
systems completely independent.
Note: Each system comes with 4 RF channels. When using multiple systems for
independent applications, the systems must be on different RF channels and
you must turn
“Synchronization” OFF in the on screen menu.
Remote Control
Power
(Receiver only)
TV/AV
(Switch to Digital Box if Connected)
Menu
(On Screen Menu)
RF
(Select RF Channel)
JUMP
(Previous TV Channel)
CH UP
(TV Channel Up)
Vol Down
(TV Volume Down)
OK
(Confirm Menu Selection)
Menu Selection
(Use in MENU Mode)
Channel Selection
Channel Minus
(Delete Channel)
Scan
(Scans Available TV Channels)
Fine Tune
(Fine Tune TV Channels)
Display
(Displays TV Channel and Mode)
Mute
(Mutes TV Volume)
Vol Up
(TV Volume Up)
Menu Selection
(Use in MENU Mode)
TV Channel Down
Channel Add
(Add Channel)
1. Select MENU on the remote
2. Use the CH Down button to move down to the
Synchronization area.
3. Use the small arrow buttons under the Ch Down button to
move the selection.
4. When finished, select OK on the remote.
Turning Synchronization OFF
6
3. Turn on the Receiver by pressing the
power button at bottom of the receiver.
Your
Receiver
is Now Ready
7
Operation
1. Install the batteries into the remote
control.
2. Point the remote at the Receiver and
push the RF button on the remote to
allow the Transmitter and Receiver to
synchronize. (The TX and RX should
now be on the same RF channel)
Receiver
TV/AV Selector Button
TV/AV Indicator Light
RF Channel Indicator Lights
IR Remote Sensor
RF Channel Selector Button
TV Channel Up
TV Channel Down
TV Volume Up
TV Volume Down
Power Button
Composite Output
to Remote TV
Power Input
Troubleshooting
Why does my remote control not change the channels?
1. The Wireless Cable TVs has built in synchronization. If the TX and the RX have not synchronized, the remote control will not
work the Channel function. And pls do above firstly
a) Pull up flexible antenna
b) Used RF splitter. Don't connected to " RF out " ( Because some cable supplier will carrier electrical power inside. This is
another type interfere for us.)
To test for synchronization, set the RF channel on the transmitter and receiver to channel 4. If you connections are correct, you should
see a TV picture
Once you have a picture, point the remote control at the receiver and press the RF button. The RF channel should change to RF 1 and
the Picture should follow. If you lose the picture, they are not synchronized and the remote will not work.
Put the receiver back on RF channel 4 so that you see your picture.
Now, go to the transmitter room and move the transmitter one way or the other. By moving the tranmitter, this allows the receiver try
and synchronize. You may have to change the position of the transmitter several times to gain synchronization. Once you find the right
position for the transmitter, leave it in that position.
If you still have problems getting the remote control to work, try moving the transmitter to a diferent cable drop if available.
Why am I not getting a picture?
1. Make sure both units are on the same RF Channel (1,2,3 or 4)
2. Make sure that if you are using the system in TV mode, that the top light on both units are ON
3. If you connected the remote TV using coaxial cable, make sure your TV is ON and is on Channel 3
4. Make sure you follow the instructions on page 8 of the owners manual when connecting your transmitter to your incoming cable..
5
6
AITech International Headquarters
1288 Kifer Rd., Suite 203
Sunnyvale, CA 97086
Tel: 408.991.9699 Fax: 408.991.9691
Web site: www.AITech.com
5
Place your receiver close to the remote TV. We have supplied 2 options for
connections to your remote TV; Through the Antenna Connection or through
the Composite video Input. Choose one: DO NOT USE BOTH!
2. Connect the 12V
power adapter to
your transmitter
and to your
110v wall outlet.
RCA Connection Option
Connection to another
display or DVR for record
1. Connect the RCA
cables to the back of the
Receiver and the TV.