Craftsman 833.14334 User Manual
Page 5
Attention! The text in this document has been recognized automatically. To view the original document, you can use the "Original mode".
SEARS ELECTRONIC INSECT KILLER - MODEL NO. 833.14334
R E F . N O .
P A R T N O .
D E S C R I P T I O N
O T Y .
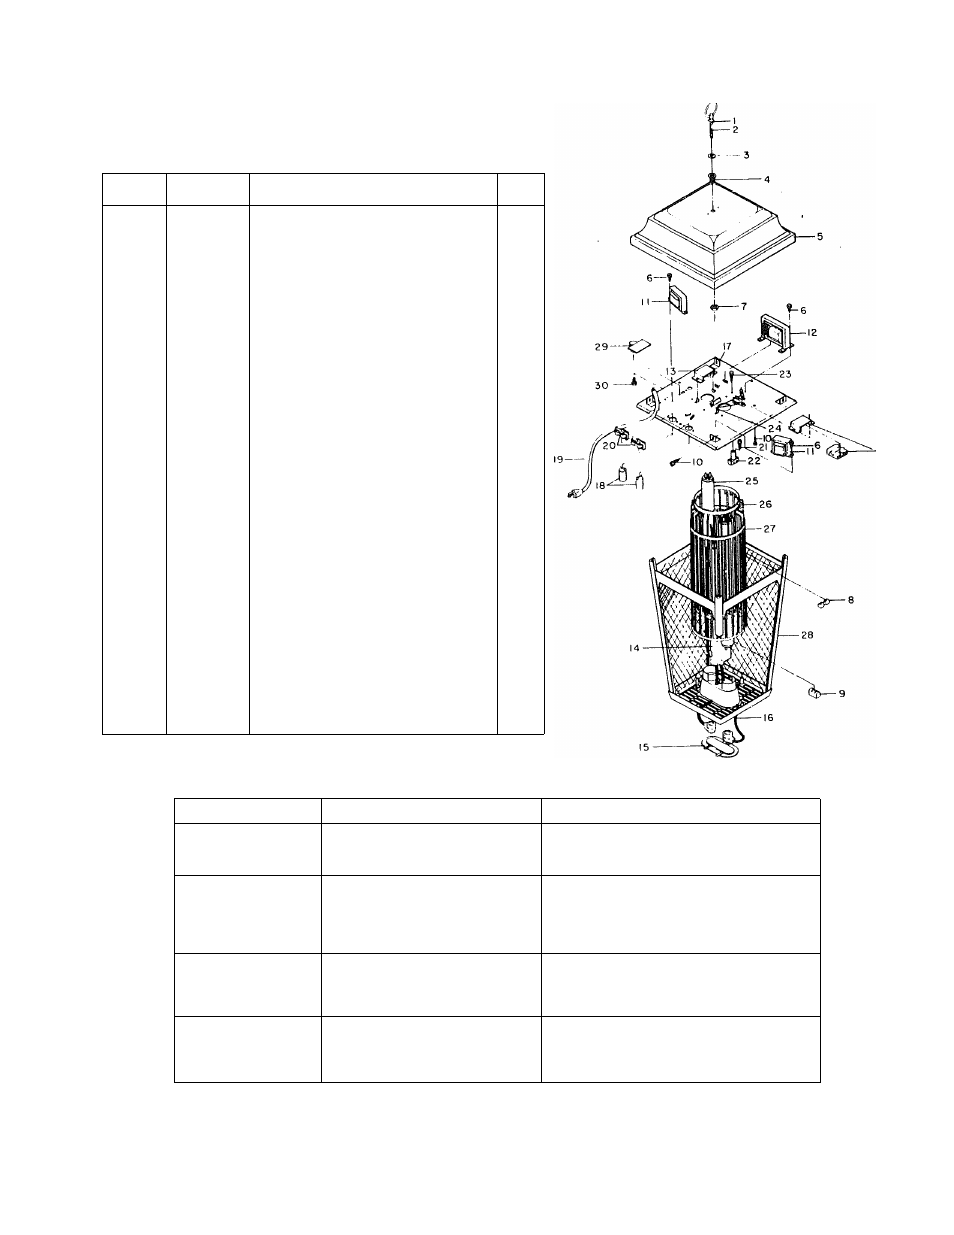
1
5 5 4 7 2 2
H A N G I N G R I N G
1
2
5 9 6 1 5 6 5 P 0 2
T H R E A D E D N I P P L E , 1 " L O N G
1
3
5 6 7 4 2 0
N E O P R E N E W A S H E R
1
4
5 9 6 7 8 4
R E D U C I N G B U S H I N G
1
5
5 5 5 5 3 1 4 S R
H O O D
1
6
2 4 5 6 2 6 0 P 2 7
T H R E A D C U T T I N G S C R E W , F , 8 - 3 2
k
3 / 8
4
7
5 9 6 7 8 5
L O C K N U T
1
8
5 4 4 5 2 8 8
G R I D S P A C E R
5
9
5 4 4 3 7 5 0
S P A C E R I N S U L A T O R
2
1 0
2 4 5 6 2 4 5 P 2 8
S H E E T M E T A L S C R E W , N O . 8 x 1 / 2
8
1 1
5 3 2 3 0 0 6
B A L L A S T
2
1 2
5 7 6 4 8 9 0
T R A N S F O R M E R
1
1 3
5 0 5 3 3 7 0
B U L B S O C K E T A S S Y
2
1 4
5 5 2 3 3 6 9 Р О З
R E F L E C T O R
2
1 5
5 5 5 3 5 3 4
B U L B R E T A I N E R
1
1 6
5 1 2 3 9 2 P 2 6
B U L B B O O T W I R E , 2 6 " L O N G
2
1 7
5 5 2 5 2 0 2
T O P P L A T E
1
1 8
5 3 1 2 0 3 4
S T A R T E R
2
1 9
5 1 2 5 1 4 0
P O W E R C O R D
1
2 0
5 7 1 5 1 7 0
S T A R T E R S O C K E T
2
2 1
2 4 5 6 2 3 6 P I I
S H E E T M E T A L S C R E W , N O . 6 x 3 / 8
3
2 2
5 4 4 3 7 4 9
M O U N T I N G I N S U L A T O R
3
2 3
2 4 5 6 2 4 5 P I 2
S H E E T M E T A L S C R E W , N O . 6 x 1 / 2
3
2 4
5 1 2 4 0 4 P 0 2
H V G R I D W I R E
2
2 5
5 3 0 2 8 1 5 S
B U L B , B L A C K L I G H T
2
2 6
5 5 3 2 8 4 6 P O I
I N N E R G R I D
1
2 7
5 5 3 2 8 4 7 P O I
O U T E R G R I D
1
2 8
5 0 5 3 3 7 7
B A S K E T A S S Y
1
2 9
5 0 5 4 0 3 1
P H O T O C E L L A S S Y
1
3 0
2 4 5 6 2 6 0 P 2 5
T H R E A D C U T T I N G S C R E W , F , 8 - 3 2 x 1 / 4
2
3 1
5 5 7 5 1 9 9
O W N E R ' S M A N U A L
1
13
TROUBLESHOOTING AND REPAIR ANALYSIS
PROBLEM
POSSIBLE CAUSE
CORRECTION
A. Bulbs do not light
and no high voltage
on grid.
1. No electrical power.
1. Check fuse or circuit breaker.
2. Check extension cord. (If used.l
B, Bulbs light but no
grid high voltage.
1. Shorted grids.
1. Examine grids to see if inner and outer
grids are free from foreign material, dirt
or a build up of dead insects.
2. Check to make sure inner grid and outer grid
are not touching. Use insulated screwdriver.
C. Grid voltage present
but bulbs do not
light.
1. Lamplsl not seated properly.
2. Starter defective.
3. Burned-out bulbisl.
1. Check all sockets for proper seating and
alignment. ^
2. Replace if needed. ;
3. Replace if needed.
D. Intermittent or
continuous sparking
between grids.
1. Gap between grids is too small.
2. Grid clogged with foreign material,
3. Grid not seated in insulator.
1. Unplug unit and adjust grids by bending
back into alignment using screwdriver blade.
2. Clean grid using an air blower,
3. Look for proper grid seating at all insulators.
Any problems you encounter that are not corrected by the action recommended in this chart should be
referred to your nearest Sears Service Center.