Pro-Ject Audio Systems Pro-Ject 1Anniversary User Manual
Page 4
© ATR-Audio Trade GmbH · Pro-Ject 1 Anniversary/Ortofon Super OM 10 · Revision 2011.10.01
4
Set-up
The deck is supplied partially disassembled and carefully packaged for safe transport. Carefully remove all
parts from the transport packaging. Make sure the surface you wish to use the turntable on is level (use a spirit
level) before placing the turntable on it.
Fit the drive belt (3) around the hub (4) and the smaller diameter part of the motor pulley (2). Avoid getting
sweat or grease on the belt as these will deteriorate the performance and reduce the belt's lifespan. Use
absorbent kitchen paper to remove any oil or grease from the outer edge of the hub and the belt.
Remove the two red transport screws (1) which secure the motor (22) during transportation. Fit the platter and
the mat over the spindle of the hub.
Remove the transport lock from the tonearm. Store it together with the two red motor transport screws (1) in
the original packaging so they are available for any future transportation.
Cartridge downforce adjustment
The counterweight (6) supplied is suitable for cartridges weighing between 5 - 7,5g. An alternative counter-
weight for cartridges weighing between 10 - 13g is available as an accessory part. Adjust the downforce prior
to installing the anti-skating weight.
Gently push and turn the counterweight (6) onto the armtube stub. Lower the armlift and position the cartridge
in the space between arm rest and platter. Carefully rotate the counterweight (6) until the armtube balances
out. The arm should return to the balanced position if it is moved up or down. This adjustment must be done
carefully. Do not forget to remove the cartridge protection cap if fitted.
Once the arm is correctly balanced return it to the rest. Hold the counterweight (6) without moving it, and gently
revolve the downforce scale ring (6a) until the zero is in line with the anti-skating prong (15). Check whether the
arm still balances out.
Rotate the counterweight counter clockwise (seen from the front) to adjust the downforce according to the
cartridge manufacturer's recommendations. One mark on the scale represents 1 mN (= 0,1g / 0,1 Pond) of
downforce.
The recommended downforce for the factory fitted cartridge is 15mN.
Adjusting the vertical tracking angle (vta)
** Put a record on the platter. When the needle is lowered into the record groove and the tonearm is not
resting on the lift arm, the tube of the tonearm should be parallel to the surface of the record. If it is not
loosen both allen screws in the tonearm base just enough to allow vertical movement of the arm pillar
without force and slide the arm up or down until it is parallel. Carefully retighten the allen screws without
applying excessive force (which would deform the arm pillar) – finger tight is quite sufficient.
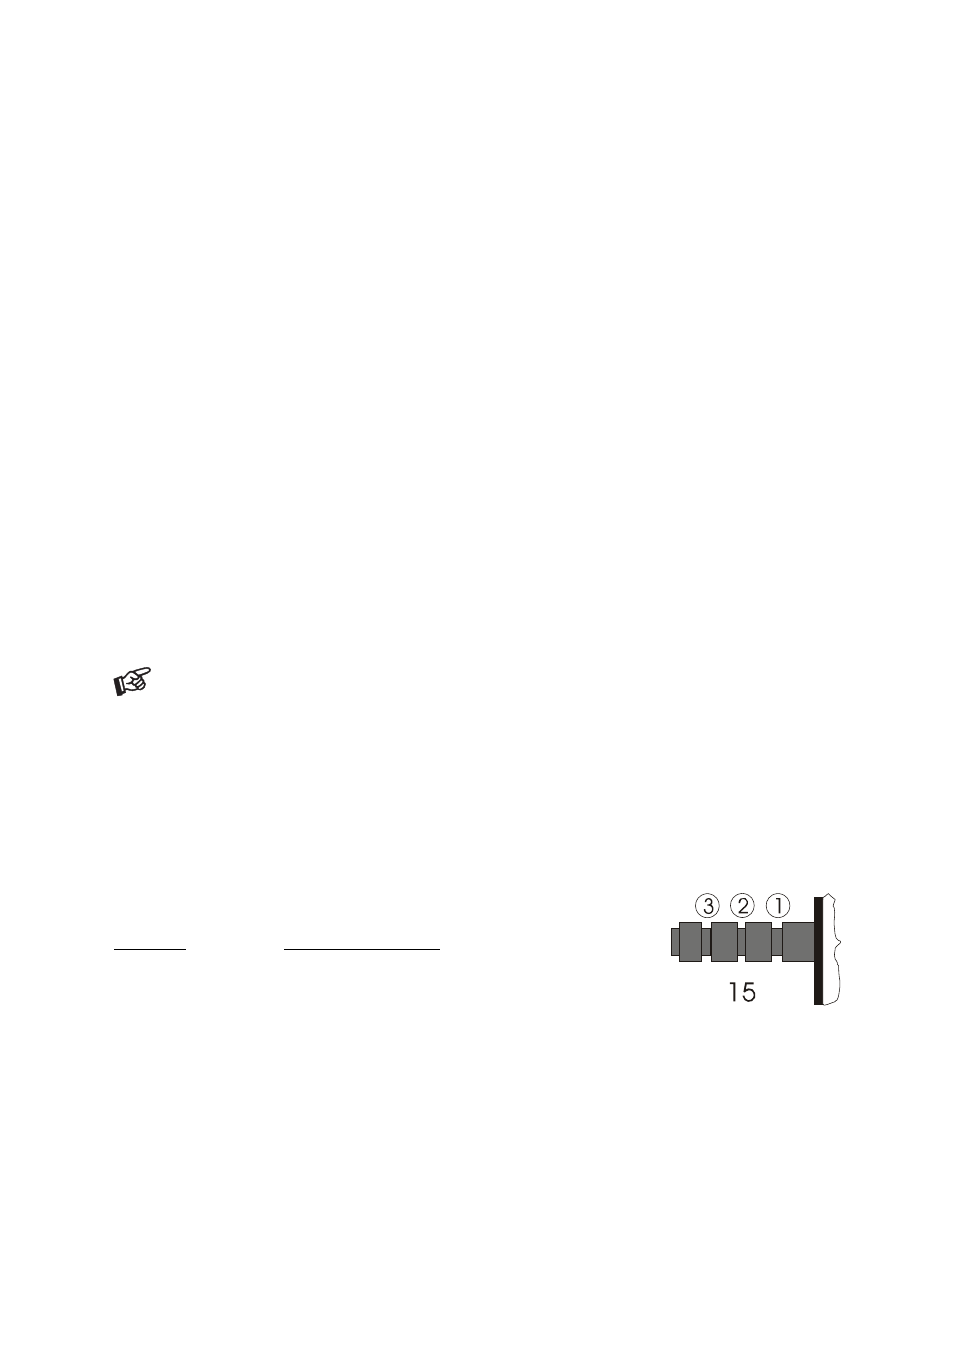
Anti-skating force adjustment
The anti-skating force must be adjusted according to the mass of the cartridge
as follows:
Downforce
Groove in the stub (15)
10 - 14mN
1
st
from bearing rings
15 - 19mN
2
nd
" " "
20mN and bigger
3
rd
" " "
Hang the loop of the thread of the anti-skating weight in the groove of the anti-skating stub (15)
corresponding to the downforce applied to your cartridge and feed the thread through the loop of the wire
support (17).