Cd operations, Operations common to each mode, 17 english 16 – Clarion ProAudio DXZ435 User Manual
Page 9: English
DXZ435
17
English
16
DXZ435
English
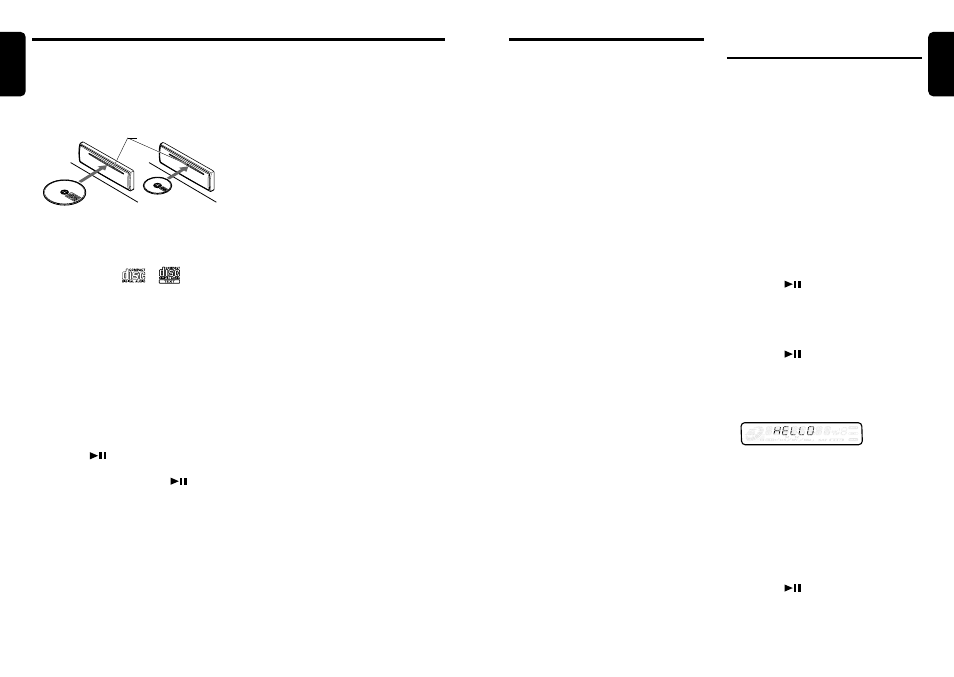
Loading a CD
Insert a CD into the centre of the CD SLOT with
the labeled side facing up. “LOADING” appears
in the display, the CD enters into the slot, and
the play starts.
For CD (12 cm)
For single CD (8 cm)
CD SLOT
Notes:
• Never insert foreign objects into the CD SLOT.
• If the CD is not inserted easily, there may be
another CD in the mechanism or the unit may
require service.
• Discs not bearing the
or
mark and
CD-ROMs cannot be played by this unit.
• Some CDs recorded in CD-R/CD-RW mode may
not be usable.
Loading 8 cm compact discs
∗ No adapter is required to play an 8 cm CD.
∗ Insert the 8 cm CD into the centre of the insertion
slot.
Listening to a CD already inserted
Press the [FNC] button to select the CD mode.
Play starts automatically. If no CD is loaded in
the unit, “NO DISC” appears in the display.
Pausing play
1. Press the [
] button to pause play.
“PAUSE” appears in the display.
2. To resume CD play, press the [
] button
again.
Displaying CD titles
This unit can display title data for CD-text CDs
and user titles input with this unit.
1. Press the [DISP] button to display the title.
2. Each time you press and hold the [DISP]
button for 1 second or longer, the title
display changes in the following order:
User title (disc)
➜ CD-text title (disc) ➜ Artist
name
➜ CD-text title (track) ➜ User title
(disc)...
CD Operations
Note:
• If the CD playing is not a CD-text CD or no user
title has been input, “NO TITLE” appears in the
display.
Ejecting a CD
1. Press the [
Q] to eject the CD. Take it out
from the ejected position.
Note:
• If you force a CD into before auto reloading, this
can damage the CD.
∗ If a CD (12 cm) is left in the ejected position for 15
seconds, the CD is automatically reloaded (Auto
reload).
∗ 8 cm CDs are not auto reloaded. Be sure to remove
it when ejected.
Selecting a track
●Track-up
1. Press the [
d] button to move ahead to the
beginning of the next track.
2. Each time you press the [
d] button, the
track advances ahead to the beginning of the
next track.
●Track-down
1. Press the [
a] button to move back to the
beginning of the current track.
2. Press the [
a] button twice to move to the
beginning of the previous track.
Fast-forward/fast-backward
●Fast-forward
Press and hold the [
d] button for 1 second or
longer.
●Fast-backward
Press and hold the [
a] button for 1 second or
longer.
Top function
The top function resets the CD player to the first
track of the disc. Press the [BND] button to play
the first track (track No. 1) on the disc.
CD Operations
Scan play
The scan play locates and plays the first 10
seconds of each track on a disc automatically.
This function continues on the disc until it is
cancelled.
∗ The scan play is useful when you want to select a
desired track.
1. Press the [SCN] button to start scan play.
“SCN” lights in the display.
2. To cancel the scan play, press the [SCN]
button again. “SCN” goes off from the
display and the current track continues to
play.
Repeat play
The repeat play continuously plays the current
track. This function continues automatically until
it is cancelled.
1. Press the [RPT] button. “RPT” lights in the
display and the current track is repeated.
2. To cancel the repeat play, press the [RPT]
button again. “RPT” goes off from the display
and normal play resumes.
Random play
The random play selects and plays individual
tracks on a disc in no particular order. This
function continues automatically until it is
cancelled.
1. Press the [RDM] button. “RDM” lights in the
display, an individual track is selected
randomly and play begins.
2. To cancel the random play, press the [RDM]
button again. “RDM” goes off from the
display and normal play resumes.
Operations Common to
Each Mode
Turning the screen saver function
on or off
This unit is provided with the screen saver
function which allows you to show various kinds
of patterns and characters in the Operation
Status indication area of the display in a random
order. You can turn on and off this function.
If the button operation is performed with the
screen saver function on, the operation display
corresponding to the button operation is shown
for about 30 seconds and the display returns to
the screen saver display.
∗ The factory default setting is “SS”.
1. Press and hold the [TITLE] button for 1
second or longer to switch to the adjustment
selection display.
2. Press the [
a] or [d] button to select
“SCRN SVR”.
3. Press the [
] button.
4. Turn the [ROTARY] knob clockwise or
counterclockwise to select the setting. Each
time you turn the [ROTARY] knob, the setting
changes in the following order:
OFF
➜ SS ➜ MESSAGE
5. Press the [
] button to store the setting.
6. Press the [TITLE] button to return to the
previous mode.
∗ The following illustration presents one of the
patterns which are shown when the screen
saver function is turned on.
Entering MESSAGE INFORMATION
Message up to 30 characters long can be stored
in memory and displayed for any mode.
* The factory default setting is “WELCOME TO
CLARION”.
1. Press and hold the [TITLE] button for 1
second or longer to switch to the adjustment
selection display.
2. Press the [
a] or [d] button to select
“INPUT”.
3. Press the [
] button.
4. Press the [
a] or [d] button to move the
cursor.